
DNS Management Guide
This article explains how to manage DNS records (A / CNAME / MX / TXT, etc.) in the client portal, including adding, editing, and deleting them.
Important #
-
DNS records edited on this screen will be reflected externally only if
the nameserver (NS) for the target domain is currently set to this DNS management.
For example: If you have switched the nameserver to an external DNS (Cloudflare / Route53, etc.), the external DNS settings will be referenced going forward, and changes made on this screen will not be reflected externally. - Before making changes, it is recommended to note the current record contents (via screenshot or memo). Particularly for email (MX / SPF / DKIM / DMARC) or authentication TXT records, incomplete migration can have significant consequences.
-
CNAME cannot generally coexist with other records (A / MX / TXT, etc.) on the same hostname.
(For example: If CNAME exists for
www, adding an A record with the same name will cause a conflict) - DNS propagation takes time due to TTL and caching. During testing, it is recommended to set a short TTL, then return it to an appropriate value once stable.
Disclaimer and Support Information #
- This procedure summarizes typical operation examples. Depending on your domain configuration and usage of external services (email, various SaaS, automatic SSL renewal, etc.), the required DNS records and settings may differ.
- We are not responsible for any indirect or consequential damages (loss of business opportunity, business interruption, email delivery failure, etc.) resulting from following this procedure.
- If you have questions / find it difficult to determine the scope of impact / or plan to make changes related to email (MX / SPF / DKIM / DMARC, etc.), please open a support ticket from the BESTNET client portal before proceeding.
Scope #
- Adding / Editing / Deleting DNS records in the client portal
- Applying (confirming) changes via the “Save Changes” button
Prerequisites #
- An account that can log into the client portal
- The target domain is in a manageable state on the portal (active, etc.)
- The contents of the DNS records you want to add or change (e.g., target IP, CNAME destination, MX priority, TXT value, etc.)
Pre-Work Checklist (Recommended) #
- The records to be changed (hostname, type, value) and their purpose (e.g., web migration / email setup / authentication TXT addition) are clear
- You have noted the current DNS records (screenshot recommended)
- If email is used: You have confirmed the consistency of MX / SPF (TXT) / DKIM (TXT) / DMARC (TXT) in advance
- You know which nameserver the target domain is pointing to (if external DNS operation, editing must be done on the external DNS side)
Opening the DNS Record Management Screen #
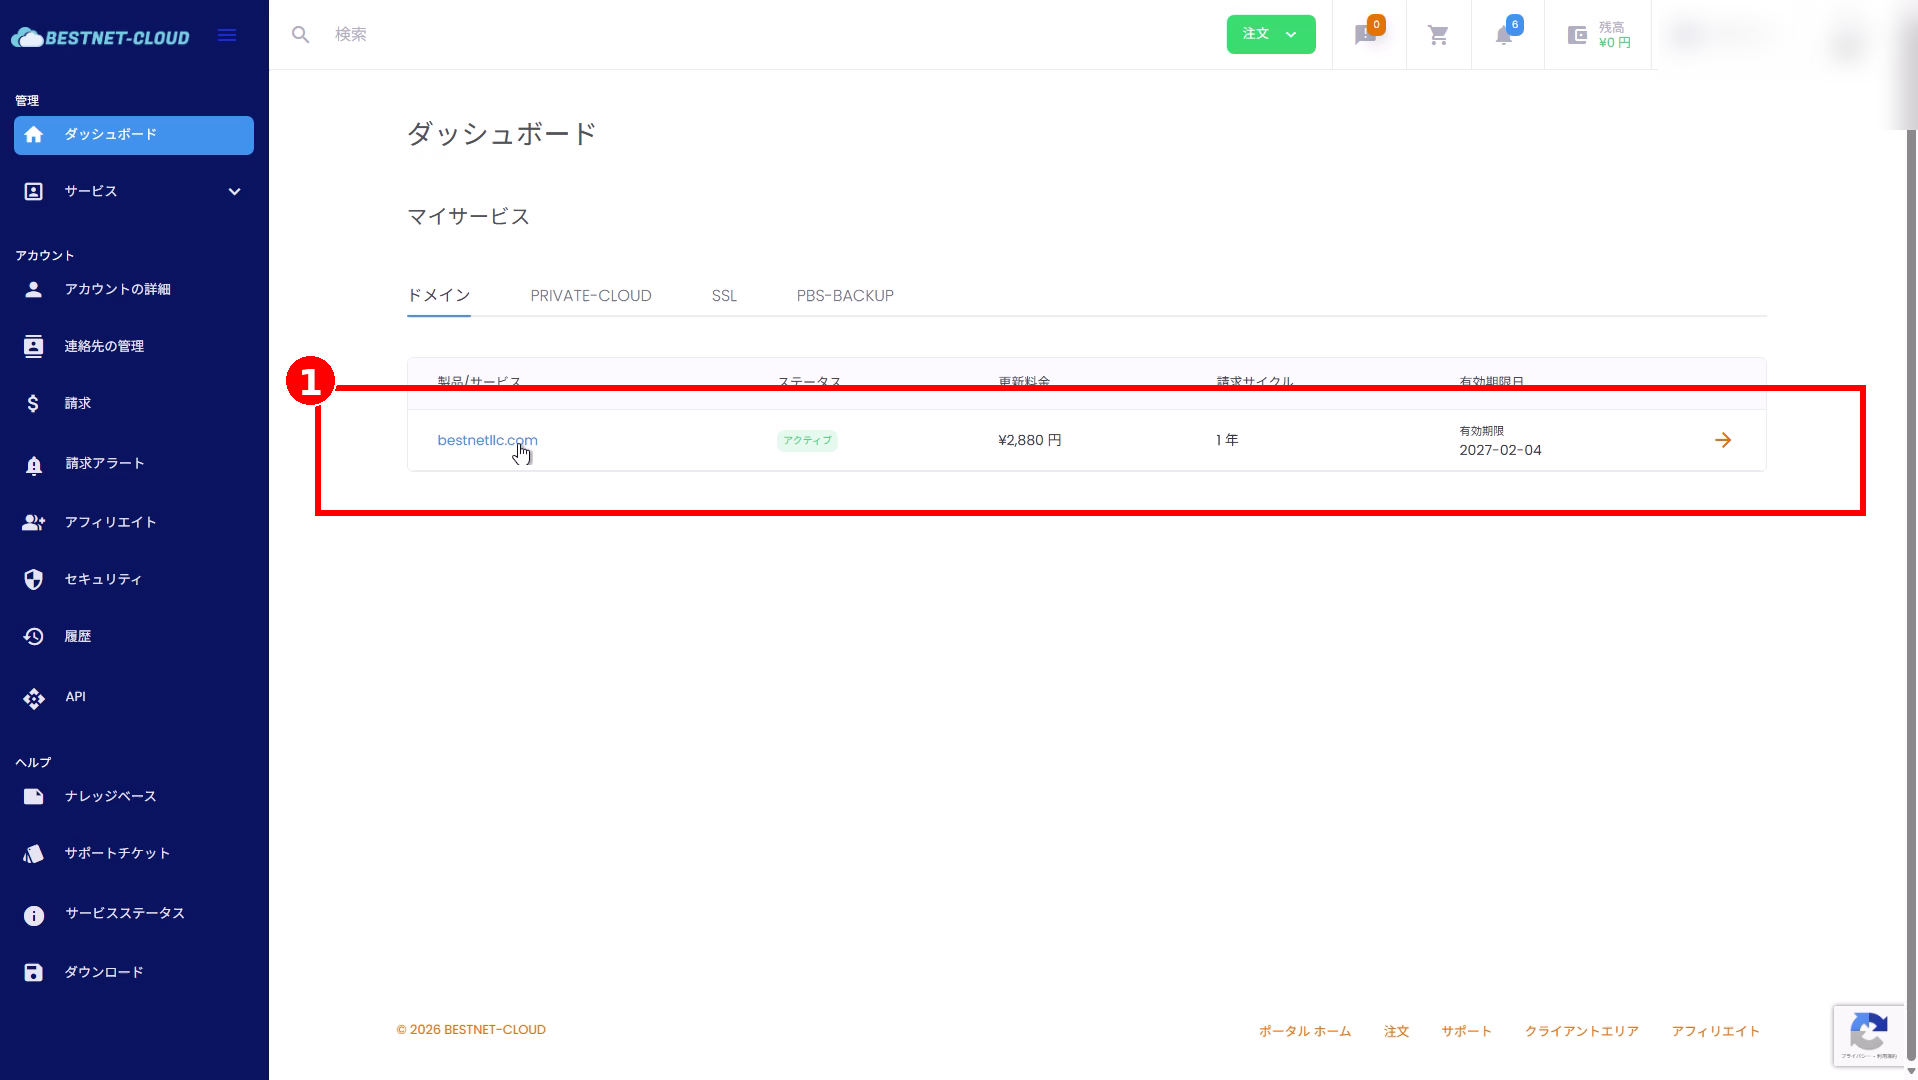
1Open the target domain from the dashboard #
- Open Dashboard from the left menu.
- In “My Services”, click the row for the target domain in the Domains tab.
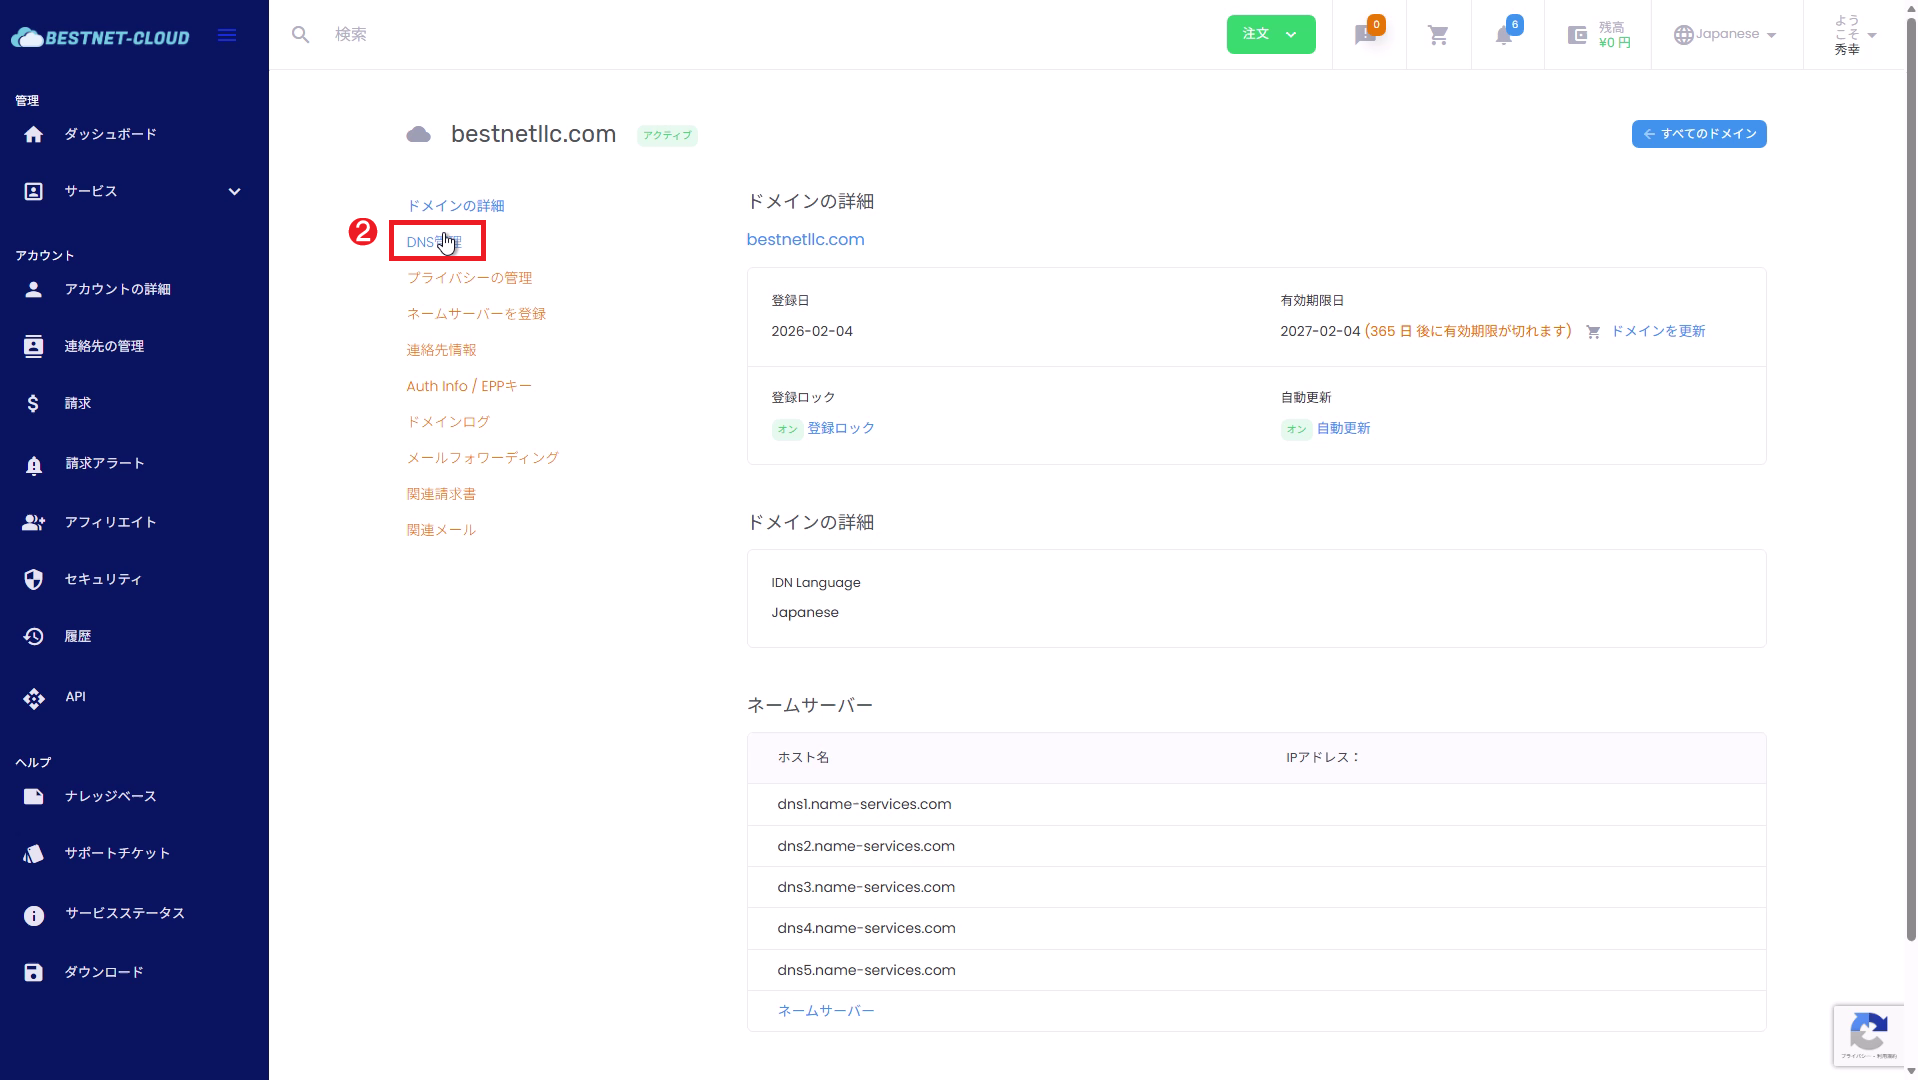
2Open “DNS” in the domain details #
- Click DNS from the left menu on the domain details screen.
- The “DNS Management” section (record editing form) will appear on the page.
Understanding the Screen Items (DNS Management) #
“DNS Management” contains editing fields for existing records and a “Add New Record” section. The meaning of input fields is as follows (display may vary depending on your contract plan or record type).
Note:
When you want to set a record on the root (example.com itself), the screen specification may represent the hostname as blank / @ / “default name”, etc. Please enter according to the screen specification.
| Field | Description | Input Example |
|---|---|---|
| Hostname | Specifies the hostname (subdomain portion) of the record. For example: www refers to a subdomain like www.example.com. Some configurations allow wildcard * to be specified. |
www / subdomain / * |
| Priority | Primarily used for record types that require priority, such as MX (generally the default value is fine for A / CNAME / TXT). | 10 |
| Record Type | Select the type of record to create: A / AAAA / CNAME / MX / TXT, etc. | A |
| Value (shown on screen as “IP Address”, etc.) | Enter the value according to the record type (e.g., A = IPv4, AAAA = IPv6, CNAME = destination hostname, TXT = string). | 203.0.113.10 / example.target.com / "v=spf1 ..." |
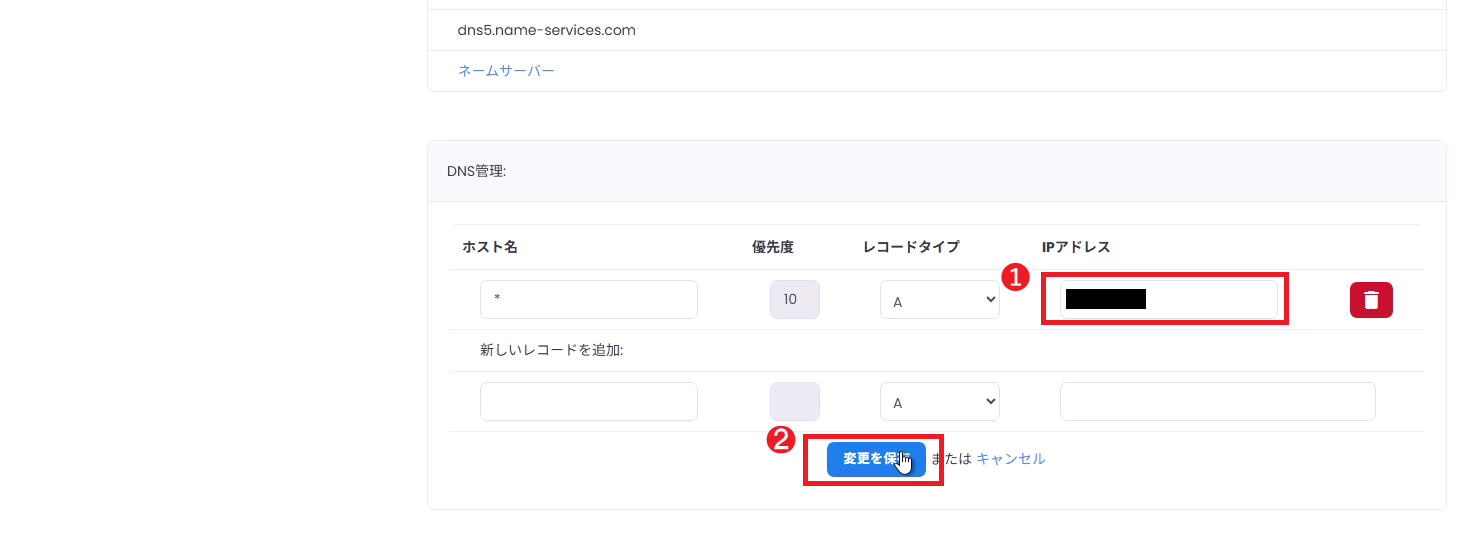
Editing DNS Records #
This is the procedure for changing the value of an existing record. After editing, be sure to confirm by clicking “Save Changes”.
Step 0 (Recommended): Note the value before editing #
- Before changing, note the value of the target record row (hostname, type, value, priority) – a screenshot is recommended.
- If you are changing email-related records (MX / SPF / DKIM / DMARC), please proceed with particular caution as the impact is significant.
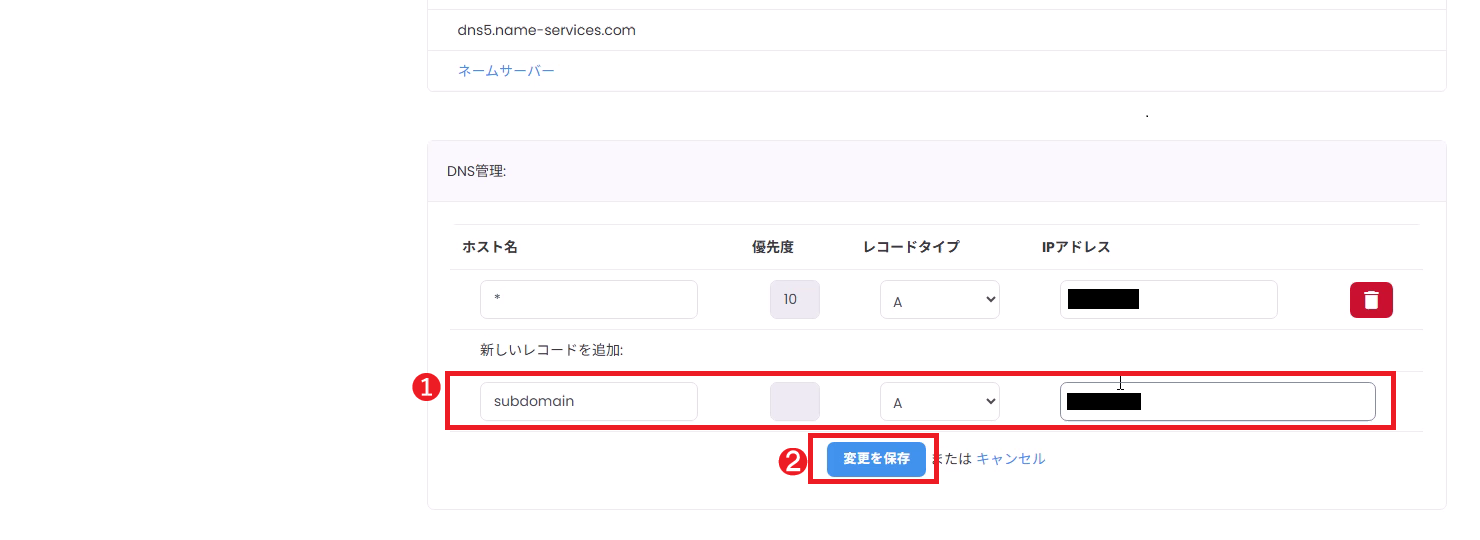
Adding DNS Records #
Add a record from the “Add New Record” section. After entering information, confirm by clicking “Save Changes”.
Step 0 (Recommended): Check for same-name records and CNAME conflicts #
- Check that a CNAME does not already exist on the hostname you want to add (to prevent conflicts).
- If A / AAAA / TXT with the same name already exist multiple times, verify that the result (multiple responses, round-robin, etc.) aligns with your intent.
1Enter required information in “Add New Record” #
- Enter “Hostname”, “Priority (if needed)”, “Record Type”, and “Value”.
- Example: To add an A record for
subdomain, entersubdomainin the hostname field,Aas the record type, and the IPv4 address of the target in the value field.
2Confirm by clicking “Save Changes” #
- Click Save Changes.
- After the page reloads, verify that the added record appears in the list.
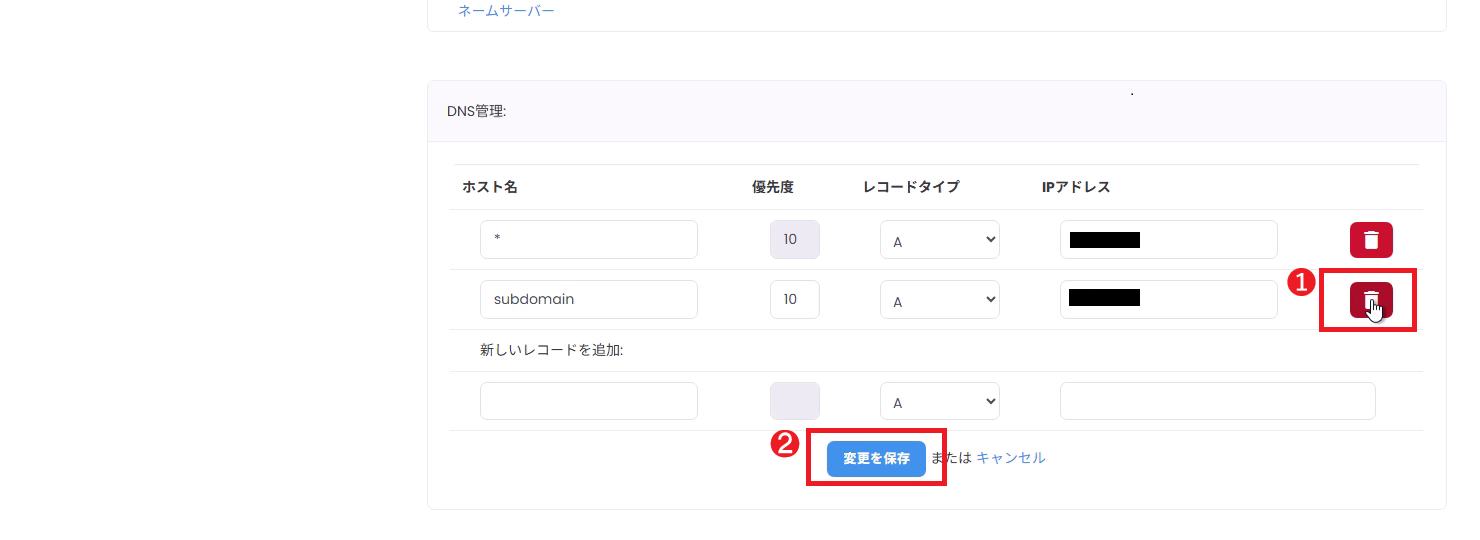
Deleting DNS Records #
Unnecessary records can be deleted with the trash icon. After deletion, confirm by clicking “Save Changes”.
Step 0 (Recommended): Verify that deletion is appropriate and check for impact #
- Verify that the record to be deleted is not being used for web, email, or authentication.
- In particular, deletion of MX / TXT (SPF / DKIM / DMARC) records can result in email delivery failures.
1Click the trash icon for the record you want to delete #
- Click the trash (delete) icon at the right end of the record row you want to delete.
- Once the row is marked for deletion, make any other necessary changes.
2Confirm by clicking “Save Changes” #
- Click Save Changes to confirm the deletion.
- Verify that the deleted record is no longer in the list.
Verification Method (External Name Resolution Check: Recommended) #
- In addition to checking what appears on screen, it is best to verify that name resolution actually works from outside.
- DNS propagation takes time due to TTL and caching. Please wait a while after making changes before verifying again.
Example verification commands
dig A example.com
dig A www.example.com

dig MX example.com

dig TXT example.com
dig TXT _dmarc.example.com

dig +trace example.com
Precautions #
- Before clicking “Save Changes”, entries are not confirmed. Be sure to save after performing operations.
- DNS propagation may take minutes to hours due to caching and TTL. For records exposed to the public, it may take up to half a day to a day in some cases.
- Input format varies by record type (e.g., A = IPv4, CNAME = hostname, TXT = string). If there are input errors, they will not be reflected.
Troubleshooting #
Changes are not being reflected #
- Verify that you have pressed the save button (Save Changes).
- Browser cache and DNS cache can affect results, so wait and recheck (e.g., verify from a different connection / different DNS resolver).
- Verify that the nameserver is not pointing to external DNS (if operating external DNS, editing must be done on the external DNS side).
Input error occurs #
- Verify that A / AAAA records use the correct IP address format.
- Check that the hostname does not contain unusable characters (full-width characters, spaces, etc.).
- TXT records may require double quotes (enter according to the screen specification).
The intended value is not being returned #
- There may be multiple records with the same name (multiple A or TXT) / CNAME and other records may be in conflict. Review the record list.
- If TTL is long, the old value may be cached. Wait and recheck.
If You Need Help (Opening a Support Ticket) #
If you have questions or encounter issues that are not resolved after making changes,
please open a support ticket from the BESTNET client portal.
Including the following information will help us assist you more smoothly.
- Target domain name
- Operations performed (add / edit / delete) and target record (hostname, type)
- Date and time of operation (approximate)
- Values before and after the change (to the extent known)
- Screenshot of the screen (DNS Management screen)
- External verification results (e.g., results of
dig A example.com/dig +trace example.com) - Issues occurring (web cannot be viewed / email not being delivered, etc.)


