
網域聯絡人設定指南
如何變更網域聯絡人 #
說明如何從客戶入口網站變更網域的 網域聯絡人 (註冊人聯絡人 / 行政聯絡人 / 技術聯絡人 / 帳務聯絡人)。
本指南中,網域聯絡人名稱一律以英文列出 (Registrant Contact 等)。
概覽 #
您可以在網域詳細資料畫面的「聯絡資訊」區塊中變更各項網域聯絡人。 輸入資料時,請以英文(羅馬拼音)登錄姓名、地址、公司名稱等資訊。
事前準備 #
- 您已登入客戶入口網站
- 目標網域顯示在入口網站的「網域」清單中
- 您已準備好欲輸入的聯絡資訊(姓名、地址、公司名稱等),並以英文(羅馬拼音)準備
操作步驟 #
1開啟「網域」清單 #
從左側選單開啟「網域」,即可顯示網域清單畫面。
2開啟欲變更網域的詳細資料 #
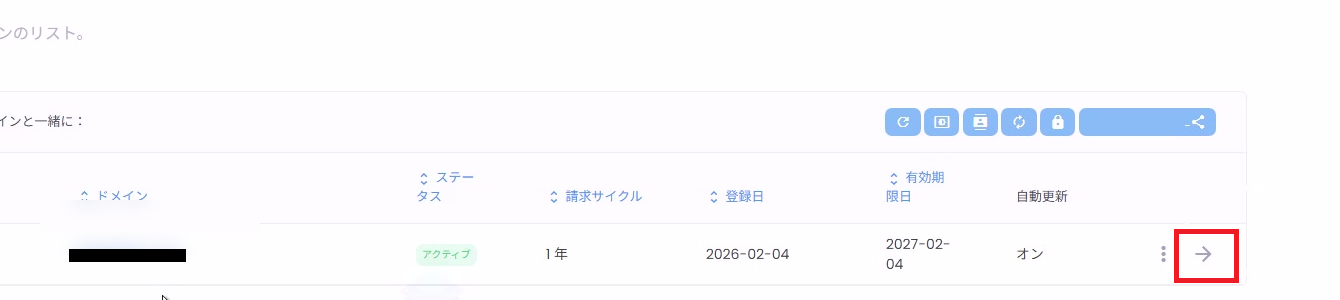
在網域清單中,點擊目標網域列最右側的箭頭(→),即可開啟詳細資料畫面。
3開啟「聯絡資訊」 #
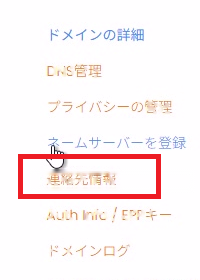
在網域詳細資料畫面(「Domain Details」)的左側選單中,點擊 「聯絡資訊」。
4設定 Registrant Contact #
在「聯絡資訊」下的Registrant Contact區塊(畫面上顯示為「Registrant Contact」)中,選擇設定方式。
- Custom:手動於表單中輸入資訊
- Use an existing contact:從下拉選單選擇既有聯絡人
若採手動輸入,請以英文(羅馬拼音)填寫以下項目。
- 名/姓
- 公司名稱
- 電子郵件地址
- 地址/城市/州
- 郵遞區號
- 國家
- 電話

5設定 Administrative Contact 與 Technical Contact #
接著設定Administrative Contact與 Technical Contact。
各聯絡人類型可用的設定方式
- Custom:手動輸入表單
- Same as Registrant:使用與 Registrant Contact 相同的資訊
- Use an existing contact:選擇既有聯絡人

6設定 Billing Contact #
以相同方式設定Billing Contact。
- Custom:手動輸入表單
- Same as Registrant:使用與 Registrant Contact 相同的資訊
- Use an existing contact:選擇既有聯絡人

7儲存變更 #
完成所有聯絡人設定 (Registrant Contact / Administrative Contact / Technical Contact / Billing Contact)後,點擊畫面底部的 「儲存變更」。

補充說明與注意事項 #
- 透過「Use an existing contact」可選擇的聯絡人,是從帳戶端登錄的 「聯絡人管理」區塊中取得。
- 依註冊管理機構(TLD)不同,聯絡人變更可能會受到限制。 若儲存後顯示錯誤,請重新檢查輸入內容 (英文字元、必填欄位)。
- 變更生效可能需要一些時間。