
डोमेन कॉन्टैक्ट्स सेटअप गाइड
डोमेन कॉन्टैक्ट्स कैसे बदलें #
client portal से अपने डोमेन के Domain Contacts (Registrant Contact / Administrative Contact / Technical Contact / Billing Contact) बदलने के निर्देश।
इस गाइड में domain contact के नाम हमेशा English में ही दिखाए गए हैं (Registrant Contact, आदि)।
ओवरव्यू #
आप domain details screen पर मौजूद “Contact Information” सेक्शन से विभिन्न Domain Contacts बदल सकते हैं। जानकारी दर्ज करते समय, कृपया नाम, पता, कंपनी का नाम आदि English (Roman characters) में ही register करें।
पूर्व-आवश्यकताएँ #
- आप client portal में लॉगिन हैं
- लक्षित डोमेन portal की “Domain” list में दिख रहा है
- आपने दर्ज की जाने वाली contact जानकारी (नाम, पता, कंपनी का नाम आदि) English (Roman characters) में तैयार कर रखी है
ऑपरेटिंग प्रोसीजर #
1“Domain” list खोलें #
domain list screen देखने के लिए left menu से “Domain” खोलें।
2जिस डोमेन को बदलना है उसकी details खोलें #
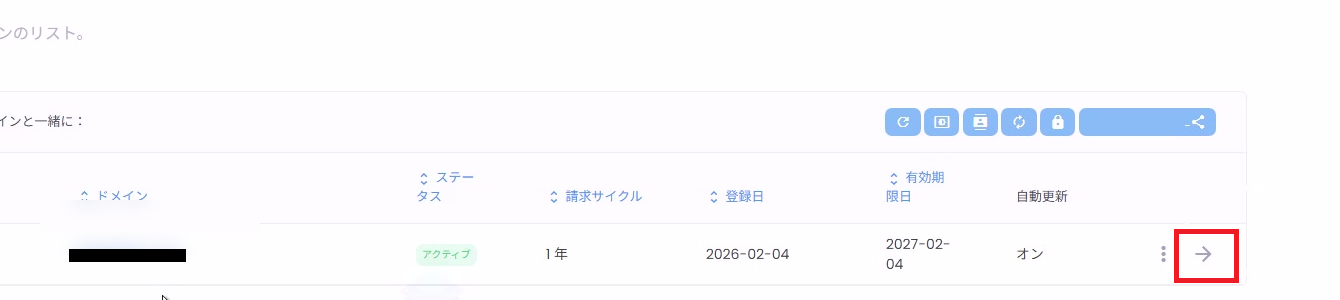
domain list में, details screen खोलने के लिए लक्षित डोमेन की row के सबसे दाईं ओर मौजूद arrow (→) पर क्लिक करें।
3“Contact Information” खोलें #
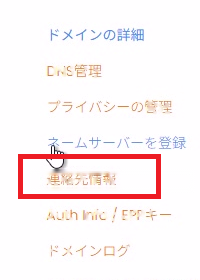
domain details screen (“Domain Details”) के left menu से “Contact Information” पर क्लिक करें।
4Registrant Contact सेट करें #
“Contact Information” के अंतर्गत Registrant Contact सेक्शन (screen पर “Registrant Contact” के रूप में दिखता है) में, setup method चुनें।
- Custom: form में जानकारी मैन्युअली दर्ज करें
- Use an existing contact: dropdown से मौजूदा contact चुनें
अगर मैन्युअली दर्ज कर रहे हैं, तो निम्नलिखित items English (Roman characters) में भरें।
- First Name / Last Name (पहला नाम / अंतिम नाम)
- Company Name (कंपनी का नाम)
- Email Address (ईमेल पता)
- Address / City / State (पता / शहर / राज्य)
- Postal Code (पोस्टल कोड)
- Country (देश)
- Phone (फ़ोन नंबर)

5Administrative Contact और Technical Contact सेट करें #
इसके बाद, Administrative Contact और Technical Contact सेट करें।
प्रत्येक contact type के लिए उपलब्ध setup methods
- Custom: form में मैन्युअली दर्ज करें
- Same as Registrant: Registrant Contact जैसी ही जानकारी उपयोग करें
- Use an existing contact: मौजूदा contact चुनें

6Billing Contact सेट करें #
इसी तरह से Billing Contact भी सेट करें।
- Custom: form में मैन्युअली दर्ज करें
- Same as Registrant: Registrant Contact जैसी ही जानकारी उपयोग करें
- Use an existing contact: मौजूदा contact चुनें

7बदलावों को Save करें #
सभी contacts सेट करने के बाद (Registrant Contact / Administrative Contact / Technical Contact / Billing Contact), screen के नीचे मौजूद “Save Changes” पर क्लिक करें।

अतिरिक्त नोट्स और सावधानियाँ #
- “Use an existing contact” के जरिए चुनने के लिए उपलब्ध contacts, account साइड पर register किए गए “Contact Management” सेक्शन से प्राप्त होते हैं।
- registry (TLD) के अनुसार, contact बदलने पर कुछ प्रतिबंध हो सकते हैं। अगर save करने के बाद कोई error दिखे, तो दर्ज की गई जानकारी की समीक्षा करें (English characters, required fields)।
- बदलाव reflect होने में समय लग सकता है।