
Network How-To

घर, ब्रांच ऑफिस या अपनी कंपनी में OPNsense को WireGuard server के रूप में configure करने और Windows PC से सुरक्षित रूप से connect करने की एक practical guide।
यह article “internal LAN और home network तक access करने” के use case के लिए split tunnel configuration मानकर चलता है। प्रक्रिया का framework OPNsense की official WireGuard Road Warrior Setup, सामान्य WireGuard documentation और official Windows installer guide पर आधारित है।[1][2][4]
इस article में बनाया जाने वाला configuration
⇄
⇄
- Protocol: WireGuard / UDP
- उद्देश्य: Remote access
- तरीका: split tunnel
- Client: Official WireGuard for Windows
Overview
अवलोकन और पूर्व-आवश्यकताएँ #
OPNsense पर WireGuard को एक Instance (server-side virtual interface settings) और Peers (अधिकृत connection partners) के संयोजन से configure किया जाता है। OPNsense की official documentation tunnel addresses को एक स्वतंत्र network के रूप में design करने की सलाह देती है, मानो कोई अलग physical interface मौजूद हो।[1][2]
इस article का लक्ष्य #
Windows PC को WireGuard के जरिए OPNsense से connect करने में सक्षम बनाना और LAN के अंदर NAS, RDP, SSH और business systems तक सुरक्षित access देना।
मानी गई connection method #
पूरे Internet का client traffic VPN से नहीं भेजा जाता; इसके बजाय एक split tunnel अपनाया जाता है जिसमें केवल LAN की ओर जाने वाला traffic tunnel से भेजा जाता है।
हालाँकि Instance / Peer / General / Firewall की वैचारिक संरचना एक जैसी रहती है।
- आप OPNsense management UI में log in कर सकते हैं
- WAN side पर UDP port 51820 उपलब्ध है
- यदि OPNsense किसी upstream router के पीछे है, तो आप UDP 51820 को OPNsense WAN पर forward कर सकते हैं
- आप एक ऐसा WireGuard network provision कर सकते हैं जो target LAN segment से overlap न करे
- आप Windows client पर official WireGuard for Windows install कर सकते हैं
Sample Design
Sample Configuration #
इस article की व्याख्या में एकरूपता के लिए नीचे दिया गया उदाहरण उपयोग किया गया है। ये values केवल sample हैं; production में इन्हें अपने organization की address scheme से बदल लें।
| Item | Value | अर्थ |
|---|---|---|
| LAN | 192.168.10.0/24 | Internal corporate या home network |
| WireGuard Network | 10.10.10.0/24 | VPN tunnel के लिए dedicated segment |
| OPNsense Tunnel IP | 10.10.10.1/24 | Instance पर set किया गया address |
| Windows Client IP | 10.10.10.2/32 | Peer को दिया गया unique address |
| Public hostname | vpn.example.jp | WAN का global IP या DDNS name |
| Listen Port | 51820/UDP | WireGuard का listening port |
10.10.10.2/32
10.10.10.0/24
10.10.10.1/24
192.168.10.0/24
10.10.10.1/24 जैसे network-inclusive CIDR के साथ set करने की सलाह देती है, और server-side Instance पर /32 या /128 से बचने को कहती है।[1]Step 1
OPNsense की तरफ WireGuard Instance बनाएँ #
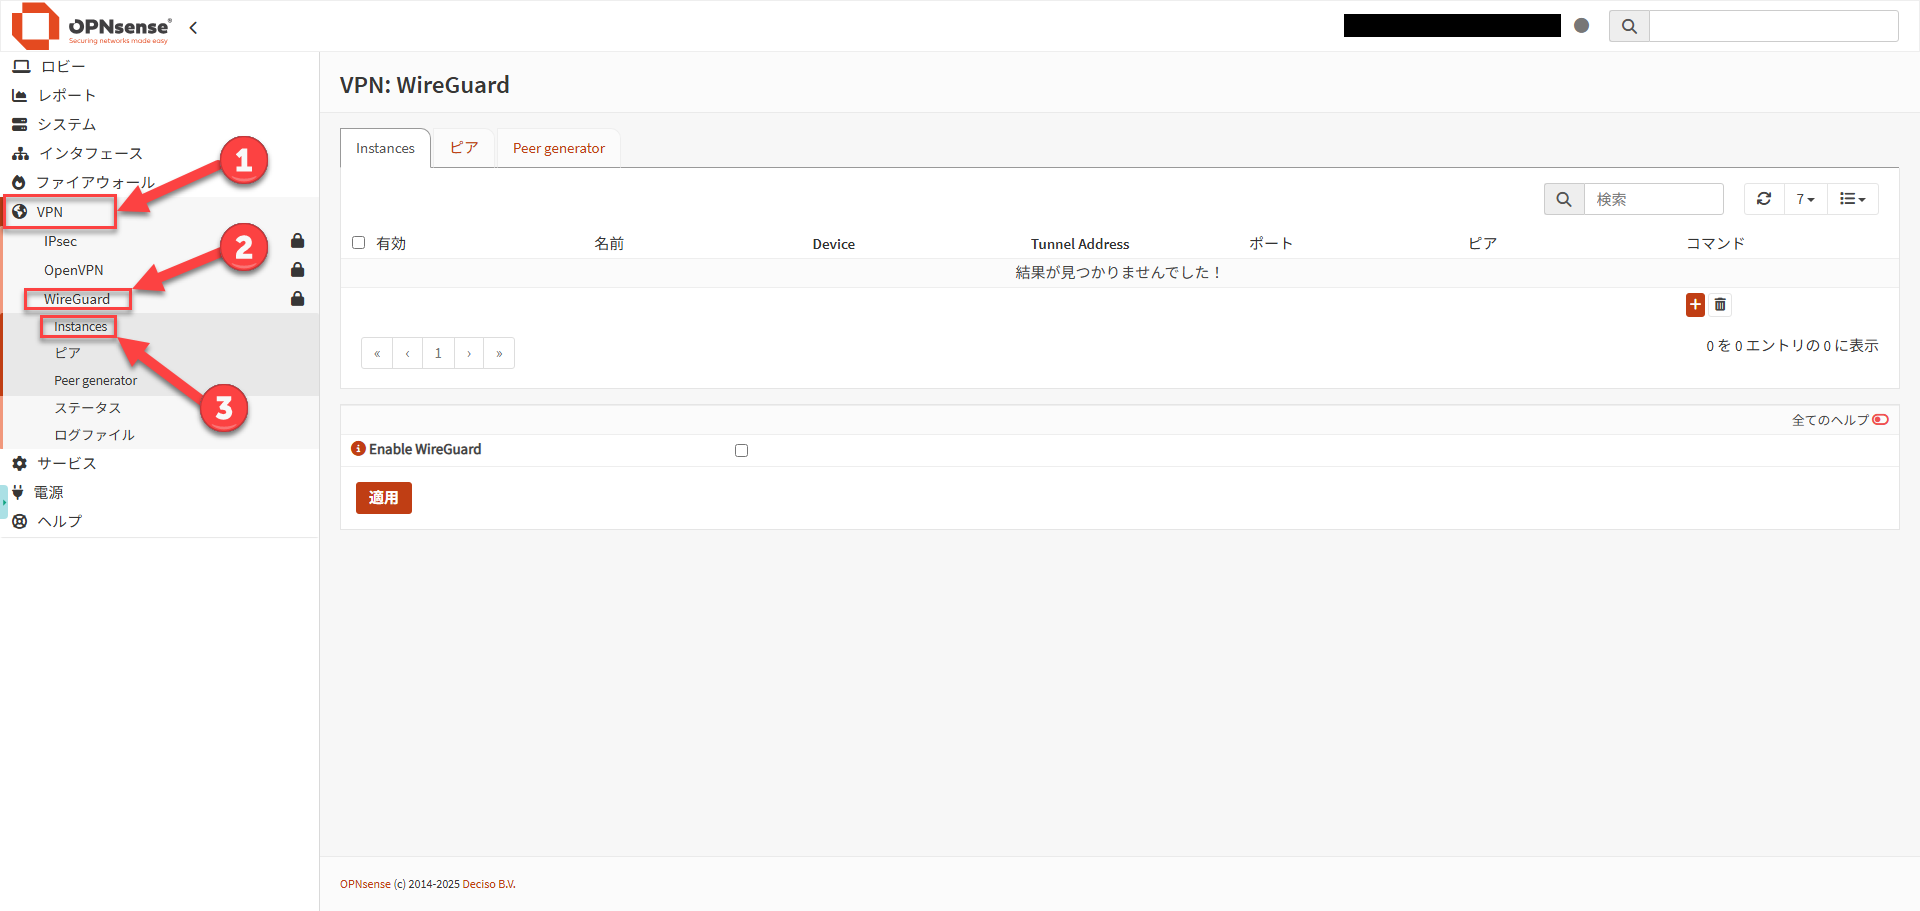
| Item | Setting का उदाहरण | टिप्पणी |
|---|---|---|
| Enabled | Check करें | Enable करें |
| Name | HomeWireGuard | पहचान के लिए कोई भी नाम |
| Public Key / Private Key | Auto-generated | Gear icon से नई generate करें |
| Listen Port | 51820 | ऐसा UDP port जिसका किसी अन्य service से conflict न हो |
| MTU | 1420 | PPPoE के लिए 1412 पर विचार करें[1] |
| Tunnel Address | 10.10.10.1/24 | WireGuard के लिए dedicated segment |
| Peers | खाली | इस चरण में खाली छोड़ें, पहले Peer बनाएँगे |
| DNS Server | खाली | Advanced mode में भी सामान्यतः खाली छोड़ें। इसे set करने पर OPNsense की अपनी DNS configuration override हो जाती है।[1] |
Save करने के बाद Instance को फिर से खोलें और Public Key record कर लें।
यह public key वही server-side public key है जिसे बाद में Windows client की settings में डालना है।[1]
Step 2
Client के लिए Peer बनाएँ #
वर्तमान OPNsense documentation कई clients को configuration वितरित करने के लिए Peer generator का उपयोग करने की सलाह देती है। यह instance selection, endpoint saving, automatic address assignment और Config text generation सक्षम करता है, और OPNsense पर केवल public key ही store होती है। चूँकि private key OPNsense पर नहीं रखी जाती, generate की गई configuration को सुरक्षित रूप से store करें।[2][3]
अनुशंसित प्रक्रिया: Peer generator का उपयोग #
VPN > WireGuard > Peer generatorखोलें।- Target Instance चुनें और client का नाम, connection destination का FQDN/port, आवश्यक networks और DNS दर्ज करें।
- Client-specific address के रूप में
10.10.10.2/32जैसा address assign करें। वर्तमान implementation में automatic address assignment भी उपलब्ध है।[3] - Keepalive interval 25 seconds रखने की सिफारिश है (NAT और firewalls के पार connection बनाए रखने के दृष्टिकोण से)
- DNS सामान्यतः खाली रहता है; लेकिन यदि आपको VPN destination के DNS server के जरिए host name resolution चाहिए, तो उसे यहाँ specify करें।
- Enable WireGuard को check करें
- Store and generate next से public जानकारी save करें, generate हुए Config को copy करें, और उसे
client-windows.confके रूप में सुरक्षित save करें। फिर Apply कोPeersscreen पर चलाएँ।[2]
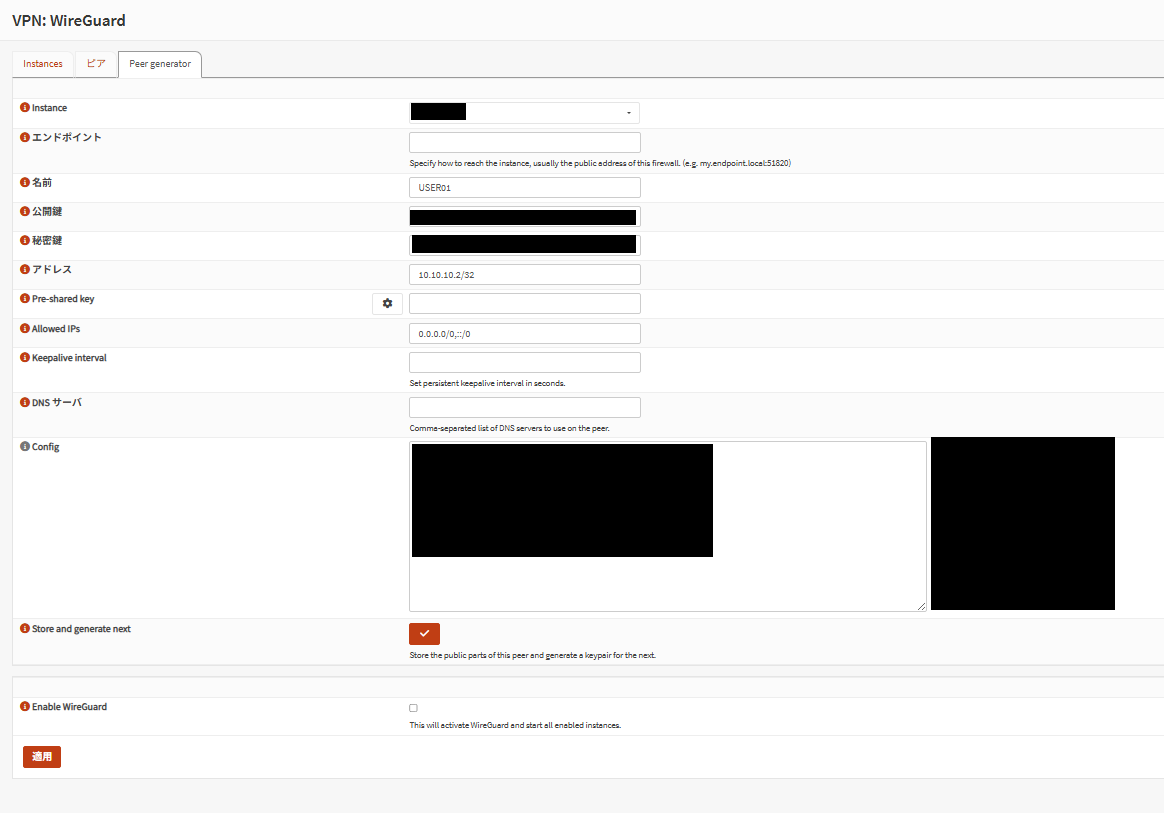
यदि आप regenerate करते हैं, तो Windows की तरफ configuration file को भी दोबारा import करें।[2]
Manual Peer बनाना #
यदि आप Peer generator का उपयोग नहीं करते, तो VPN > WireGuard > Peers पर नया Peer बनाएँ, और client की public key तथा client के लिए /32 address set करें।[1]
| Item | Setting का उदाहरण | टिप्पणी |
|---|---|---|
| Enabled WireGuard | Check करें | Enable करें |
| Name | Windows-Laptop-01 | ऐसा नाम जिससे device की पहचान हो |
| Public Key | Client की public key | Windows की तरफ generate की गई key |
| Allowed IPs | 10.10.10.2/32 | इस client को दिया गया unique address |
| Pre-shared Key | Optional | अतिरिक्त security उपाय के रूप में उपलब्ध[2] |
Peer को manually बनाने के बाद, मूल Instance पर वापस जाएँ, बनाए गए Peer को associate करें, save करें और Apply चलाएँ।[1]
Manual बनाने के लिए client-windows.conf template
यदि tunnel DNS का उपयोग कर रहे हैं, तो सुनिश्चित करें कि DNS destination AllowedIPs में शामिल है।[1]
Step 3
Interface assign करें और enable करें #
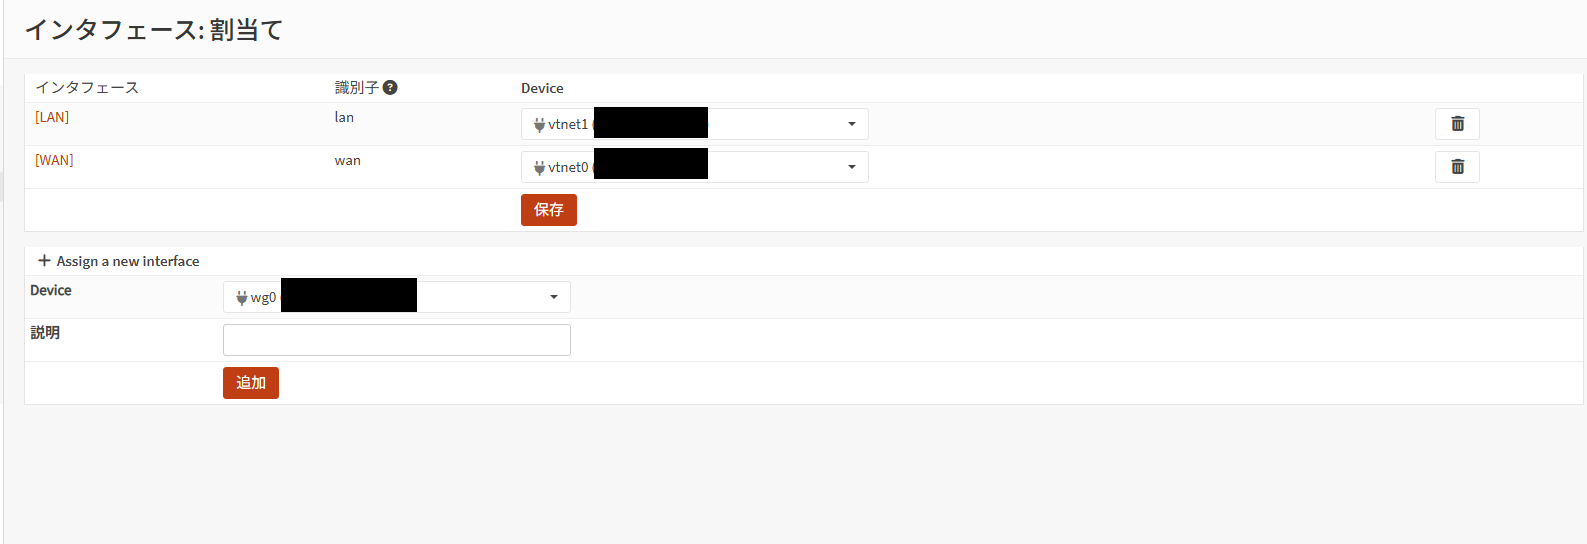
Interface enable करें #
Interfaces > OPTX पर “Enable Interface” को check करें, save करें और “Apply Changes” पर click करें
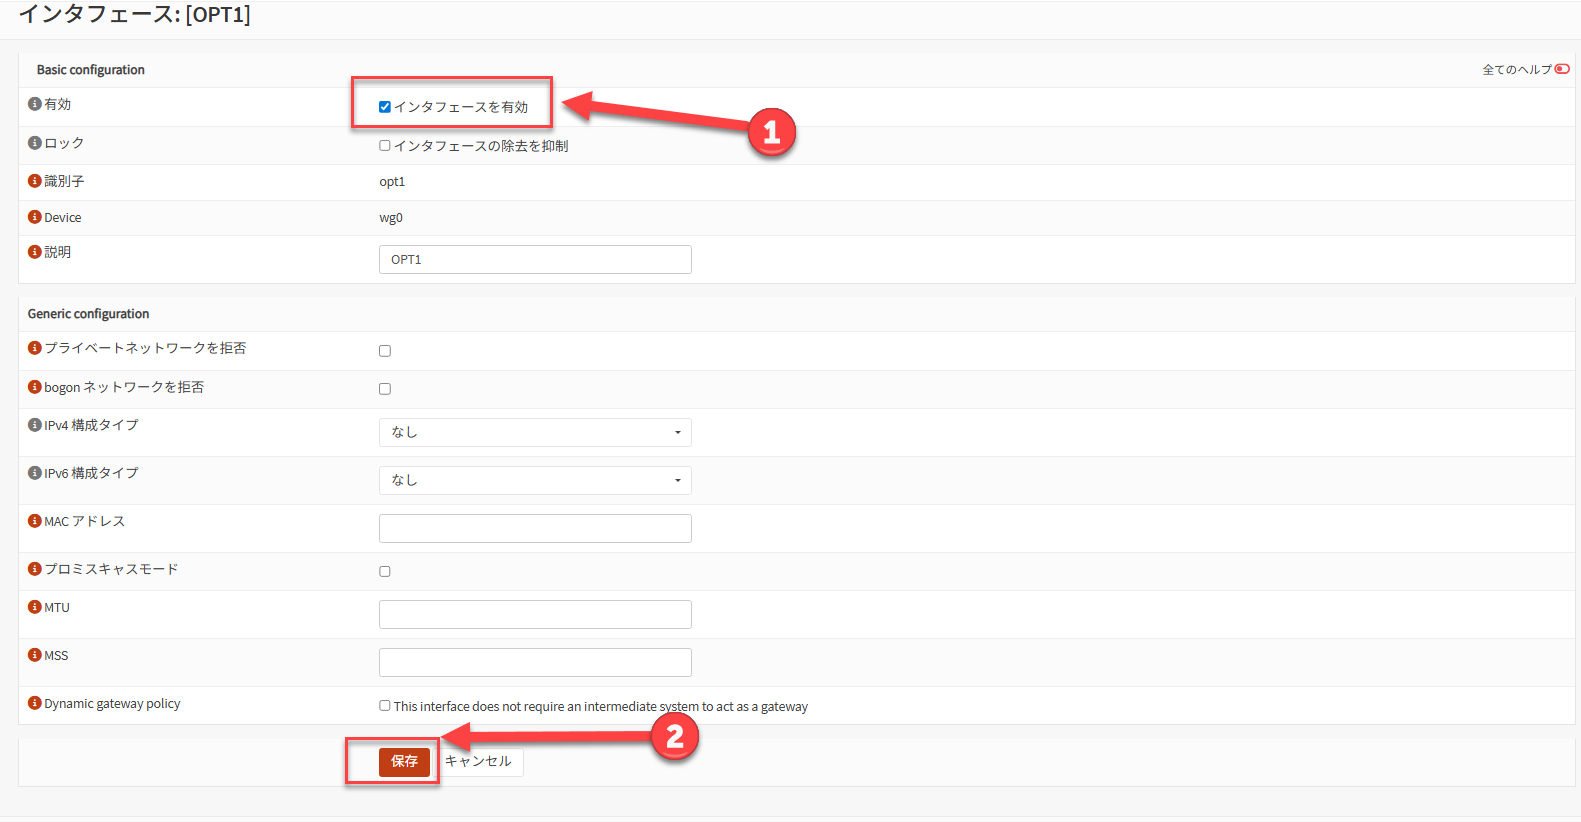
| Item | Setting का उदाहरण | टिप्पणी |
|---|---|---|
| Enable | Check करें | Interface enable करें |
| Description | HomeWireGuard | Rules बनाते समय पहचानना आसान होता है |
| IPv4 Configuration Type | None | IP manually set न करें |
| IPv6 Configuration Type | None | केवल आवश्यकता होने पर configure करें |
OPNsense की official guidance बताती है कि assign किए गए interface पर सीधे IP set करने की आवश्यकता नहीं है; Instance में दर्ज tunnel address WireGuard restart के बाद अपने आप लागू हो जाता है।[1]
Step 4
Firewall rules बनाएँ #
Official प्रक्रिया दो-स्तरीय approach अपनाती है: tunnel स्थापित करने के लिए WAN side पर UDP allow करें, फिर WireGuard interface side पर स्वीकृत destinations allow करें।[1][2]
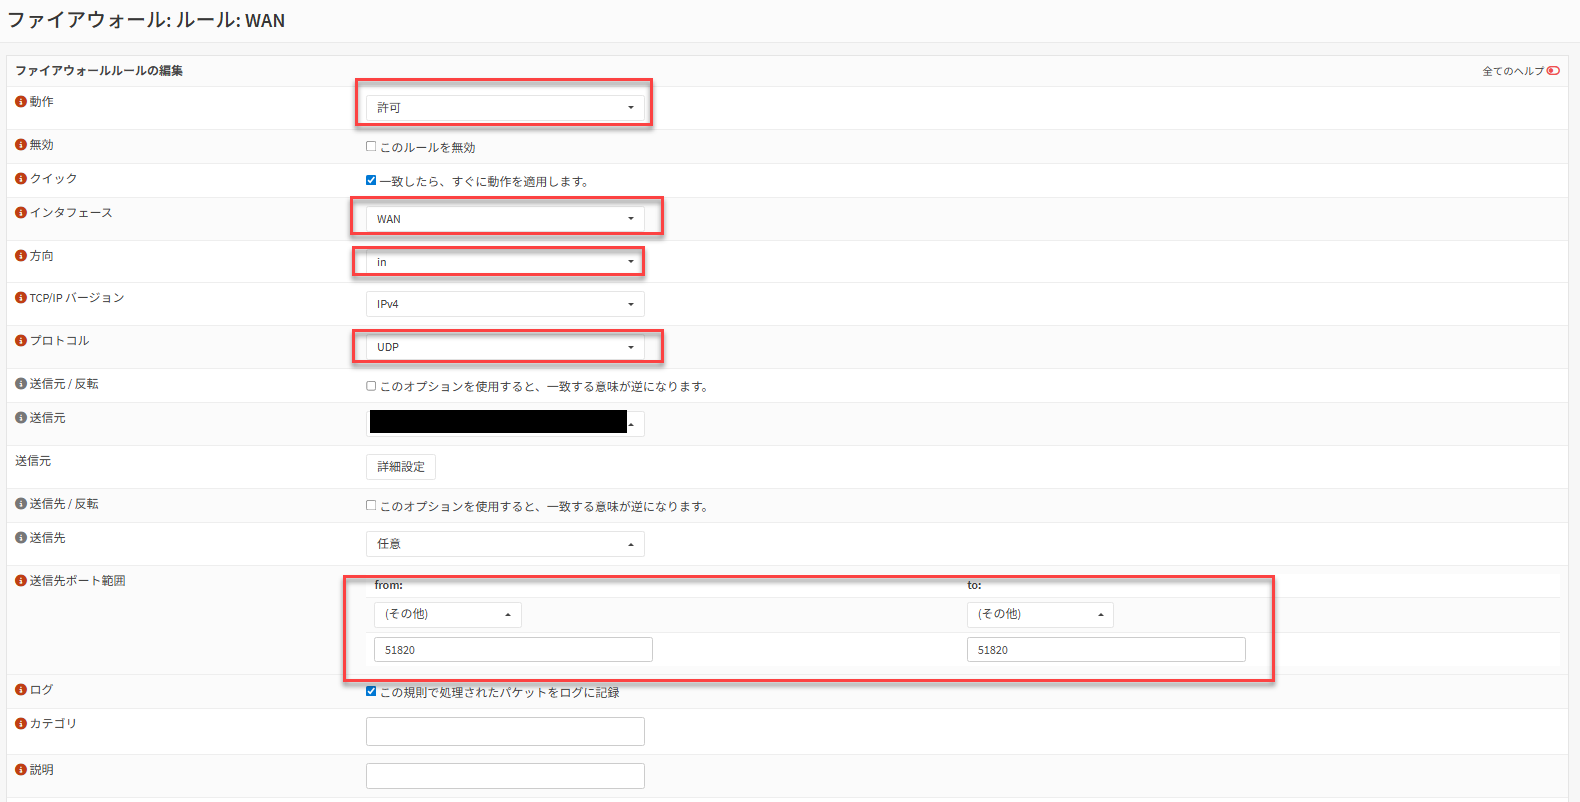
WAN side का rule #
| Item | Setting का उदाहरण | टिप्पणी |
|---|---|---|
| Action | Pass | Receive allow करें |
| Interface | WAN | WAN receive side |
| Protocol | UDP | WireGuard UDP उपयोग करता है |
| Destination | WAN address | अपना WAN |
| Destination Port | 51820 | Instance के Listen Port से match होना चाहिए |
| Description | Allow WireGuard | Optional |
WireGuard interface side का rule #
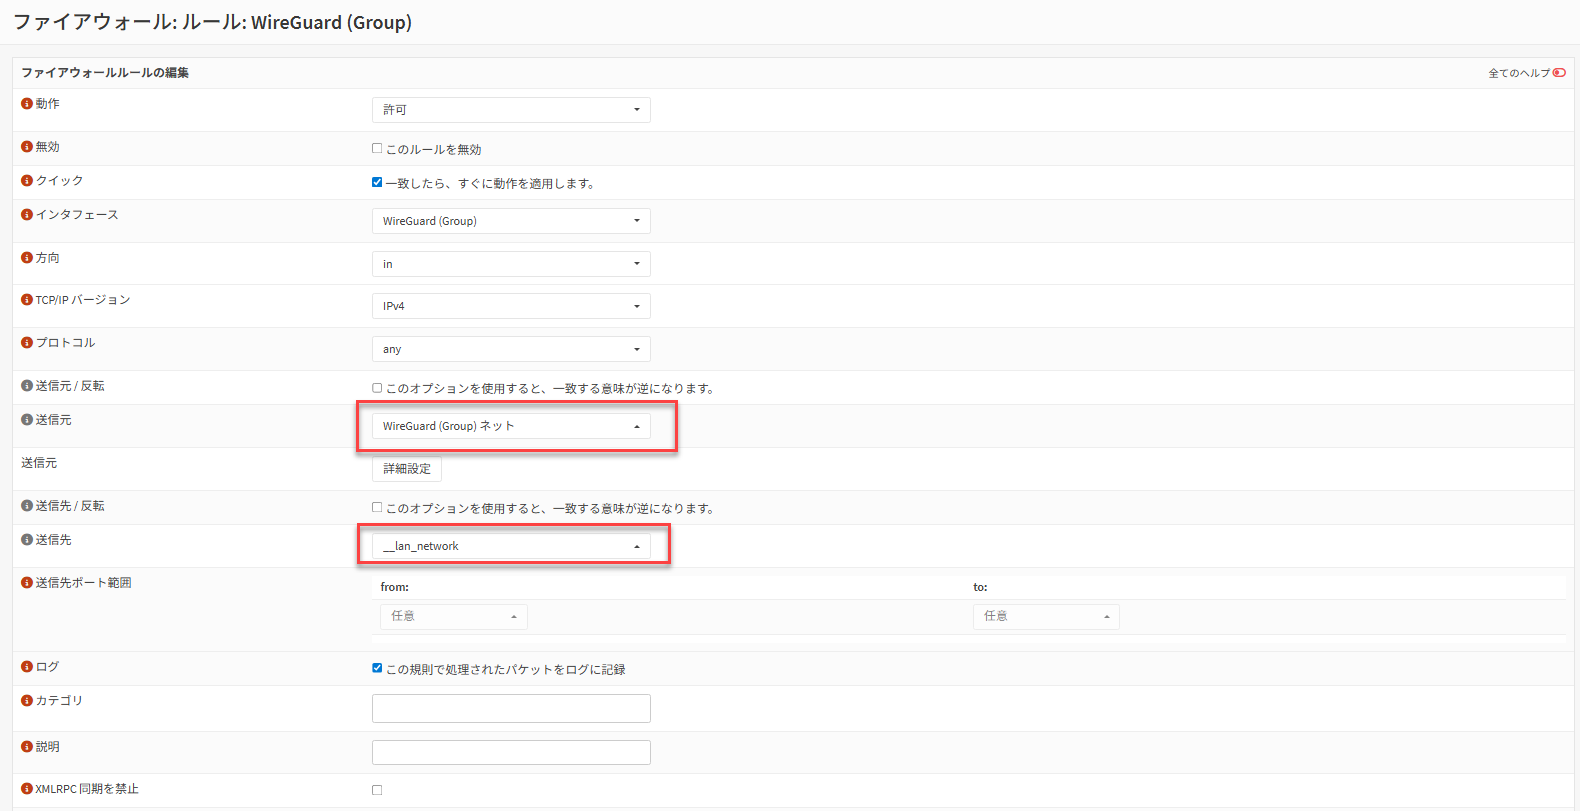
| Item | Setting का उदाहरण | टिप्पणी |
|---|---|---|
| Action | Pass | Tunnel traffic allow करें |
| Interface | HomeWireGuard | Assign किया गया WireGuard interface |
| Protocol | any | Connectivity testing के लिए शुरुआत में स्वीकार्य |
| Source | HomeWireGuard net | Tunnel network |
| Destination | 192.168.10.0/24 | शुरुआत में केवल LAN को permit करें |
OPNsense की official guidance WireGuard rule के destination को any set करने की अनुमति देती है, लेकिन operational practice में केवल आवश्यक subnets और servers तक restrict करने की सिफारिश है।[1]
PPPoE environments या कुछ TCP communication समस्याओं के लिए MTU / MSS adjustment
Official guidance में PPPoE environments में Instance MTU को 1412 तक घटाने का उदाहरण शामिल है, और आवश्यकता अनुसार Firewall > Settings > Normalization से MSS clamping जोड़ने का मार्गदर्शन भी है। यह तब कारगर है जब केवल TCP अस्थिर हो या केवल web fail हो जैसे लक्षण दिखें।[1]
| Item | Setting का उदाहरण |
|---|---|
| Interface | WireGuard (Group) |
| Description | WireGuard MSS Clamping IPv4 |
| Max MSS | 1380 (PPPoE के लिए: 1372) |
Step 5
Windows client पर configuration deploy करें #
Windows की तरफ official WireGuard for Windows का उपयोग सबसे सरल तरीका है। Installer WireGuard की official website से उपलब्ध है।[4]
- WireGuard for Windows install करें।
- OPNsense के Peer generator से save की गई
client-windows.confतैयार रखें। Manual बनाने के लिए पहले दिया गया template उपयोग करें। - Configuration file को WireGuard for Windows में import करें।
- Target tunnel को enable करें और connection शुरू करें।
client-windows.conf
192.168.10.0/24 जैसे LAN segments को AllowedIPs में शामिल करने से केवल वही destination tunnel से भेजा जाता है। यदि आप सारा client traffic VPN से route करना चाहते हैं, तो official guidance के अनुसार 0.0.0.0/0 या ::/0 उपयोग करें, लेकिन तब OPNsense की तरफ अतिरिक्त NAT / routing design भी आवश्यक है।[1]
Step 6
Connection का सत्यापन #
- Windows client पर tunnel enable करें
10.10.10.1(OPNsense tunnel IP) तक connectivity test करें- LAN के किसी representative host पर
ping, RDP, SSH आदि connections आज़माएँ (उदाहरण:192.168.10.10) - आवश्यकता अनुसार name resolution test करें और verify करें कि DNS काम कर रहा है
VPN > WireGuard > Statusपर handshake और send/receive statistics जाँचें[2]
Operations
Public करने से पहले लागू करने योग्य hardening #
प्रति Peer /32 assign करें #
हर client को एक unique /32 देने से rules और logs को per-device track करना आसान हो जाता है।[1]
केवल आवश्यक destinations allow करें #
WireGuard interface rule के destination को any छोड़ने के बजाय LAN या specific server groups तक restrict करना अधिक सुरक्षित है।
Fixed locations के लिए source restriction #
यदि WAN rule का source किसी fixed IP तक restrict किया जा सके, तो पहुँच सकने वाले पक्ष और भी सीमित हो जाते हैं।
आवश्यकता होने पर PSK जोड़ें #
OPNsense के Peers में pre-shared key जोड़ी जा सकती है, जिसे official guidance भी अतिरिक्त security उपाय के रूप में recommend करती है।[2]
Troubleshooting
Connection fail होने पर checklist #
कोई handshake दिखाई नहीं देता
सबसे पहले WAN-side UDP 51820 की अनुमति, upstream router की port forwarding, client-side Endpoint का FQDN/port, और client की घड़ी में कोई बड़ा time drift जाँचें।
Handshake दिखता है लेकिन LAN unreachable है
Peer के Allowed IPs, client-side AllowedIPs और WireGuard interface rule के destination की समीक्षा करें। OPNsense की official documentation भी बताती है कि गलत Allowed IPs होने पर packets चुपचाप drop हो जाते हैं।[2]
ICMP काम करता है लेकिन कुछ web या TCP traffic अस्थिर है
MTU / MSS के प्रभाव पर शक करें। PPPoE के लिए Instance MTU 1412 और Normalization MSS clamping आज़माएँ।[1]
केवल DNS fail होता है
Verify करें कि client पर specify किया गया DNS destination AllowedIPs में शामिल है। यदि Unbound DNS all-interface registration के साथ चल रहा है, तो नया WireGuard interface जोड़ने के बाद Unbound reload आवश्यक है।[1]
WireGuard menu नहीं मिलता / screen अलग दिखती है
Version के अंतर जाँचें। Peer generator वाले हिस्से में 24.1 series में क्रमिक सुधार हुए हैं, और UI का रूप तथा items की व्यवस्था version के अनुसार अलग होती है।[3]
Sources
संदर्भ जानकारी #
- OPNsense Documentation, WireGuard Road Warrior Setup
https://docs.opnsense.org/manual/how-tos/wireguard-client.html - OPNsense Documentation, Virtual Private Networking > WireGuard
https://docs.opnsense.org/manual/vpnet.html - OPNsense Documentation, 24.1 “Savvy Shark” Series (Peer generator updates शामिल)
https://docs.opnsense.org/releases/CE_24.1.html - WireGuard Official, Installation
https://www.wireguard.com/install/