
Client Portal गाइड
Client Portal: Snapshot Operations गाइड #
यह document आपके client portal के माध्यम से VPS के snapshots बनाने, delete करने और schedule करने की procedures बताता है।
आवश्यक शर्तें (Prerequisites) #
- आपको client portal में login करने में सक्षम होना चाहिए
- आपके पास target service (जैसे VPS) के access rights होने चाहिए
- आप कितने snapshots बना और retain कर सकते हैं, यह आपके service plan और limit settings पर depend करता है
Manual Snapshot बनाना #
1. Snapshot Screen खोलें #
- Portal में अपने target VPS की details screen खोलें।
- Screen के बाएं तरफ service menu से Snapshot पर click करें।
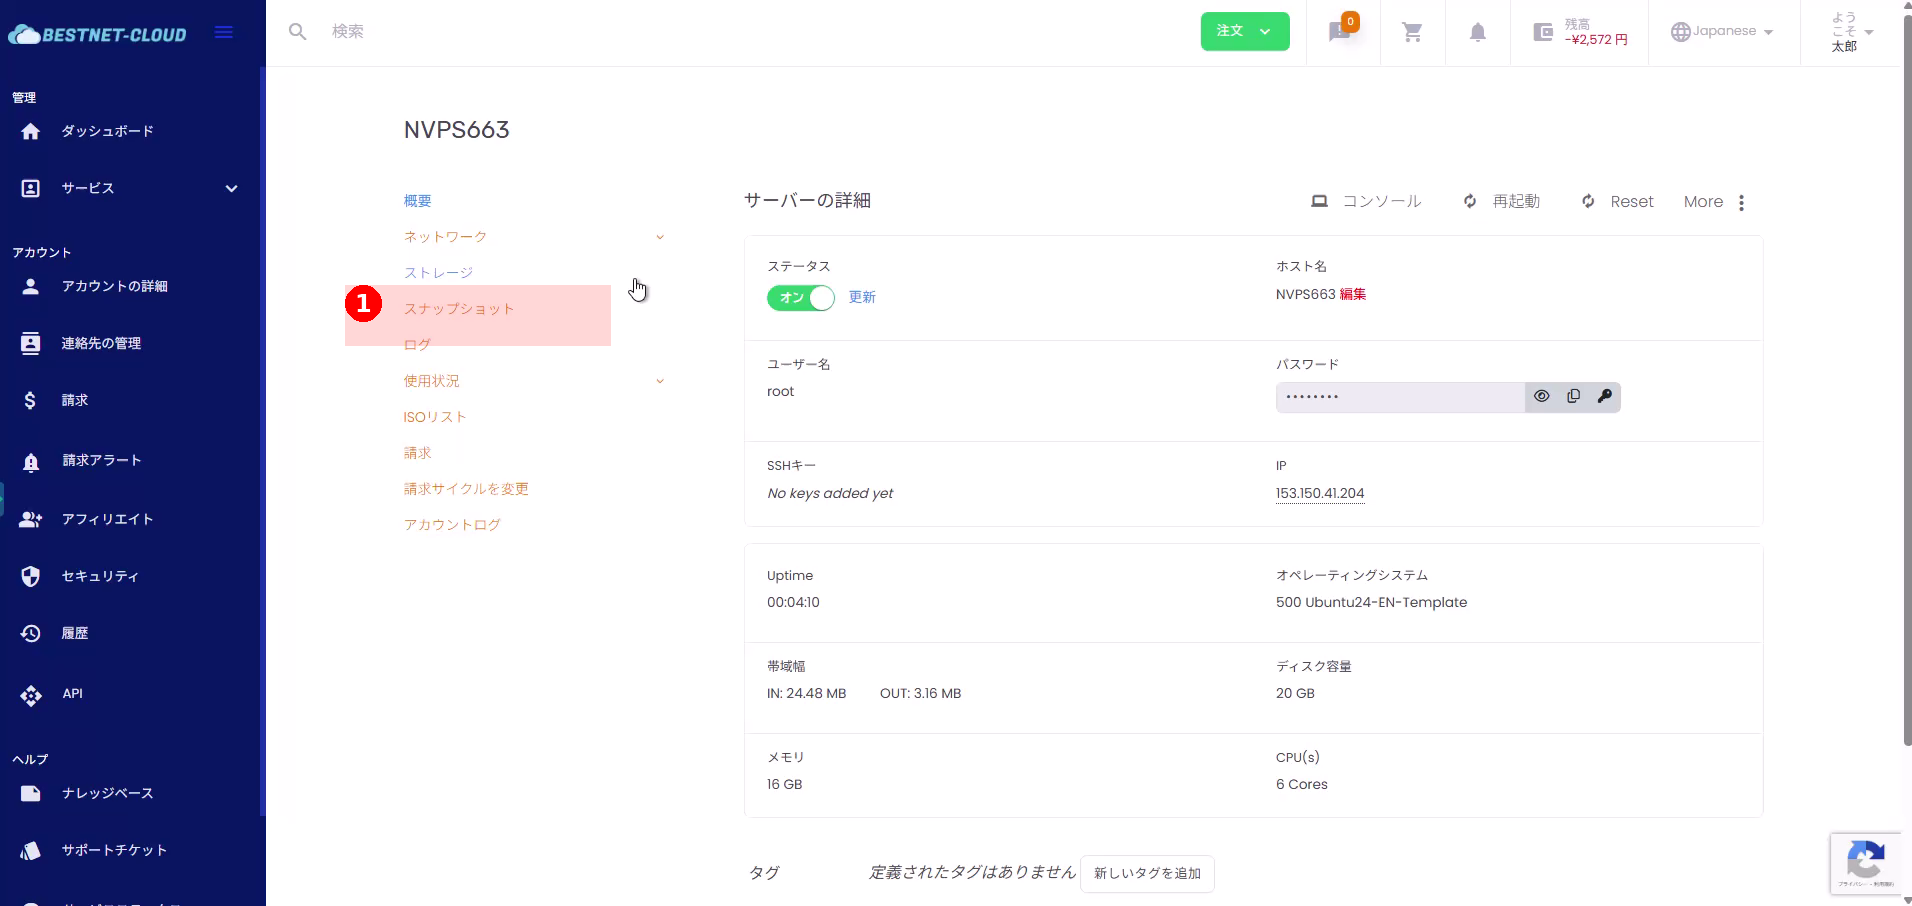
2. “Create New Snapshot” पर click करें #
- Snapshot list screen के दाईं तरफ Create New Snapshot पर click करें।
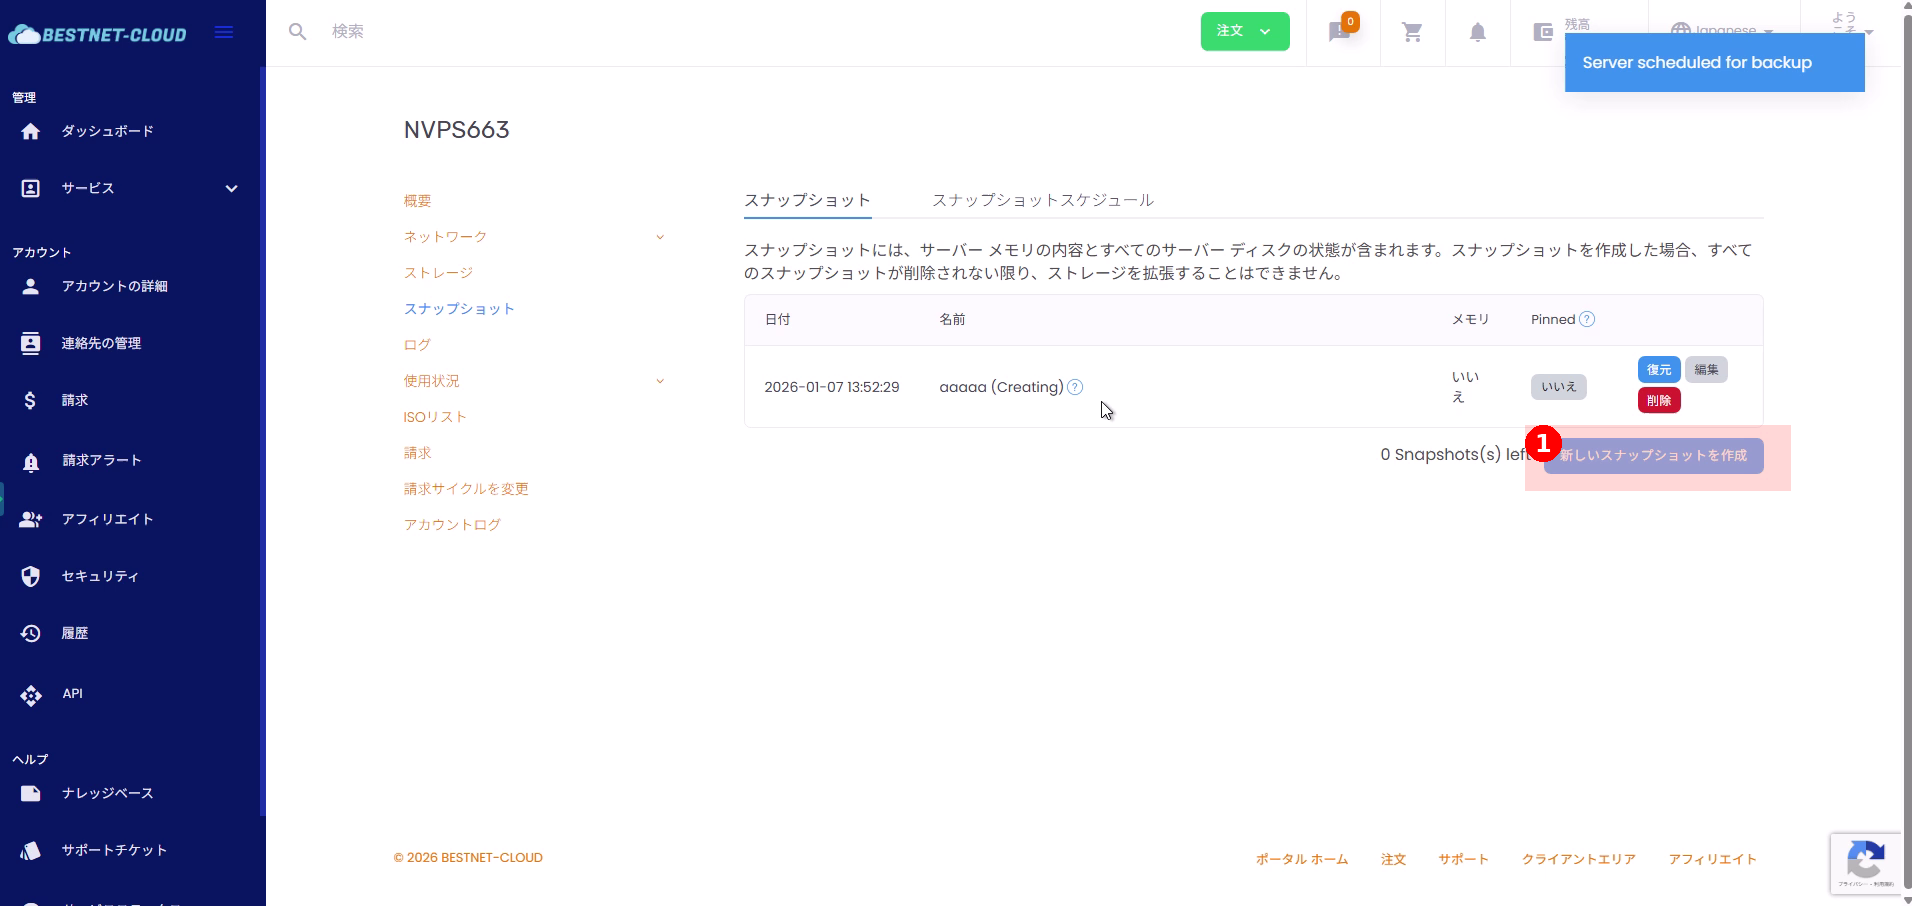
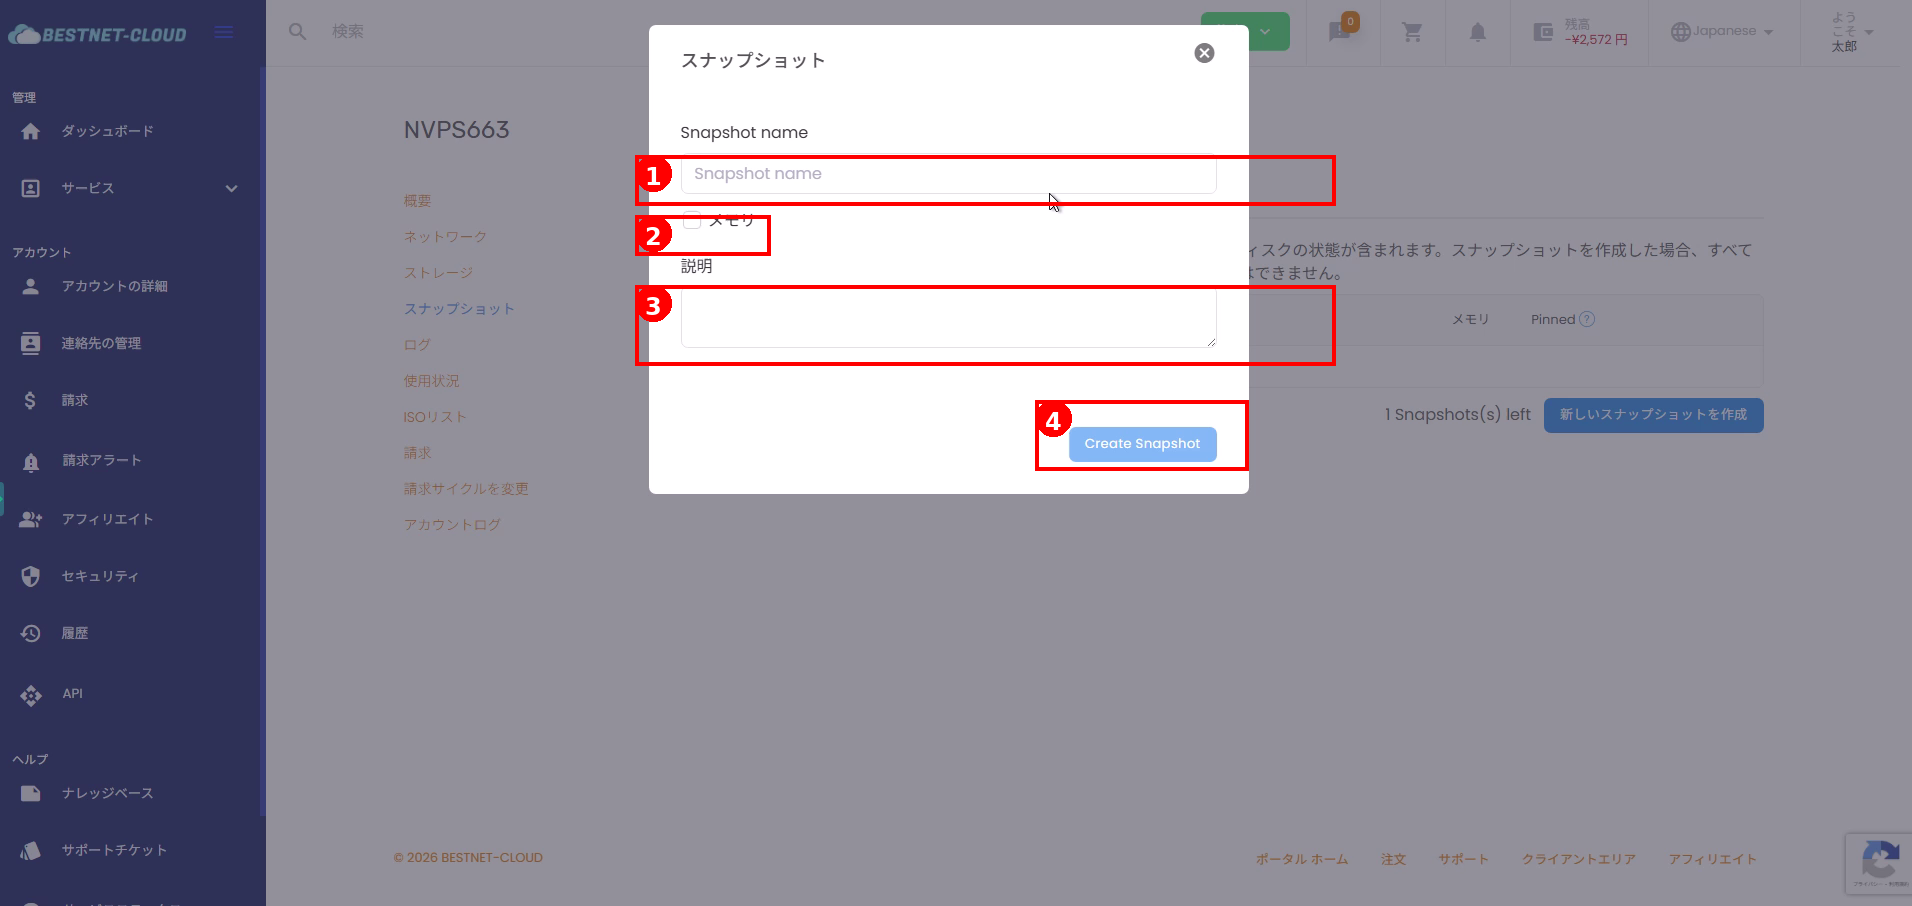
3. आवश्यक जानकारी भरें और Snapshot बनाएं #
- Snapshot का नाम भरने के लिए Snapshot name field use करें।
- यदि जरूरत हो, तो memory include करने का option check करें (stopped/running states का handling environment के अनुसार अलग होता है, इसलिए अपने operational guidelines follow करें)।
- Optionally, usage details या creation purpose के लिए description field में लिखें।
- अंत में Create Snapshot पर click करें।
4. Creation Status Check करें #
- Creation के तुरंत बाद, snapshot list में Creating जैसे status के साथ दिखाई देता है।
- पूरा होने पर, status Current या इसी तरह के status में बदल जाता है।
Snapshots को Manage करना #
1. Pinned Set करना #
- Snapshot list में target snapshot की row locate करें।
- Pinning enable या disable करने के लिए उसकी row में Pinned column (जैसे No/Yes) toggle करें।
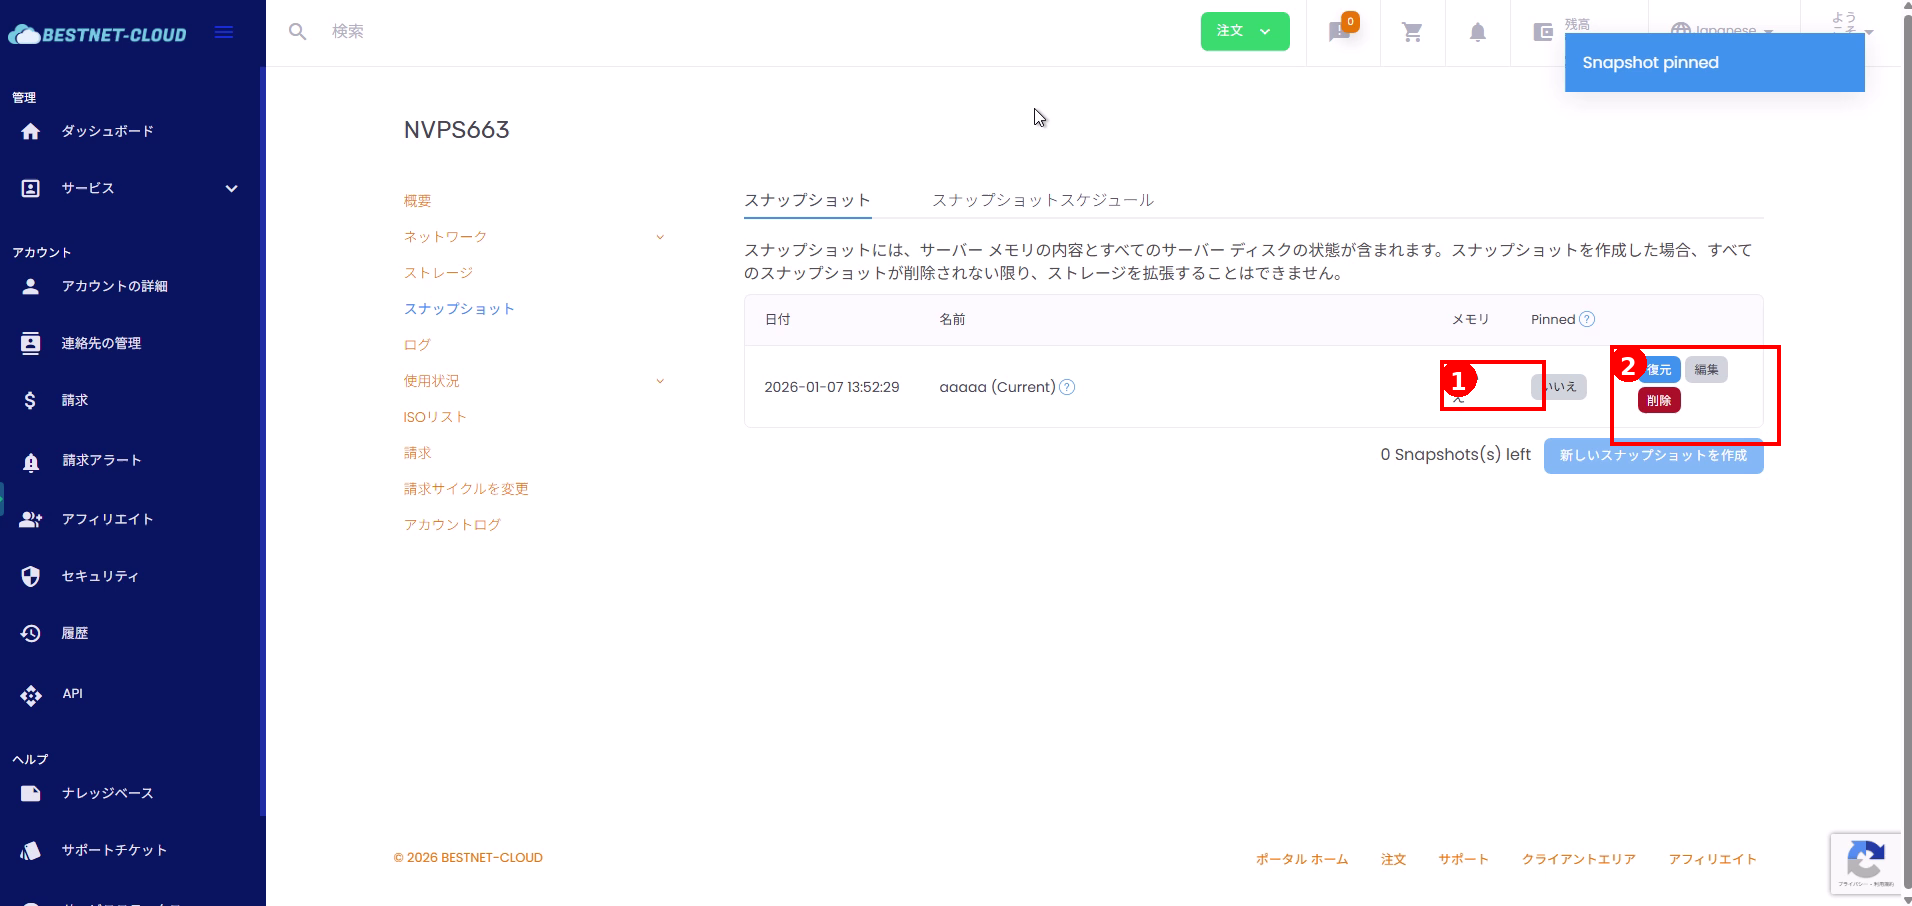
2. Snapshot से Restore करना #
- Target snapshot की row पर Restore पर click करें।
- यदि confirmation dialog दिखाई दे, तो content verify करें और restore execute करें।
3. Snapshot Delete करना #
- Target snapshot की row पर Delete पर click करें।
- Deletion request accept होने पर, “scheduled for removal” जैसा message दिखाई दे सकता है।
- Deletion पूरा होने में समय लग सकता है। Status check करने के लिए screen refresh करें।
Snapshot Schedules Configure करना #
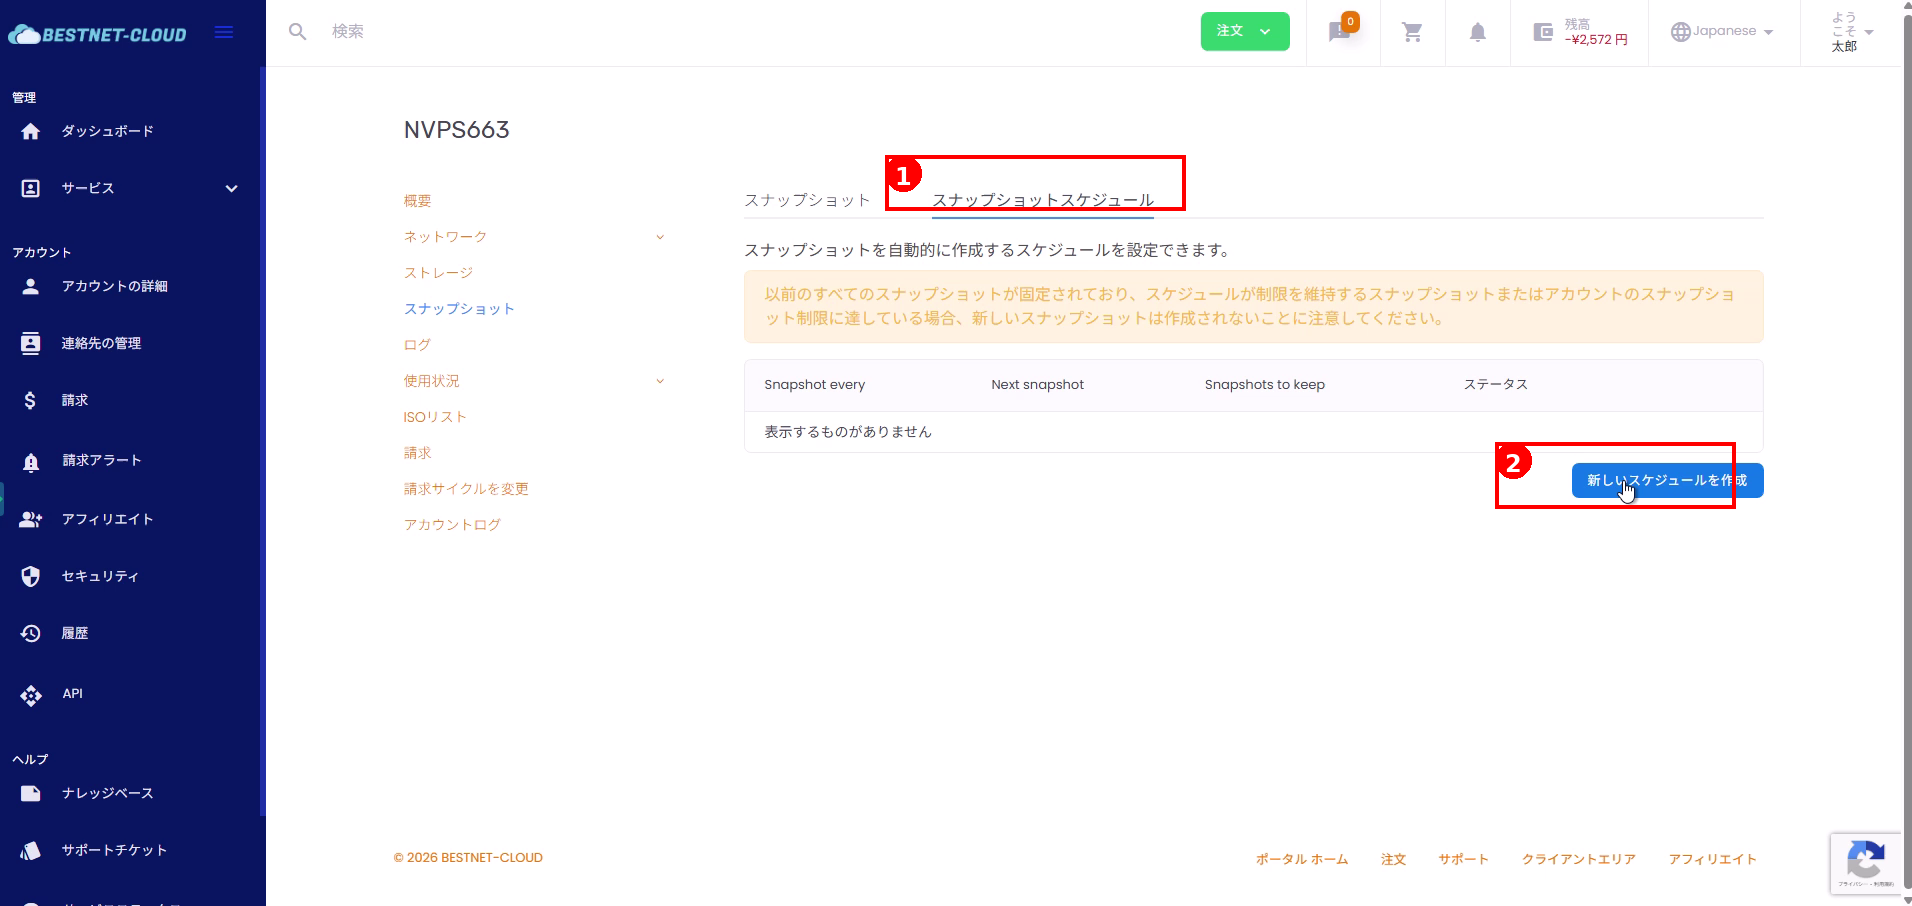
1. “Snapshot Schedule” Tab खोलें #
- Snapshot screen के top पर Snapshot Schedule पर click करें।
- फिर Create New Schedule पर click करें।
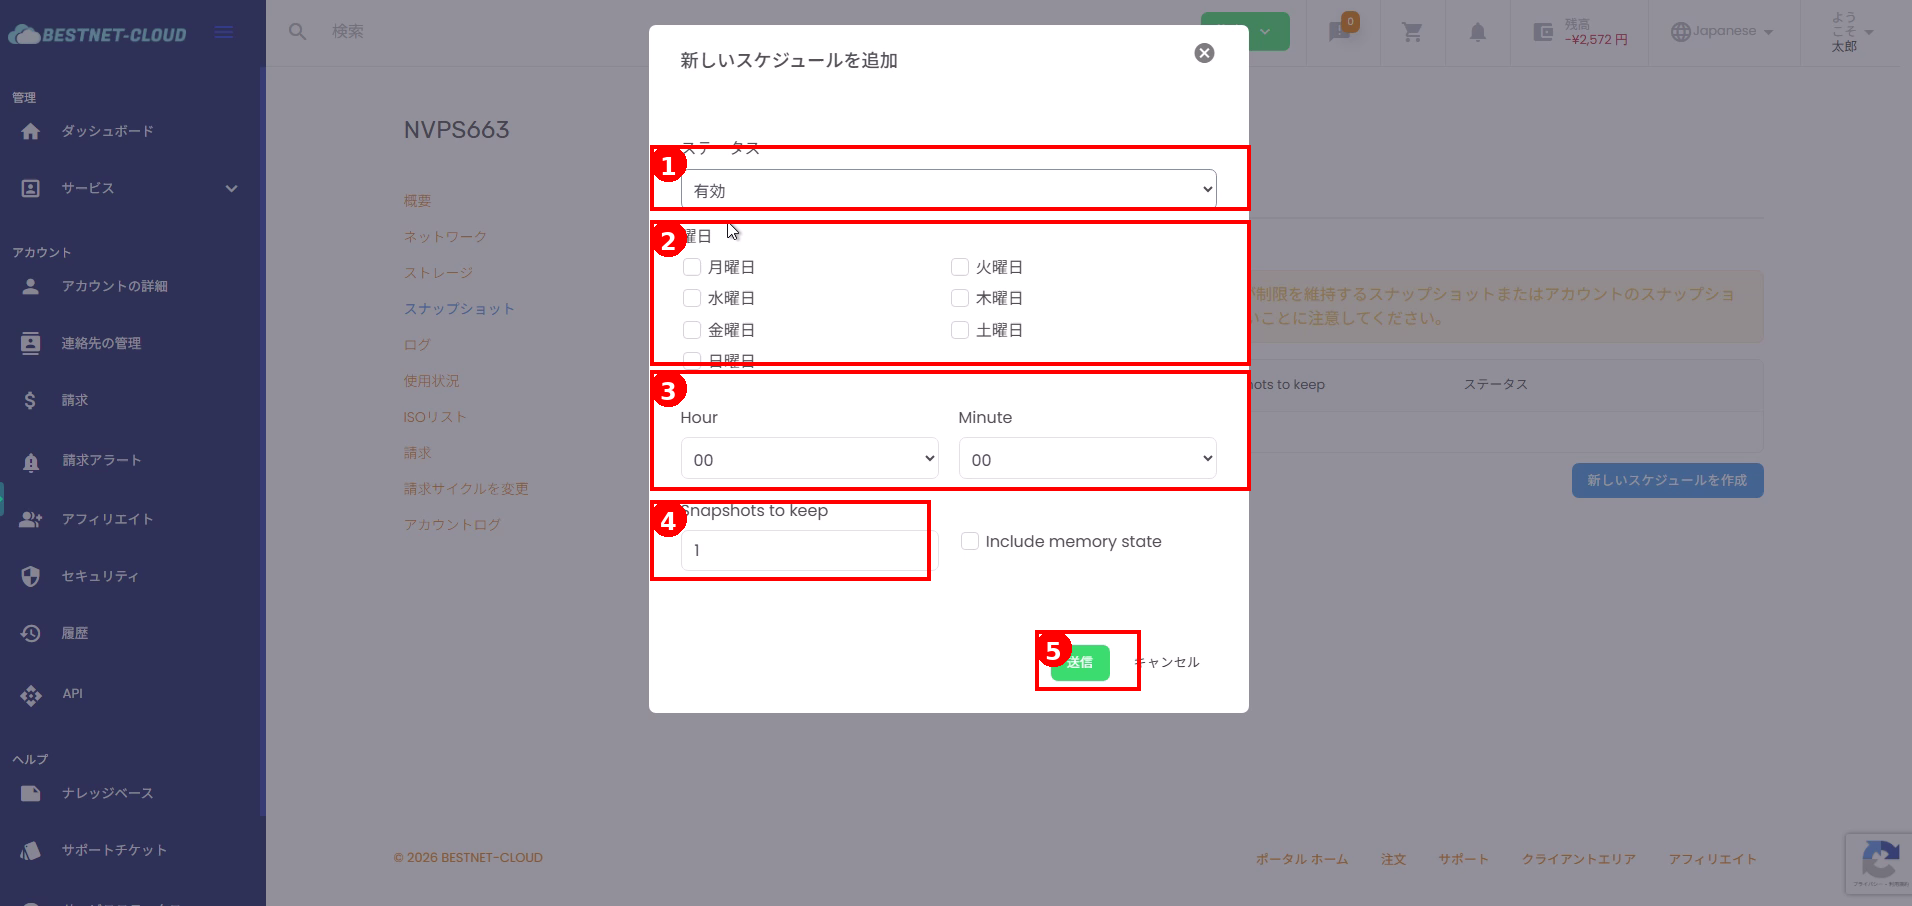
2. Schedule की Details भरें और Submit करें #
- पहले Status (Enabled/Disabled) select करें।
- जिस day of week पर आप automatically snapshots बनाना चाहते हैं, उसे select करें।
- Execution time के लिए Hour / Minute specify करें।
- Retention count के लिए Snapshots to keep specify करें।
- यदि जरूरत हो तो Include memory state configure करें।
- अंत में Submit पर click करें।
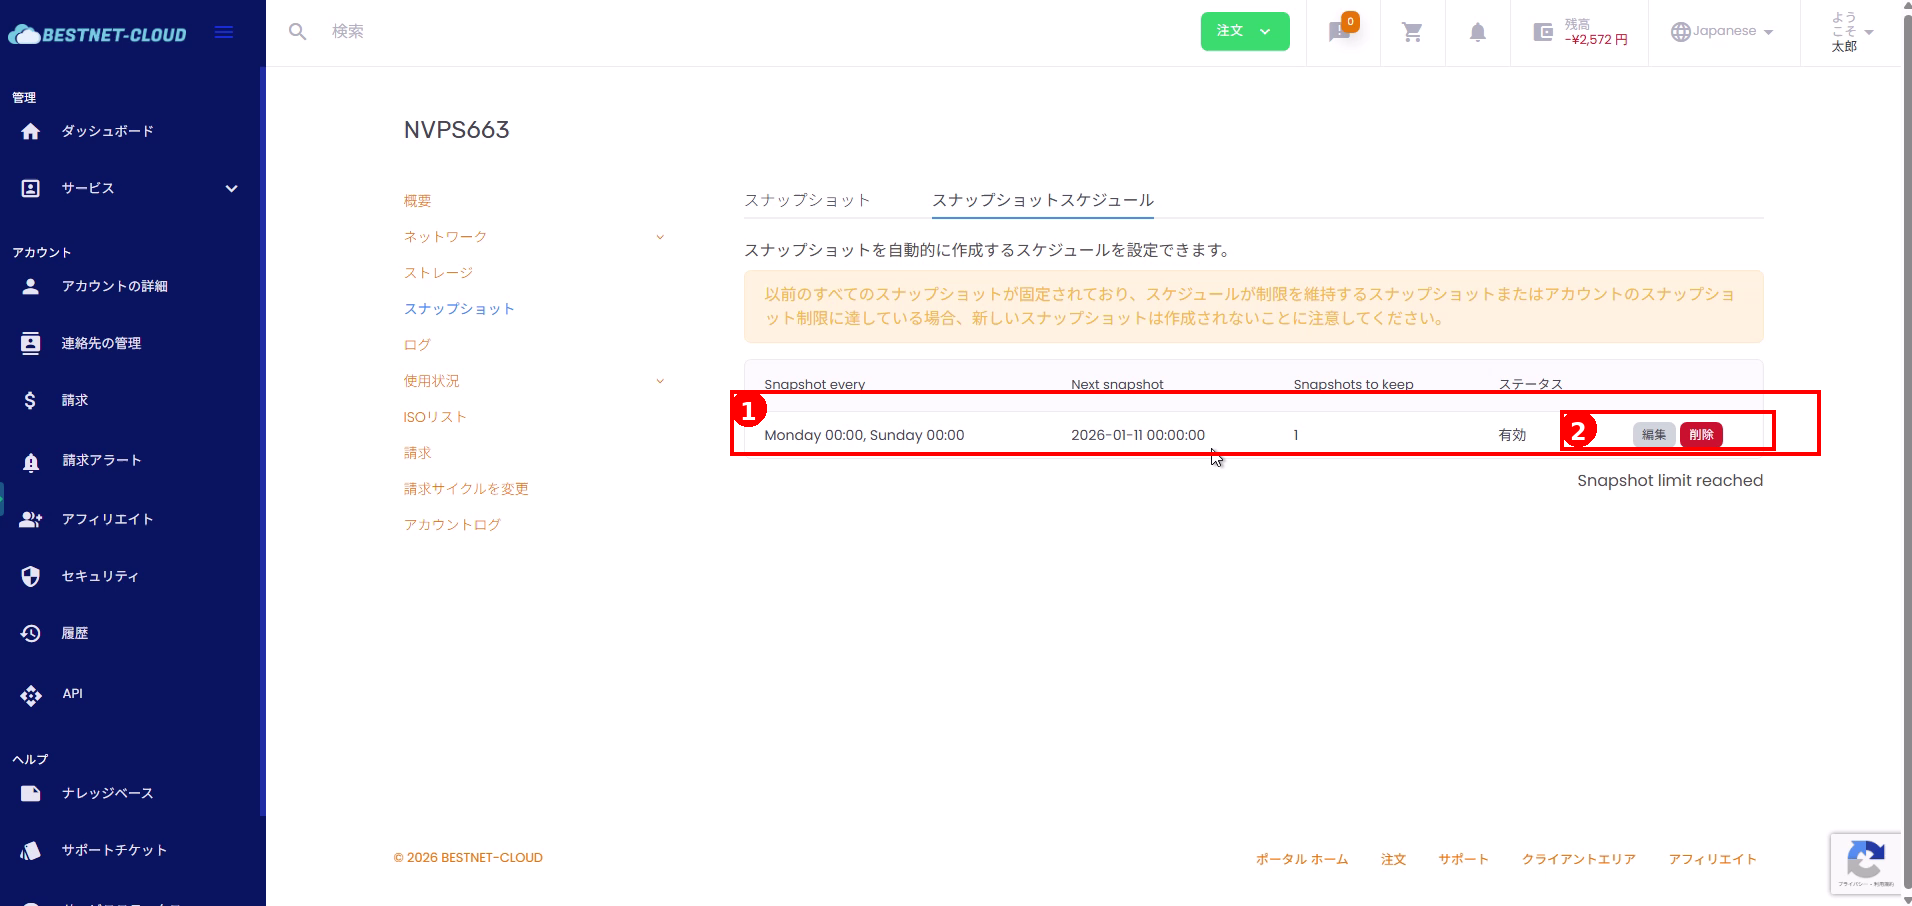
3. बनाया गया Schedule देखें, Edit करें या Delete करें #
- Verify करें कि आपका बनाया गया schedule schedule list में दिखाई दे रहा है (day of week, next execution date/time, retention count, status)।
- जरूरत के अनुसार Edit या Delete पर click करें।
जरूरी बातें (Important Notes) #
Storage Expansion से जुड़ी Restrictions
एक notice दिखाई दे सकता है कि जब तक सभी snapshots delete नहीं हो जाते, storage को expand नहीं किया जा सकता। यदि आपको expansion करना है, तो पहले अपने snapshot operations adjust करें।
Retention Limit पूरी होने पर
यदि आपको Snapshot limit reached या इसी तरह के messages दिखाई दें, तो हो सकता है कि आपकी retention limit पूरी हो गई हो। अनावश्यक snapshots या schedules delete करें, या अपने plan और limit settings review करें।
Retention Count और Pinned के बीच Relationship
जब schedule में retention count specify किया जाता है, तो pinned snapshots और retention conditions के अनुसार नए snapshots नहीं बन सकते।
Troubleshooting #
Snapshots नहीं बन पा रहे
Check करें कि क्या आप अपनी retention limit (Snapshots left = 0) तक पहुंच गए हैं, या क्या ऐसे pinned snapshots हैं जिन्हें delete नहीं किया जा सकता।
Schedule काम नहीं कर रहा
Verify करें कि status “Enabled” set है, day of week और time इच्छित रूप से configure हैं, और retention count setting limit से अधिक नहीं है।
Deletion के बाद भी Snapshot List में दिख रहा है
Deletion asynchronously process हो सकता है। थोड़ी देर wait करें और page refresh करें। अगर issue बना रहता है, तो कृपया support से contact करें।