
Overview #
This procedure document outlines the steps to switch from
standard domain registrar-provided DNS (example: dns*.name-services.com) to
our DNS service (example: dns*.cloudns.net) on our client portal (BESTNET-CLOUD).
The switching process consists of two main phases:
Import existing A / CNAME / MX / TXT and other records to our DNS service.
Change from the registrar’s standard DNS nameservers to our DNS service nameservers.
Step 4 (Record Migration) → Step 3 (NS Cutover) is the safest sequence.
Important #
- The moment you switch nameservers (NS), DNS resolution shifts to our DNS service. If all necessary DNS records are not in place at the time of cutover, Web, email, and various authentication services will be immediately impacted.
- The most common issues are with mail-related records (MX / SPF / DKIM / DMARC), authentication TXT records (Google / Microsoft / various SaaS), SSL auto-renewal records (_acme-challenge), CAA, and SRV records being missed during migration.
- Although this guide presents NS cutover (Step 3) first for screen layout reasons, the recommended sequence to prevent issues is “Step 4 (Record Migration) → Step 3 (NS Cutover)”.
- If DNSSEC is enabled on your domain, DS record updates / deletions may be necessary during cutover (see below).
Disclaimer and Support Information #
- This guide is based on general operational examples. Depending on your domain configuration and use of external services (email, various SaaS, SSL auto-renewal, etc.), the required DNS records and migration procedures may differ.
- We are not responsible for any indirect or consequential damages (loss of opportunity, business interruption, undelivered emails, etc.) resulting from following this procedure.
- If you have any questions / difficulty determining the scope of impact / if DNSSEC is enabled / if you are switching email as well, please open a support ticket from our client portal before beginning work.
Prerequisites #
- You can log in to our client portal
- The target domain appears in “Services > Domains”
- Our DNS service (DNS SERVICE) is enabled
- You can access the current DNS record contents (from the source DNS management console, record list, zone file, etc.)
When you switch nameservers, DNS resolution shifts to our DNS service. Before switching, always confirm that all necessary DNS records are in place (this impacts Web and email services).
Pre-Cutover Checklist (Recommended) #
- I have noted the current DNS record list (A / AAAA / CNAME / MX / TXT / CAA / SRV / NS delegation, etc.)
- If email is in use, I have identified MX / SPF (TXT) / DKIM (TXT) / DMARC (TXT)
- I can identify authentication TXT records (Google / Microsoft / various SaaS) and
_acme-challengeTXT records - I have confirmed the presence or absence of DNSSEC (if enabled, see below)
- If possible, reduce TTL before cutover
※TTL reduction should be performed on the “current authoritative DNS side” and may take time to take effect.
Step 1: Confirm Our DNS Service Nameservers #
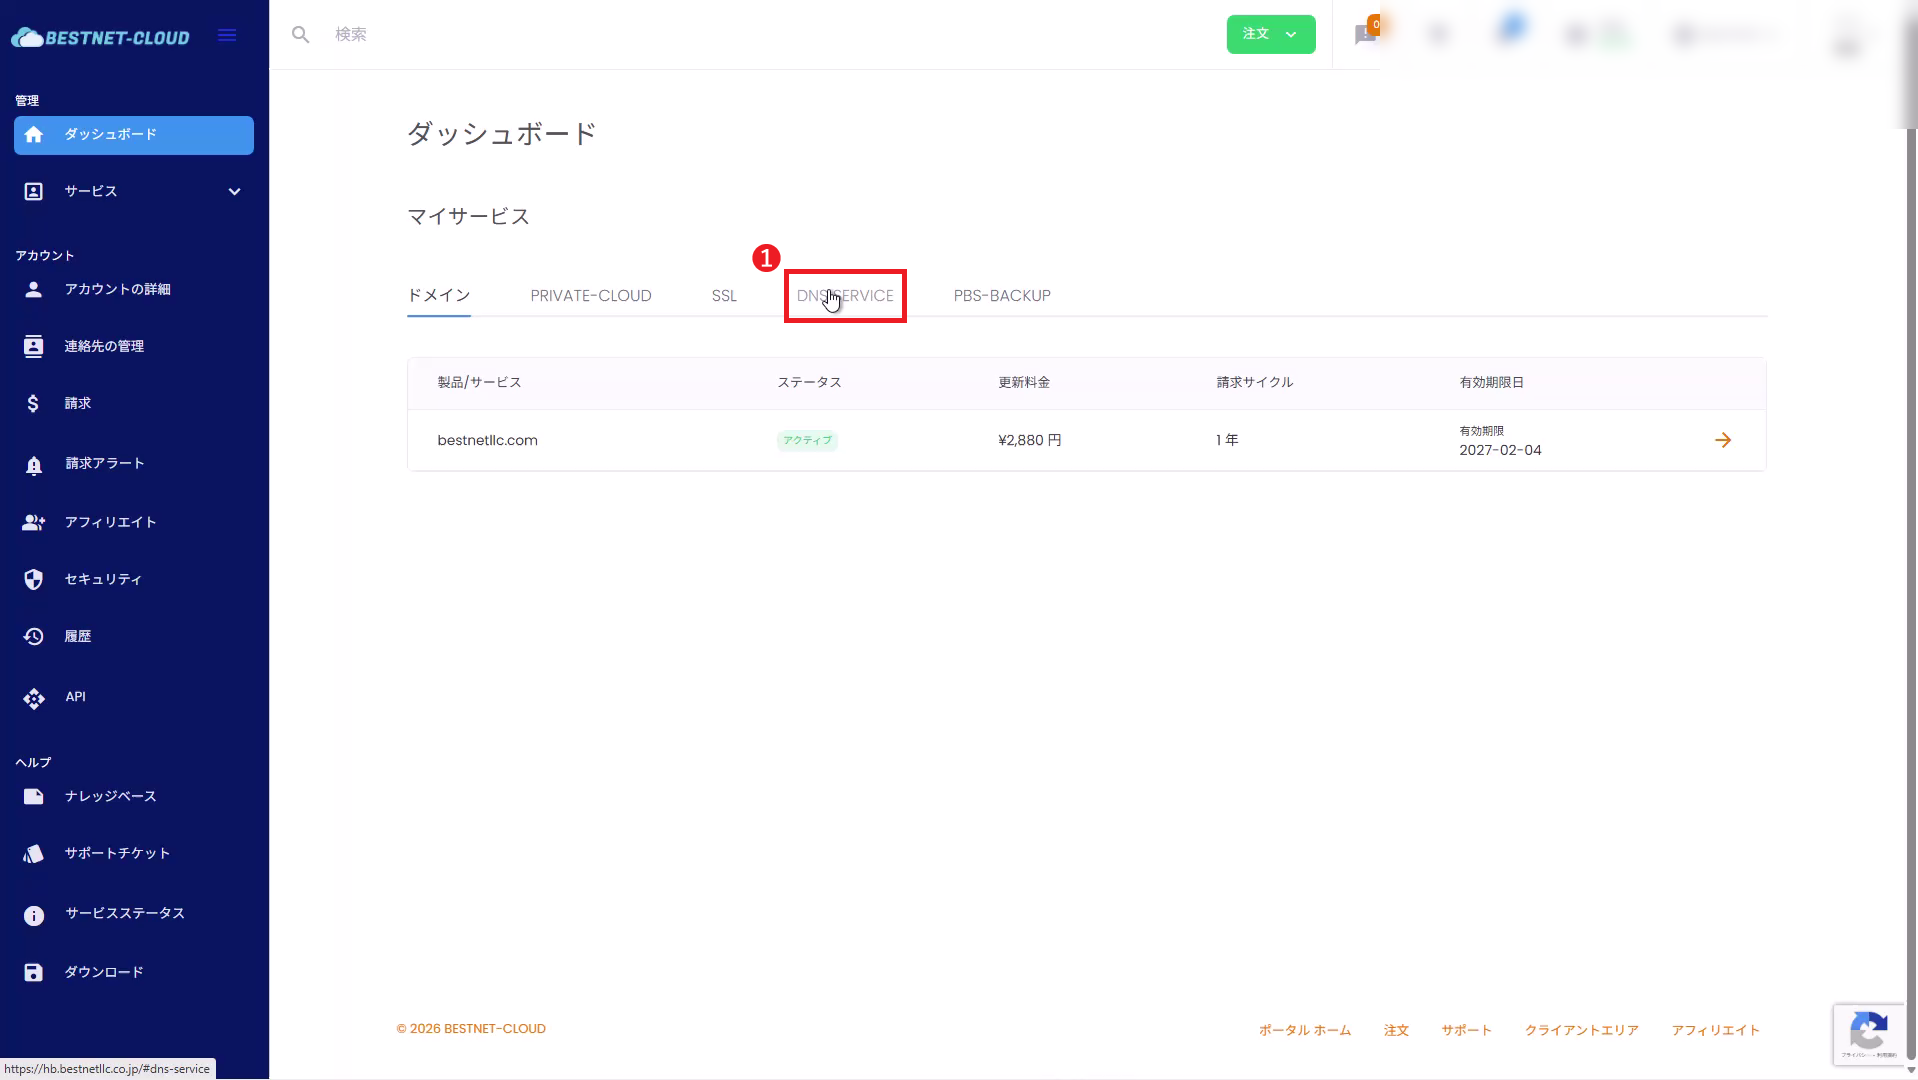
1.1Open DNS SERVICE #
Open DNS SERVICE from “My Services” at the top of the portal.
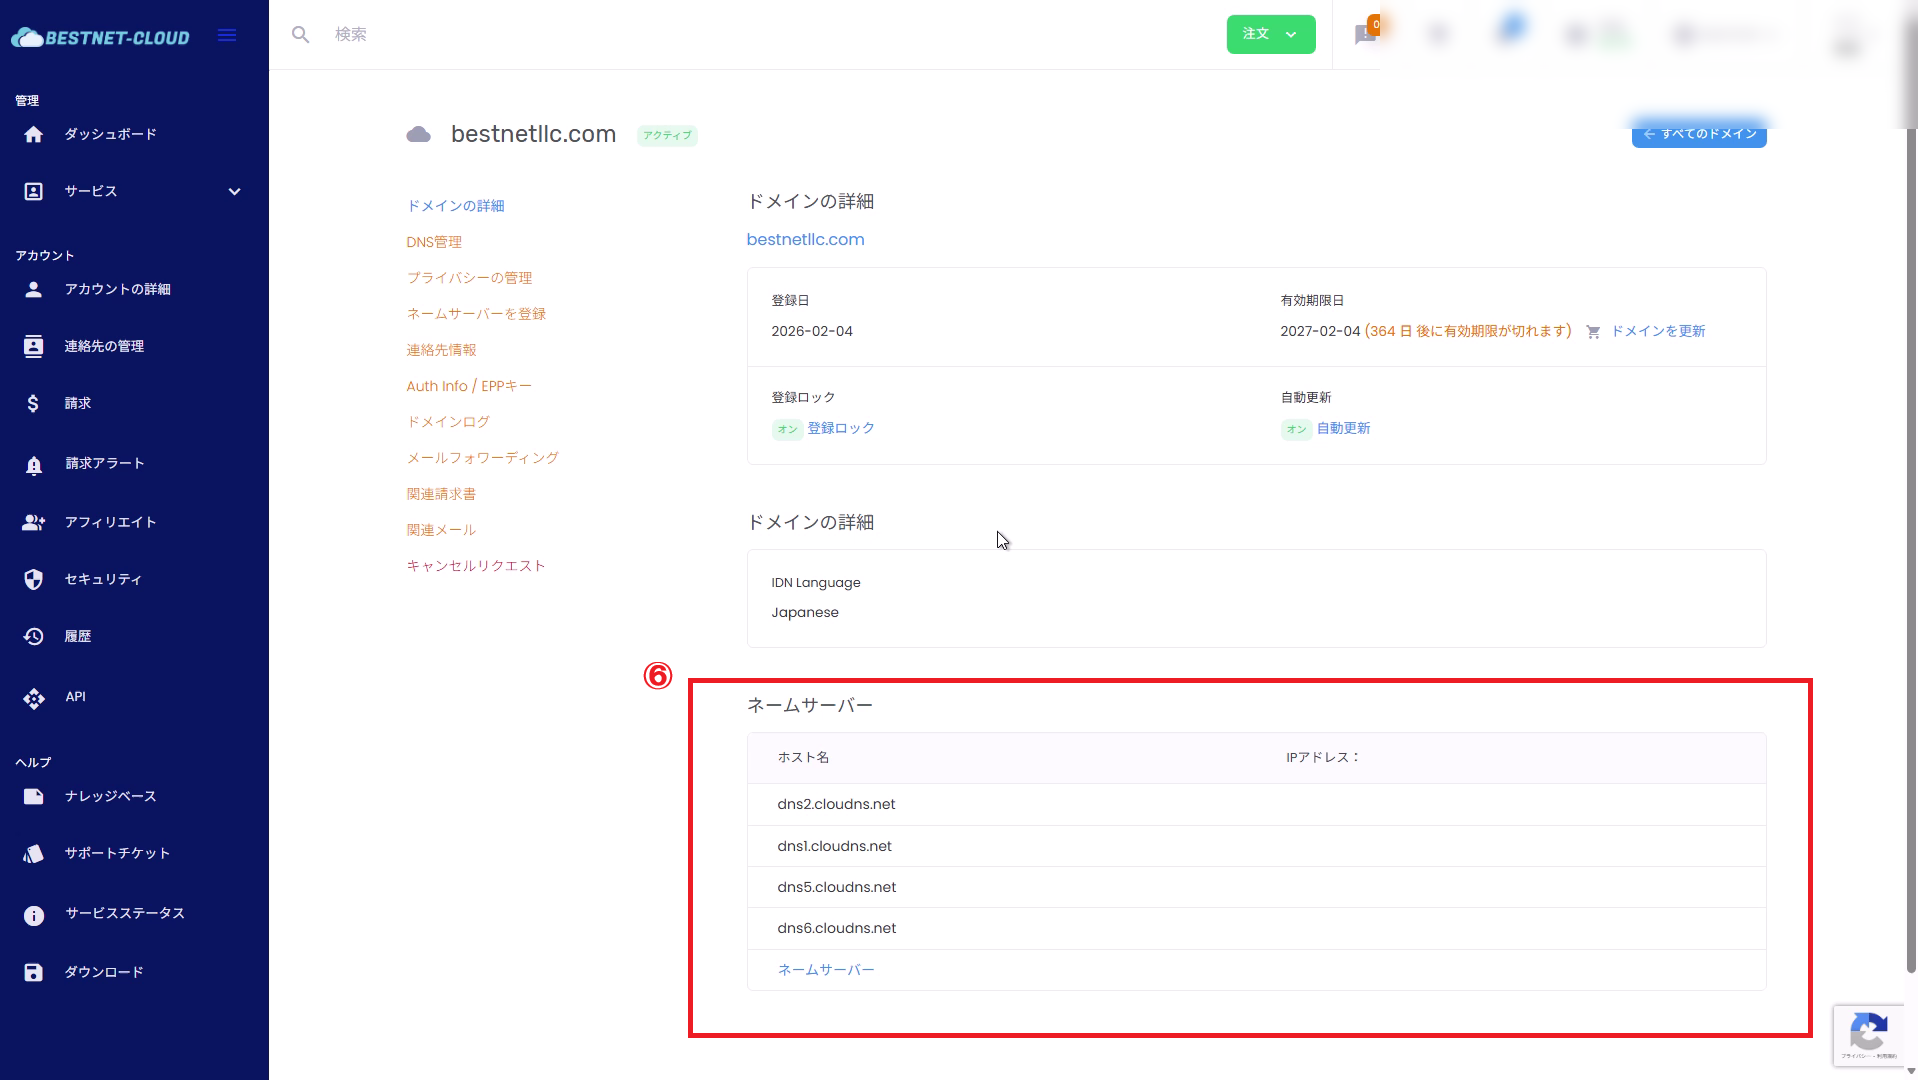
1.2Note the Nameservers to Configure #
From the “Update Domain Registrar Nameservers” table displayed on the DNS SERVICE details screen,
note our DNS service nameservers (NS).
※Since these may change in the future, use the values displayed on this page as the source of truth.
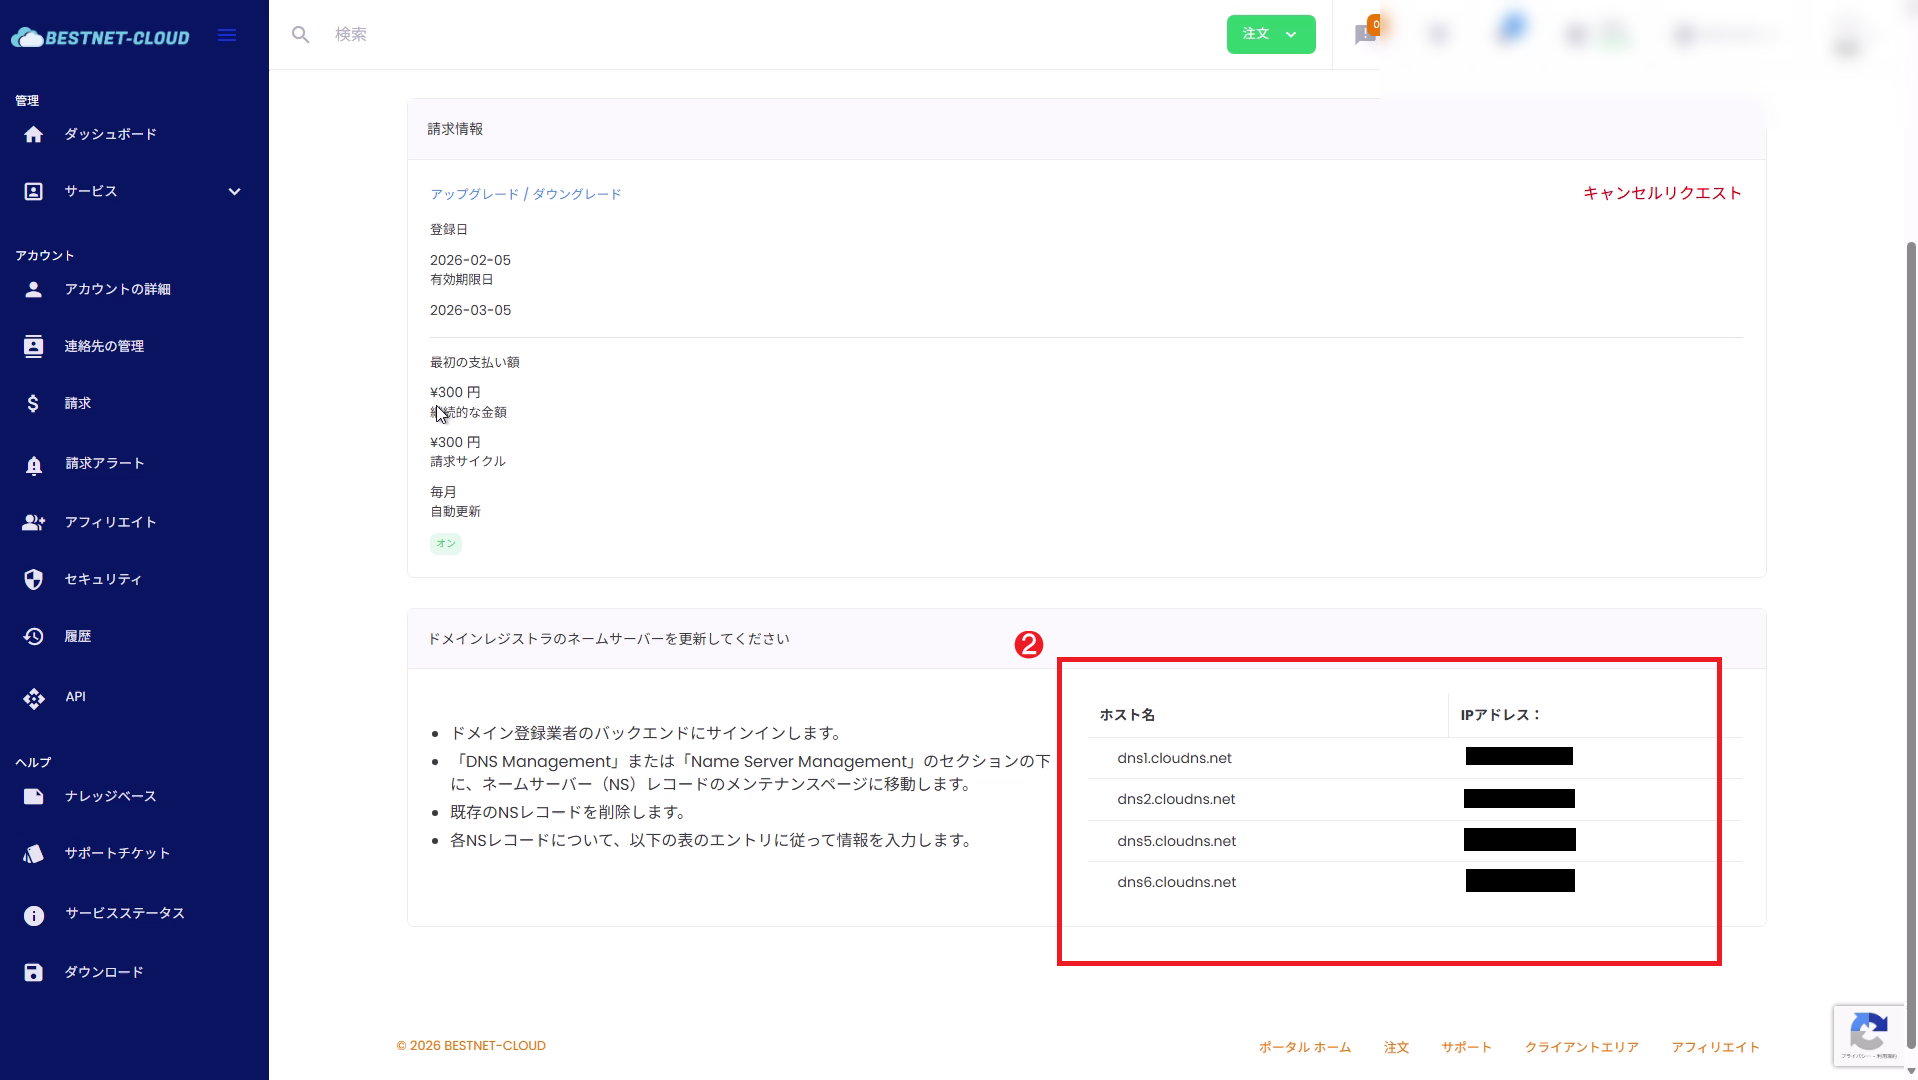
dns1.cloudns.netdns2.cloudns.netdns5.cloudns.netdns6.cloudns.net
Step 2: Open Domain Management Screen #
2.1Open “Services > Domains” #
From the left menu, open “Services” and then “Domains”. Click on the target domain to go to its details screen.

Step 3: Switch Nameservers to Our DNS Service (※Perform as the final step) #
If you perform this “nameserver switch” first, DNS resolution will immediately change, and if records have not been migrated, Web and email will stop. To prevent issues, we recommend completing Step 4 (DNS Record Migration) before performing this step.
3.1Open “Register Nameservers” #
From the domain details menu, open “Register Nameservers”.
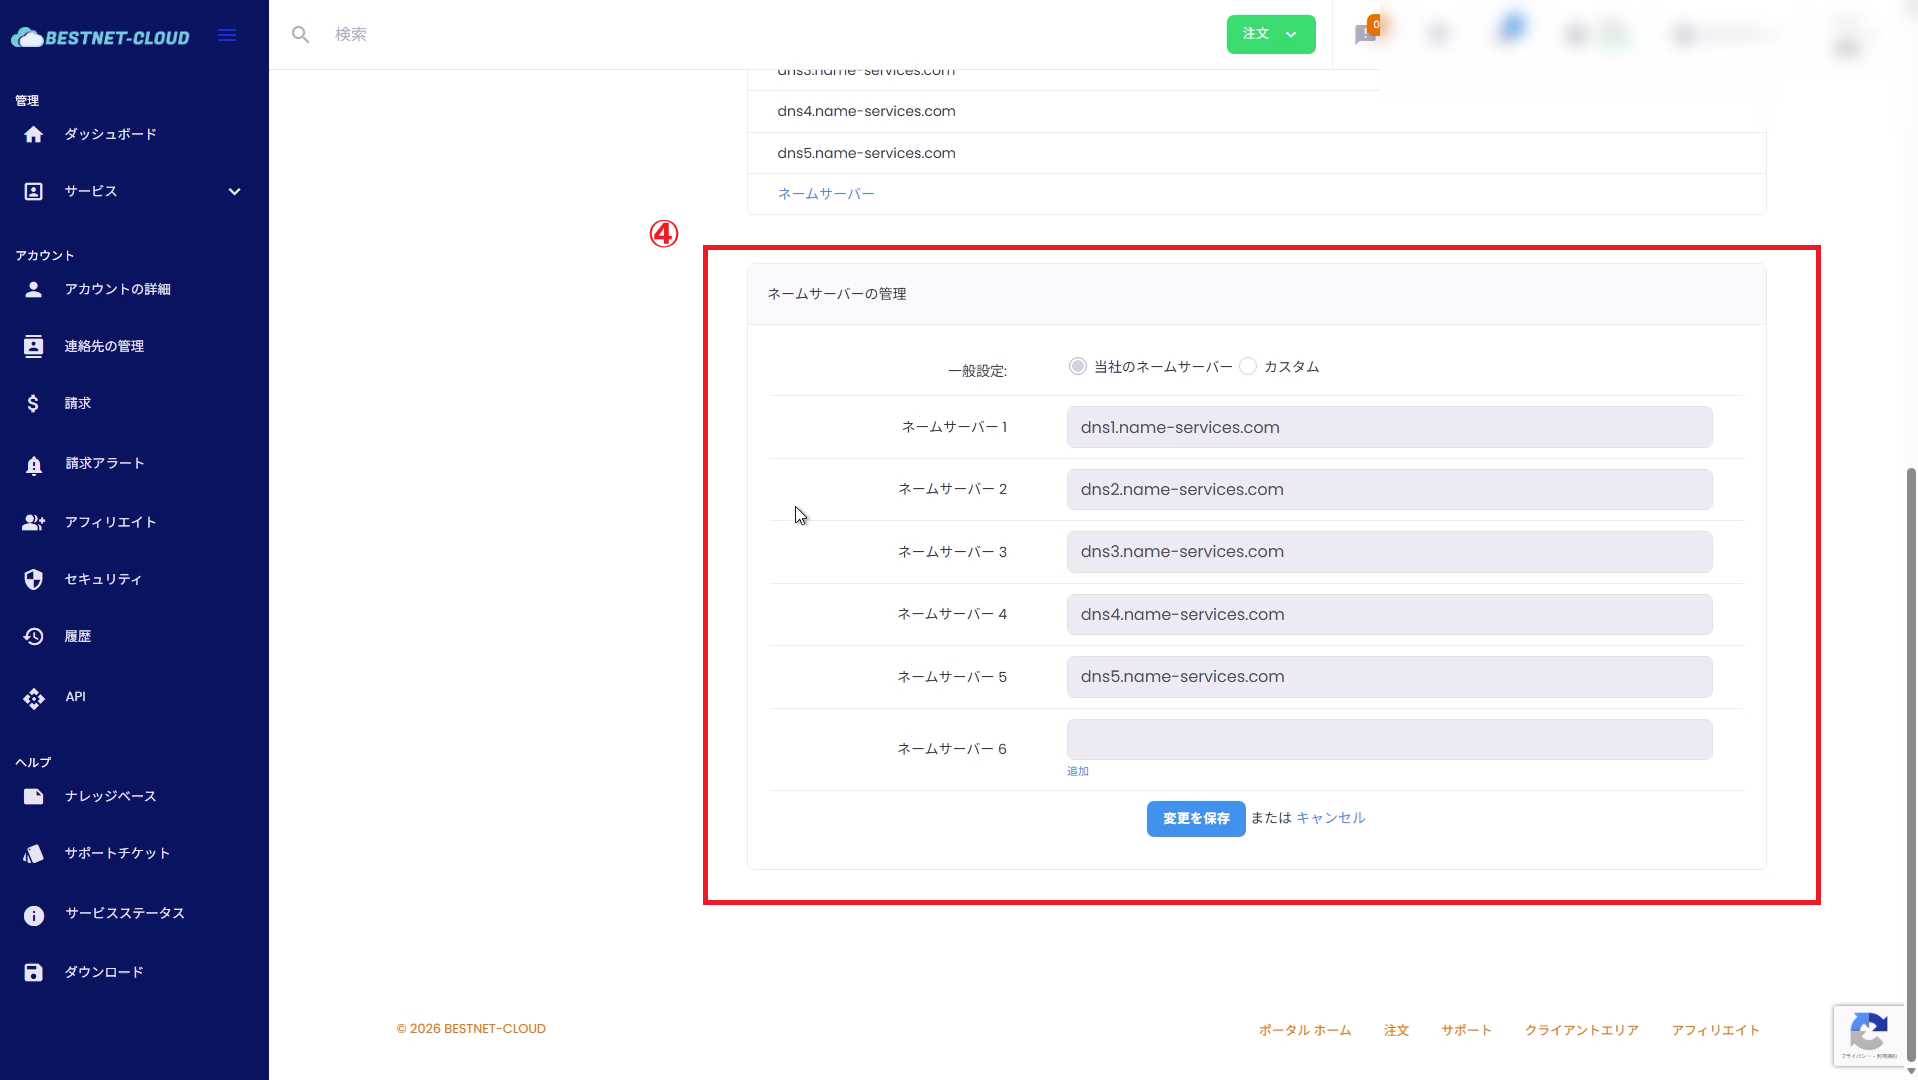
3.2Change General Settings to “Custom” #
In the “Nameserver Management” section, select Custom (input fields become editable).
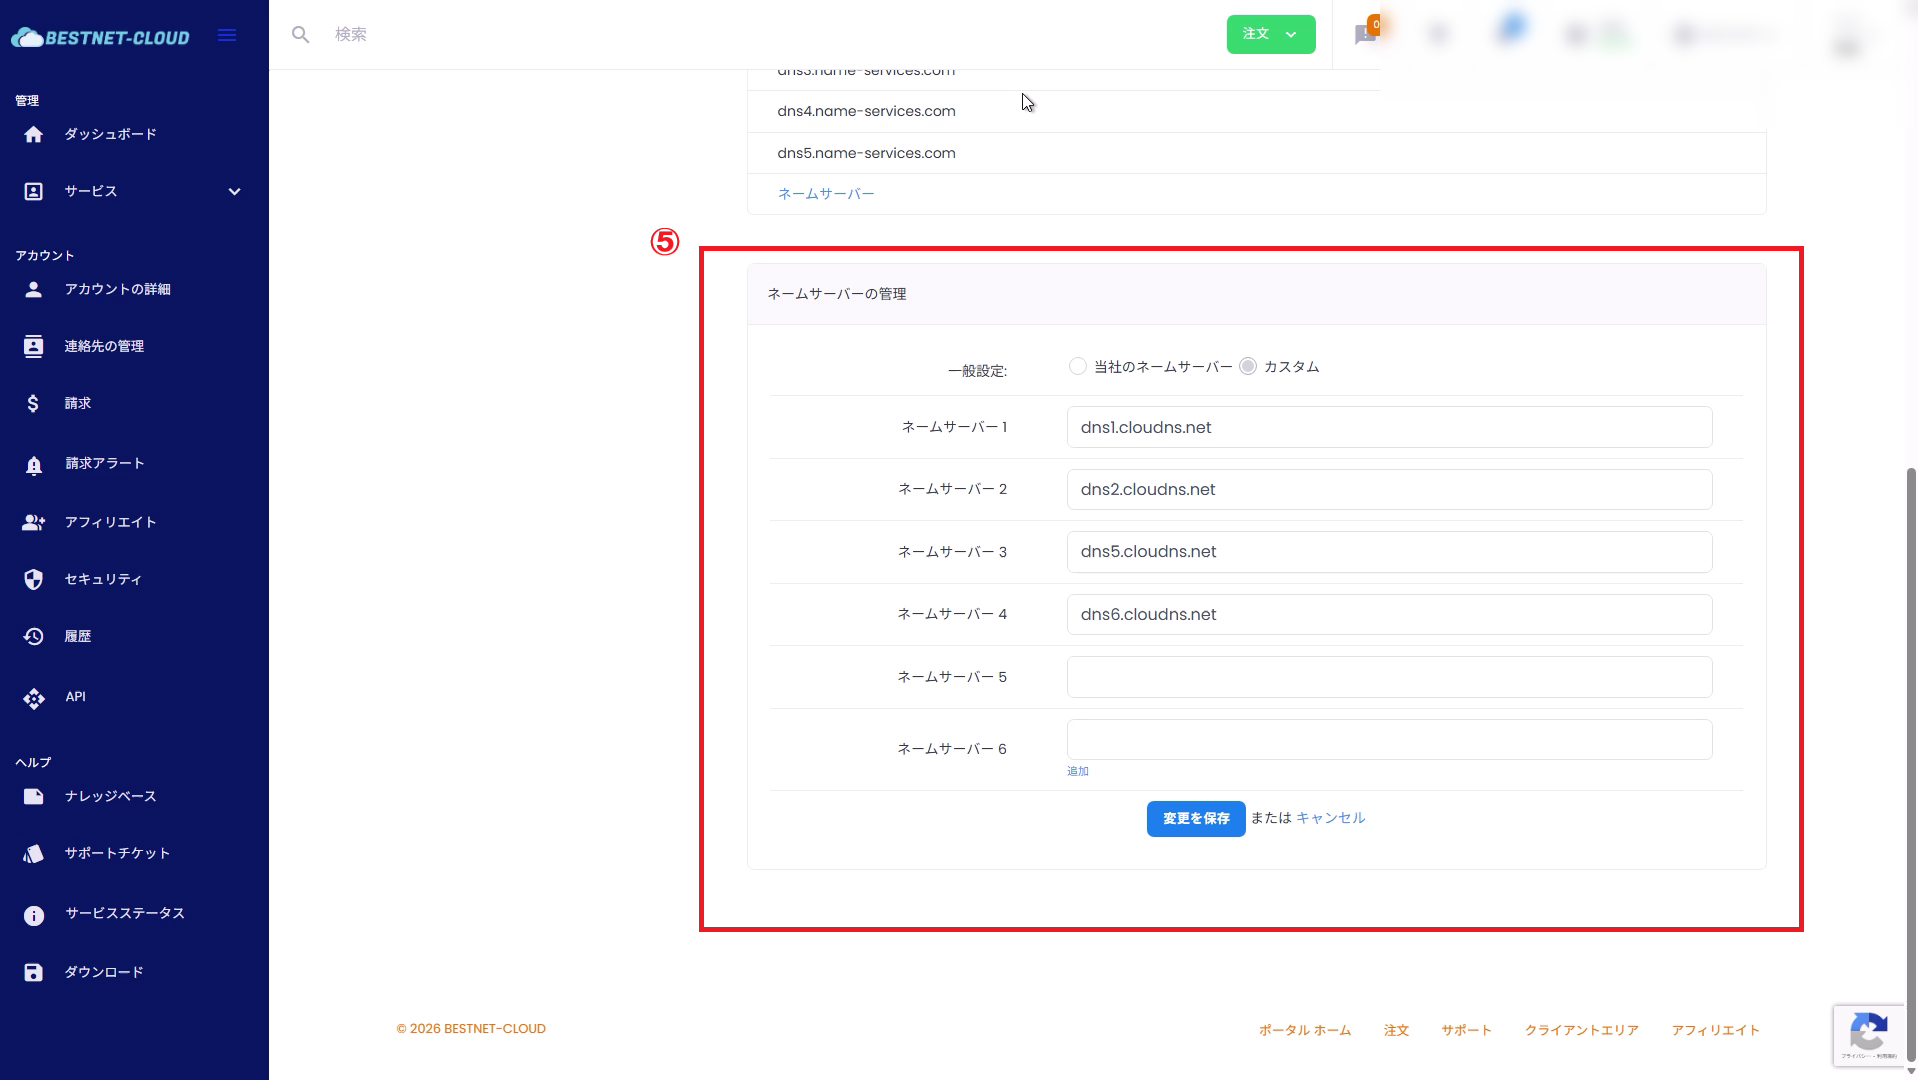
3.3Enter Our DNS Service Nameservers and Save #
In nameserver fields 1–4, enter the hostnames noted in Step 1.2. After entering, click Save Changes.
- Nameserver 1:
dns1.cloudns.net - Nameserver 2:
dns2.cloudns.net - Nameserver 3:
dns5.cloudns.net - Nameserver 4:
dns6.cloudns.net - Nameserver 5 / 6: Unused (leave blank)
3.4Verify Changes Have Taken Effect #
After saving, verify that dns*.cloudns.net is displayed in the “Nameservers” list on the domain details screen.
Step 4: Migrate Existing DNS Records to Our DNS Service (Important) #
Records (A / CNAME / MX / TXT, etc.) that were running on the standard registrar DNS must be migrated to our DNS service. There are two main migration methods:
- Zone File Import (Recommended: Most reliable)
- AXFR (Zone Transfer) Import (Only if the source DNS permits AXFR)
- Web: A / AAAA / CNAME (www, etc.)
- Email: MX / SPF (TXT) / DKIM (TXT) / DMARC (TXT)
- Authentication: Google / Microsoft / various SaaS verification TXT
- Auto-renewal:
_acme-challenge(TXT) - Other: CAA / SRV / subdomain delegation (NS)
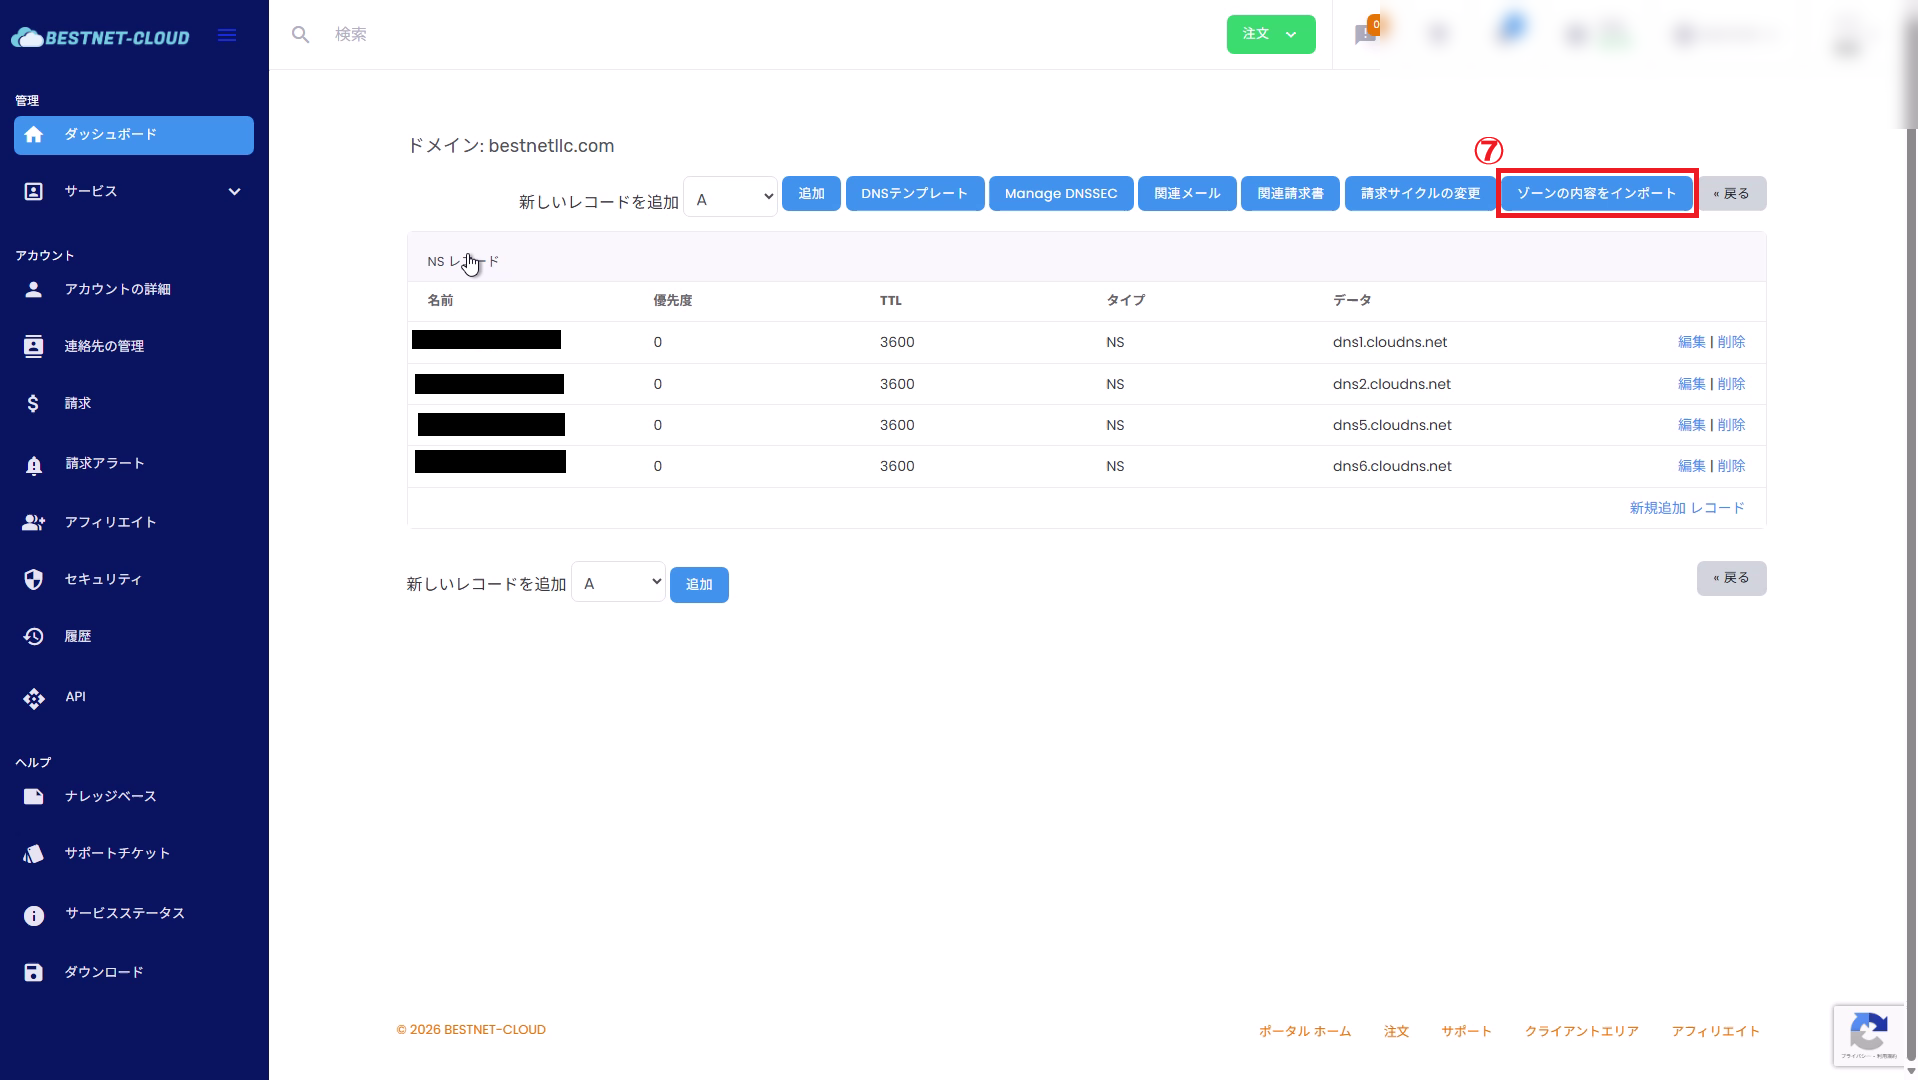
4.1Open DNS Management and Click “Import Zone Contents” #
From the domain details menu, open “DNS Management” and click Import Zone Contents at the top.
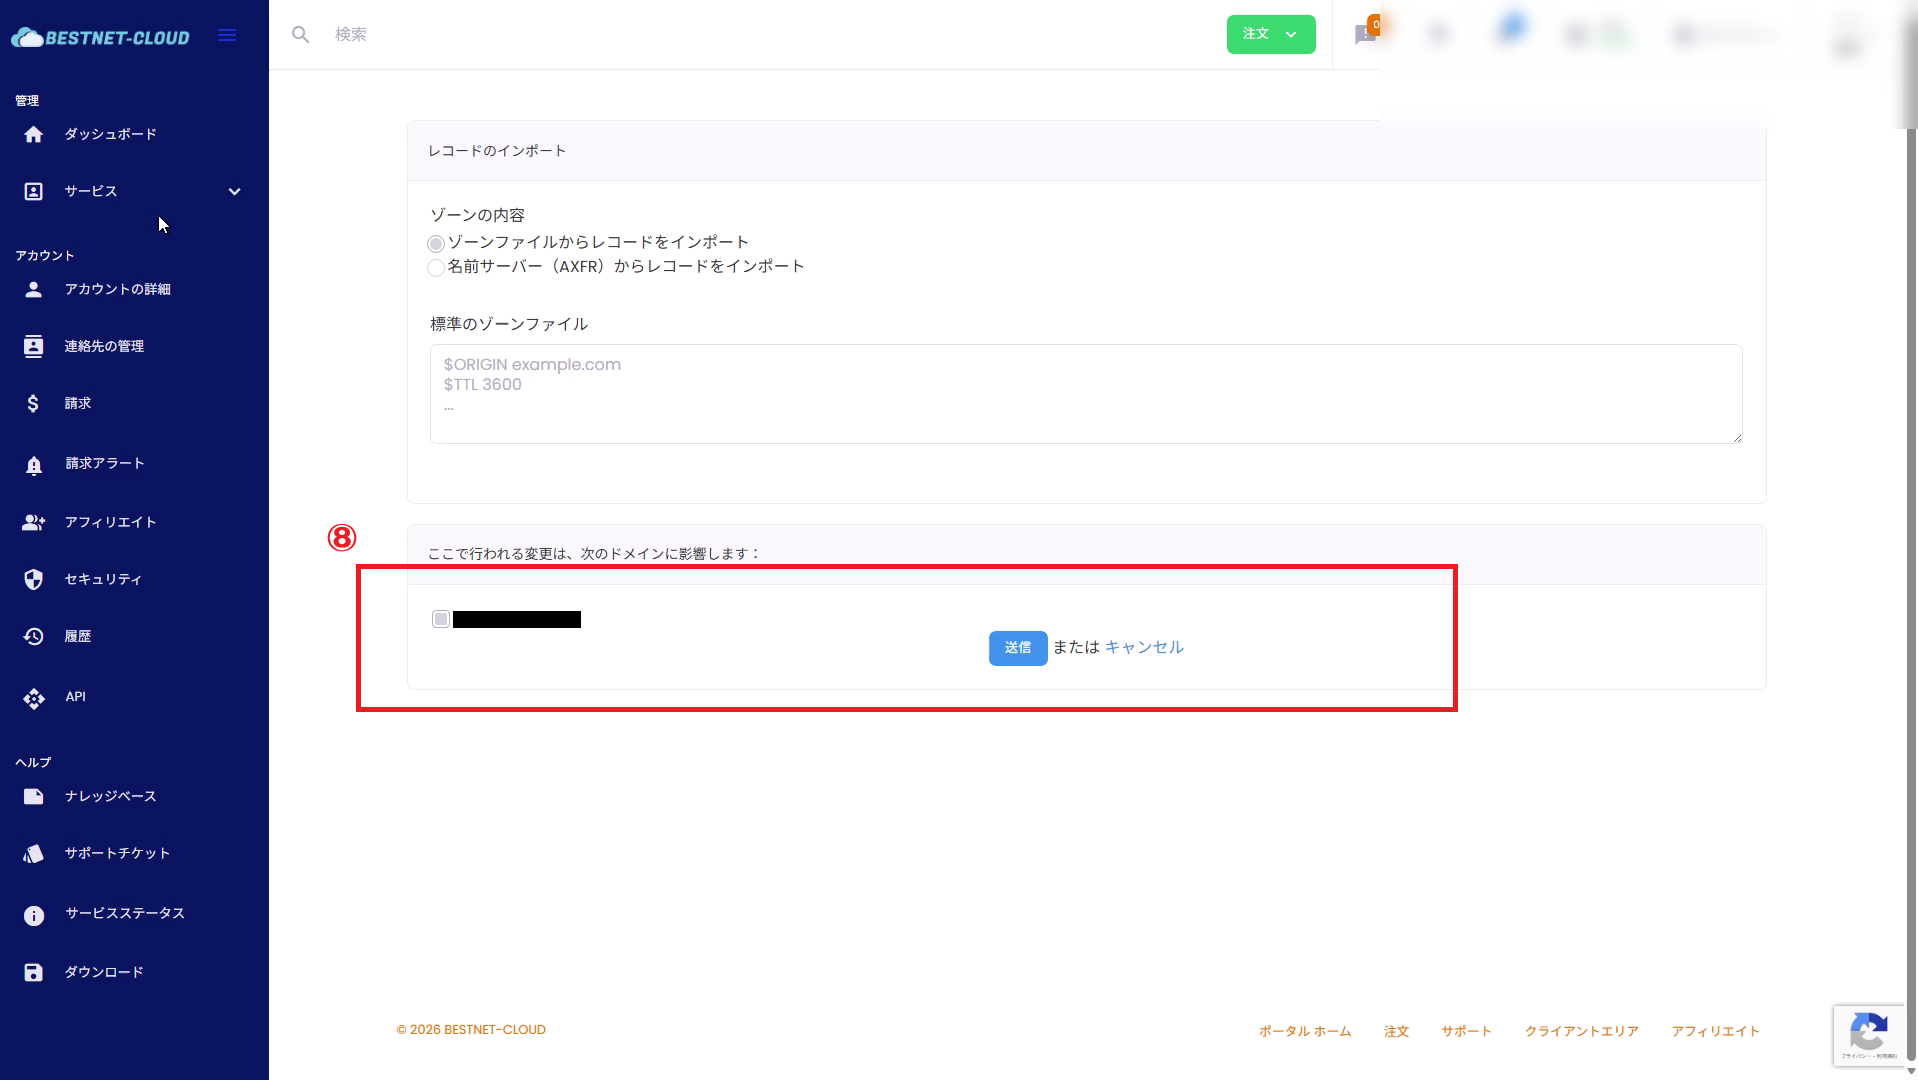
4.2Import Records from Zone File #
Select “Import Records from Zone File” and paste the zone file contents (BIND format, etc.) exported from your current DNS service. Check the target domain and click Submit.
To avoid problems immediately after cutover, always verify the following after import:
- A / AAAA / CNAME records needed for Web publication are in place
- If email is in use, MX / SPF (TXT) / DKIM (TXT) / DMARC (TXT) are in place
- TTL values are set as intended (short TTL during cutover; return to appropriate values after stabilization)
4.3Import Records from Nameserver (AXFR) #
If your current DNS provider permits zone transfer (AXFR), you can select “Import Records from Nameserver (AXFR)” to retrieve records. If AXFR is not permitted, use the zone file import method from 4.2 or add records manually.
DNSSEC Notes (If Applicable) #
- If DNSSEC is enabled on your domain, DS record mismatch after NS cutover can cause name resolution to fail.
- To continue using DNSSEC, you may need to update the DS records at the registrar to values corresponding to our DNS service’s DNSKEY.
- If determination is difficult, please open a support ticket from our client portal before beginning work.
Post-Cutover Verification #
- Nameservers are correct (3.4)
- All necessary DNS records are in place (4.2)
- Name resolution works from external sources (example:
dig/nslookup/ online DNS checker)
External Verification Examples (Recommended)
dig NS example.comdig +trace example.comdig A example.comdig A www.example.comdig MX example.comNameserver changes may take time to propagate across the internet (several minutes to approximately 48 hours depending on environment).
Troubleshooting #
Check if general settings are set to “Our Nameservers” or similar, and select “Custom”.
There may be missing required records on our DNS service. Re-verify the old DNS records and import or add them manually.
This could be due to duplicate records with the same name, CNAME conflicts with other records, or remaining TTL cache. Review your record list and TTL values.
If DNSSEC is enabled, DS record updates at the registrar may be necessary. Depending on your operational policy, consider disabling DNSSEC before switching.
Need Help? (Opening a support ticket) #
If you have any questions or encounter issues that are not resolved after cutover, please open a support ticket from our client portal.
Including the following information will speed up our verification:
- Target domain name
- Date and time work was performed (approximate is fine)
- Configured nameserver values (values noted in 1.2)
- Screenshot of relevant record list on our DNS service
- External verification results (example: results of
dig NS example.com/dig +trace example.com) - Description of issues encountered (Web not accessible / email not being delivered, etc.)
Appendix: Our DNS Service Nameserver List #
※Use the values displayed on the DNS SERVICE screen as the source of truth (they may change in the future).
| Hostname | IP Address |
|---|---|
dns1.cloudns.net |
185.136.96.77 |
dns2.cloudns.net |
185.136.97.77 |
dns5.cloudns.net |
185.136.98.77 |
dns6.cloudns.net |
185.136.99.77 |


