
Domain Contacts Setup Guide
How to Change Domain Contacts #
Instructions for changing the Domain Contacts (Registrant Contact / Administrative Contact / Technical Contact / Billing Contact) for your domain from the client portal.
In this guide, domain contact names are always listed in English (Registrant Contact, etc.).
Overview #
You can change various Domain Contacts from the “Contact Information” section on the domain details screen. When entering information, please register names, addresses, company names, etc. in English (Roman characters).
Prerequisites #
- You are logged into the client portal
- The target domain is displayed in the portal’s “Domain” list
- You have prepared the contact information to be entered (name, address, company name, etc.) in English (Roman characters)
Operating Procedures #
1Open the “Domain” list #
Open “Domain” from the left menu to display the domain list screen.
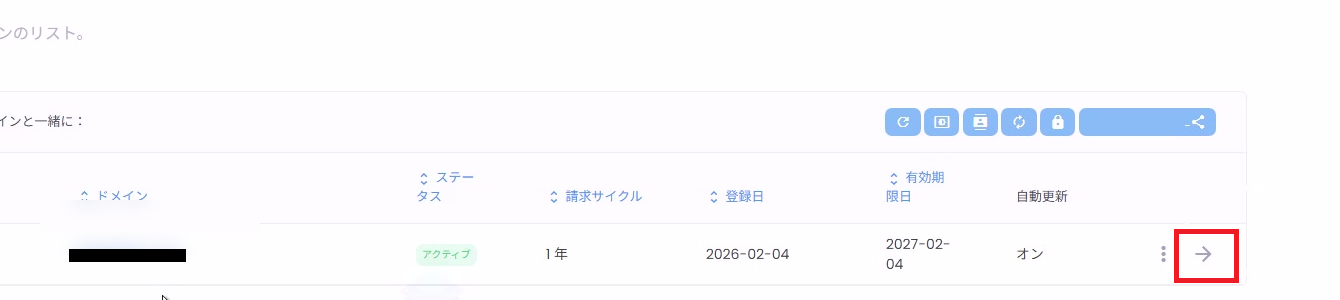
2Open the details of the domain you want to change #
In the domain list, click the arrow (→) at the right end of the target domain row to open the details screen.
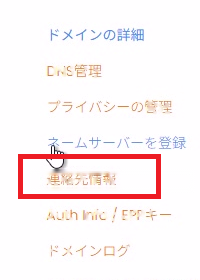
3Open “Contact Information” #
From the left menu on the domain details screen (“Domain Details”), click “Contact Information”.
4Set Registrant Contact #
In the Registrant Contact section (displayed as “Registrant Contact” on the screen) under “Contact Information”, select the setup method.
- Custom: Manually enter information into the form
- Use an existing contact: Select an existing contact from the dropdown
If entering manually, fill in the following items in English (Roman characters).
- First Name / Last Name
- Company Name
- Email Address
- Address / City / State
- Postal Code
- Country
- Phone

5Set Administrative Contact and Technical Contact #
Next, set the Administrative Contact and Technical Contact.
Setup methods available for each contact type
- Custom: Manually enter into the form
- Same as Registrant: Use the same information as Registrant Contact
- Use an existing contact: Select an existing contact

6Set Billing Contact #
Set the Billing Contact in the same manner.
- Custom: Manually enter into the form
- Same as Registrant: Use the same information as Registrant Contact
- Use an existing contact: Select an existing contact

7Save changes #
After setting all contacts (Registrant Contact / Administrative Contact / Technical Contact / Billing Contact), click “Save Changes” at the bottom of the screen.

Additional Notes and Cautions #
- Contacts available for selection through “Use an existing contact” are obtained from the “Contact Management” section registered on the account side.
- Depending on the registry (TLD), there may be restrictions on contact changes. If an error is displayed after saving, review the entered information (English characters, required fields).
- Changes may take time to reflect.


