
Infrastructure / Self-hosted AI Agent
Installing OpenClaw on Ubuntu 24.04 #
Following Windows Server 2019 and Windows 11, we have verified OpenClaw installation on Ubuntu 24.04.
The Linux native environment is officially supported and is significantly simpler compared to Windows environments.
However, there is a pitfall requiring device pairing approval for remote dashboard access.
We are publishing the complete record including those procedures.
Ubuntu 24.04
Linux
nginx
HTTPS
GPUStack
This article is a continuation of OpenClaw installation records for “Windows Server 2019” and “Windows 11”.
PATH issues, npm bugs, and NODE_OPTIONS problems that caused trouble in Windows environments did not occur at all on Ubuntu.
Environment Configuration #
OpenClaw Host
- Ubuntu 24.04 LTS
- OpenClaw v2026.4.10 (npm installation)
- Node.js v22.22.2 (automatically set up by installer)
- nginx reverse proxy (443/HTTPS)
- Gateway port: 18789 (loopback)
Model and Search Backend
- GPUStack + vLLM 0.17.1
- Qwen2.5-14B-Instruct
- SearXNG (on-premises)
- Custom Provider (OpenAI-compatible)
On Ubuntu, the official installer (
install.sh) alone completes everything from Node.js setup to OpenClaw installation and onboarding.Since systemd is available, Gateway service registration is also performed automatically.
Installation Steps #
Update packages and install required tools #
Install OpenClaw #
Run the official installer. Node.js setup is also handled automatically.
The installer automatically performs the following:
- Install Node.js v22 (via NodeSource)
- Install build tools (make / g++ / cmake)
- Install OpenClaw npm package
- Launch the onboarding wizard
Difference from Windows
On Ubuntu, npm installation does not produce MODULE_NOT_FOUND errors.
Switching to pnpm is not necessary. The official installer works as-is.Onboarding #
The wizard launches automatically after installation completes. The configuration items are as follows:
- Security warning: Continue with
Yes - Setup mode:
QuickStart - Model provider: Custom Provider
- Base URL:
http://<GPUStack IP>/v1 - API Key provision method: Paste API key now
- Endpoint compatibility:
OpenAI-compatible - Model ID: Model name running on GPUStack
- Channel: Skip for now
- Skill dependencies: Skip for now
- Web search: SearXNG Search → Enter URL
- Hooks: Enable only
session-memory
After onboarding completes, a systemd service is automatically installed and started.
- Security warning: Continue with
Fix context limit and model configuration (important) #
If you chat immediately after onboarding, a
Context limit exceedederror may appear.
You can avoid this by performing the following settings immediately after installation.Method ①: Configure from dashboard UI (recommended) #
Dashboard left menu “AI and Agents” →
“Models” tab → Open “Compat” section for the relevant model,
set the following values and press “Save”.- Context Tokens:
65536 - Context Window:
65536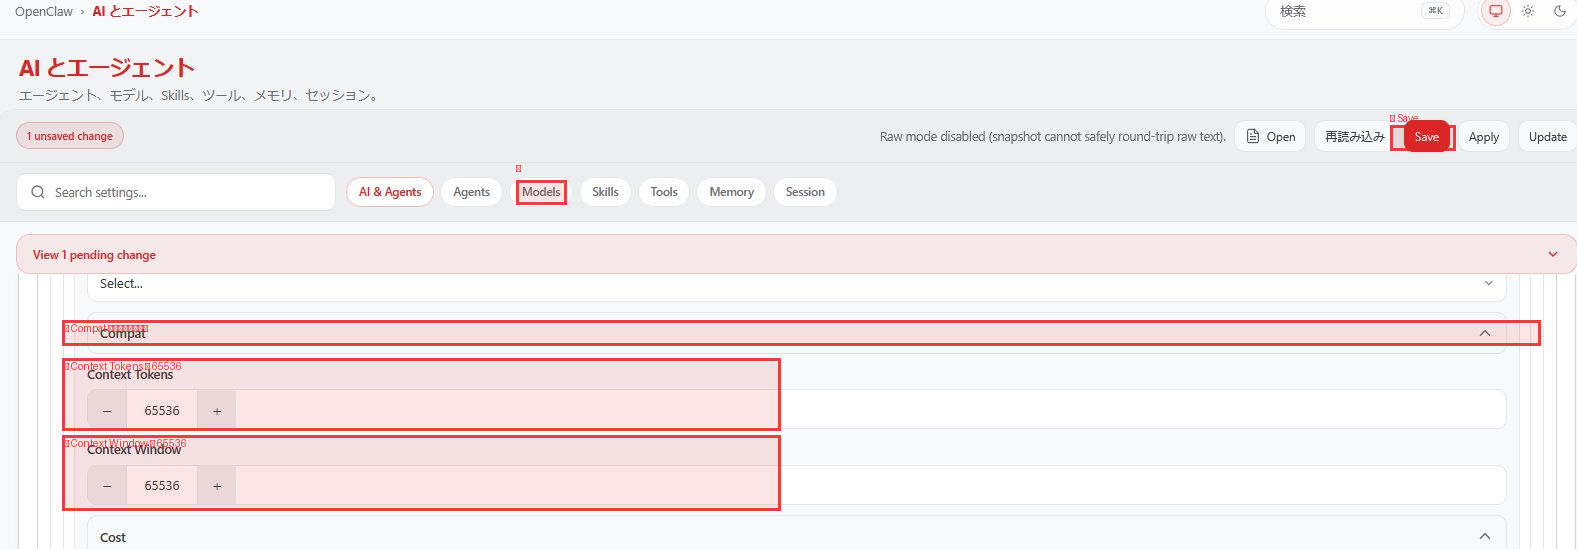
- Max Tokens:
4096(keep default)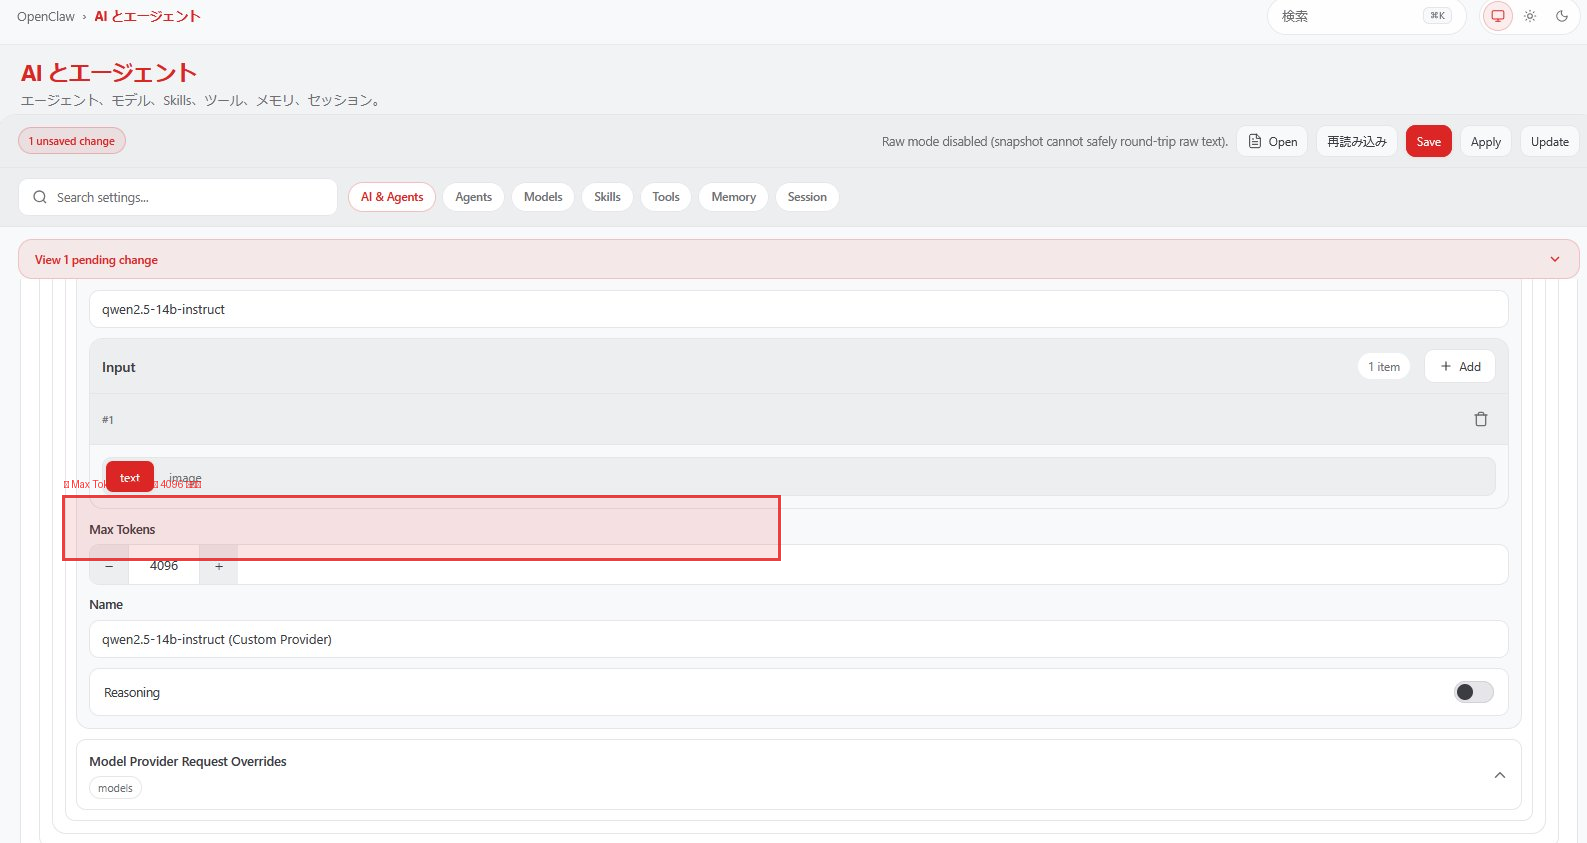
Method ②: Configure from command line #
Configuring from UI is more reliable
Setting from the dashboard immediately reflects changes and prevents configuration mistakes.
After CLI configuration,openclaw gateway restartis always required.- Context Tokens:
Verify Gateway startup #
If
enabledis displayed, the Gateway will auto-start on OS boot.
Remote access configuration (nginx + self-signed certificate) #
If you want to use the dashboard from another computer across the network, configure nginx as a reverse proxy.
Since WebSocket is used, the nginx configuration requires Upgrade header forwarding.
Device pairing approval for remote access #
When accessing the dashboard from another computer, a pairing required error is displayed.
This is an OpenClaw security feature that requires administrator approval on first access.
Once approved, it is not required afterwards.
The
openclaw pairing command used for channel (Telegram, Discord, etc.) pairing is not used here.Dashboard device approval uses the
openclaw devices command.Access dashboard from browser #
Open the token-included URL in a browser. Verify on the server side.
The browser displays
pairing required. Proceed to the next step with this state.Check pending list and approve #
If there are multiple requests pending, approve all of them.
Reconnect from browser #
After approval, press the “Connect” button in the browser to open the dashboard.
Once a device is approved, it does not require re-approval even if the Gateway is restarted.
Clearing browser cache or using a different browser will treat it as a new device and require re-approval.
GPUStack configuration #
In the GPUStack management screen, add the following to the model’s backend parameters and restart the model.
Comparison with Windows environment #
Points that became easier on Ubuntu
- Automatic setup of everything from Node.js with
install.shalone - No MODULE_NOT_FOUND errors (pnpm not needed)
- No PATH issues or NODE_OPTIONS problems
- Gateway automatically registered as systemd service
- Easy reverse proxy configuration with nginx
Work still required on Ubuntu
- Manual configuration of contextWindow / compaction
- GPUStack backend parameter configuration
Operation verification checklist #
openclaw --versionis displayedsystemctl --user is-enabled openclaw-gateway.serviceshowsenabledopenclaw gateway statusdisplaysRPC probe: ok- Access
https://<server IP>from browser on another computer - Device approval is completed with
openclaw devices approve - Chat responses are returned in
mainsession - Session screen TOKENS shows
xxxxx / 32768 - SearXNG search functions
Summary #
Installing OpenClaw on Ubuntu 24.04 was significantly simpler compared to Windows environments.
Simply running the installer completes everything from Node.js setup to service registration.
The only pitfall is device pairing for remote dashboard access.
Be careful to use openclaw devices instead of openclaw pairing (for channels).
Also, configuring contextWindow and compaction settings immediately after installation prevents
context overflow immediately after starting conversations.
Installation difficulty ranking is Ubuntu 24.04 << Windows 11 < Windows Server 2019.
If you can choose a Linux environment, Ubuntu is highly recommended.


