
Setup Guide
Steps to safely start using after initial startup. Determine WAN first, protect WebGUI with HTTPS, and configure in stages.
Recommended: Until the first WebGUI login is complete, to prevent mix-ups between WAN and LAN, proceed with only the WAN-side NIC.
Scope and Prerequisites #
- Scope: Provided OPNsense template
- Prerequisite: The initial NIC (vtnet0) will be used as WAN
- Until the first WebGUI login is complete, it is recommended to proceed with only the WAN-side NIC to prevent mix-ups between WAN and LAN
- You can add NICs later as needed to create LAN (private network on the cloud)
- Initial login uses HTTPS WebGUI for setup
- SSH only when needed. In this procedure, all SSH configuration is done from WebGUI
Important Notes (Please Read) #
This template requires manual setup on first use. Automatic configuration via cloud-init is not assumed.
- Source IP restriction is recommended (allow 443 / 22 only from your IP on both cloud-side FW/SG and OPNsense-side FW)
- If a NIC is added later, OPNsense must be restarted so the recognition and assignment are reflected (see “Add LAN NIC” below)
- As a secure default, this template binds WebGUI to WAN only. After adding LAN and setting an IP, always verify that WebGUI is not unintentionally bound to the LAN side
If you have any concerns or questions, please open a support ticket.
Overall Flow #
- (Optional) Create OPNsense instance in portal
- Note WAN information and admin source IP in portal
- Log in as root via console
- Run initial setup script (
firstsetup.sh) - Permit TCP 443 to admin source IP only in cloud-side FW/SG
- Log in to WebGUI (HTTPS)
- (Optional) Add LAN NIC → Restart → Configure LAN
- (Only when needed) Enable SSH in WebGUI (key only) → Permit 22 to admin source IP only on OPNsense / cloud side
Step 0(Optional) Create Instance in Portal #
If an instance is already provisioned, you can skip this step.
Select OPNsense (Router / Network OS) for the OS template.


Step 1Preparation (Confirm in Portal) #
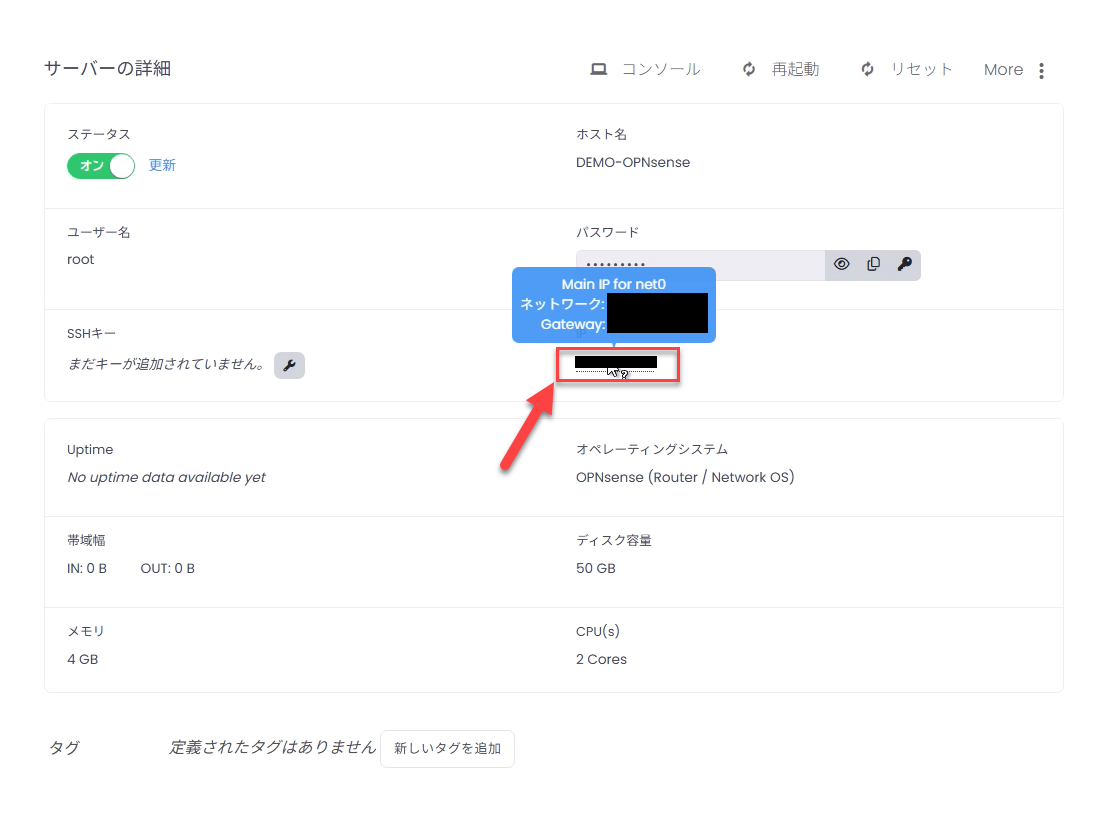
Note the following information from the portal (allocation information).
※ Click on the IP address field shown in the red box in the image to display prefix and gateway information.
WAN (Public) Information #
- IPv4 address (e.g.,
203.0.113.2) - Prefix length or netmask (e.g.,
27or255.255.255.224) - Gateway (e.g.,
203.0.113.1) - DNS (if not specified,
1.1.1.18.8.8.8is fine)
Admin Source IP (Your Device’s Source IP) #
- Fixed global IP (recommended): Company line / VPN exit, etc.
- Example:
203.0.113.10/32
If the admin source IP changes (mobile line / home line), there is a high risk of locking yourself out later. If possible, use a fixed IP (company line / VPN).
Reference: CIDR → Netmask Conversion #
| CIDR | Netmask |
|---|---|
| /29 | 255.255.255.248 |
| /28 | 255.255.255.240 |
| /27 | 255.255.255.224 |
| /26 | 255.255.255.192 |
| /24 | 255.255.255.0 |

Step 3Run Initial Setup Script #
Verify the prompt is root@OPNsense:~ # and run firstsetup.sh.
sh /root/firstsetup.sh
# (If not found) sh /root/firstboot.sh
The script will ask questions in sequence. Use the information noted in Step 1 for input values.

Step 3.1 Set root / WebGUI Password (Required) #
You will first be asked to set the password for root / WebGUI. This is required before exposing WebGUI on the WAN side.
Step 3.2 Enter WAN Configuration #
WAN is treated as vtnet0 fixed (the first NIC).
- WAN IPv4 address: IP from portal (e.g.,
203.0.113.2) - WAN netmask / prefix: e.g.,
27or255.255.255.224 - WAN gateway: e.g.,
203.0.113.1 - DNS servers: e.g.,
1.1.1.1 8.8.8.8 - Admin source IP / CIDR: e.g.,
203.0.113.10/32
Step 3.3 WebGUI Certificate and SSH Host Key Regeneration (Automatic) #
For security reasons, the following are regenerated during initial setup.
- WebGUI (HTTPS) certificate
- SSH Host Key
Therefore, a self-signed certificate warning will appear in the browser, but this is normal operation.
Step 3.4 Confirm Completion Message #

Step 4Cloud-Side Firewall Configuration (HTTPS) #
After the script completes, configure the cloud-side (infrastructure FW / SG) firewall to permit HTTPS.
- Destination: This OPNsense instance (WAN side)
- Source: Admin source IP (e.g.,
203.0.113.10/32) - Allow: TCP 443
Step 5Log In to WebGUI (HTTPS) #
Access the following from your browser:
https://<WAN_IP>/A self-signed certificate warning will appear. Review the content and proceed (browser display varies by environment).
When the login screen appears, log in with user root and the password set in Step 3.1.
Step 5.1 Verify WebGUI Listen Interface (WAN Only) #
WebGUI is designed to bind to WAN only. Verify the following:
- Menu:
System → Settings → Administration - Setting: Listen Interfaces = WAN (WAN only)
Step 6Add NIC and Create Private Network #
You can add a NIC in the client portal to build a NAT environment or L2 / L3 communication environment between servers.
Private networks are connected at 10Gbps.
Step 6.1 Always Restart After Adding NIC #
Simply adding a NIC does not properly reflect the interface assignment on the OPNsense side, and WebGUI may become unresponsive. Always restart the VM before configuring the interface assignment / address on OPNsense.
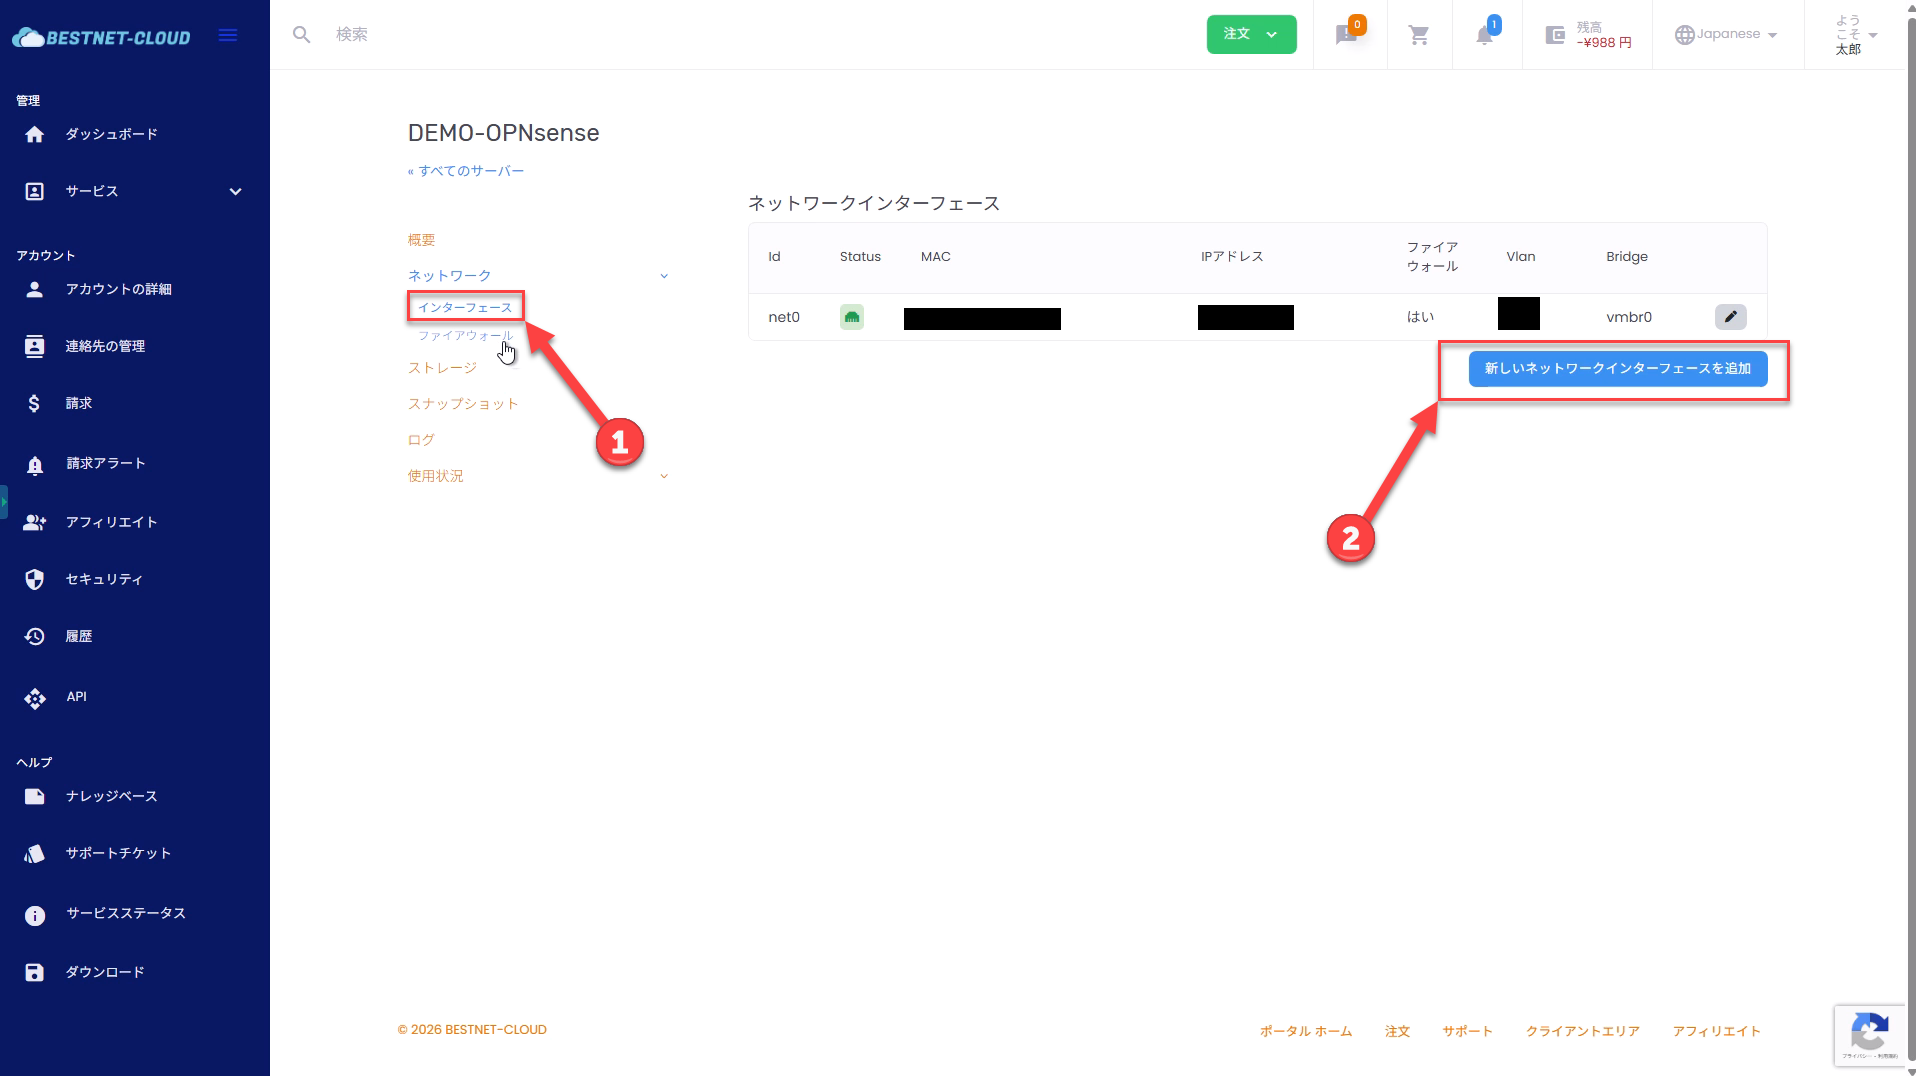
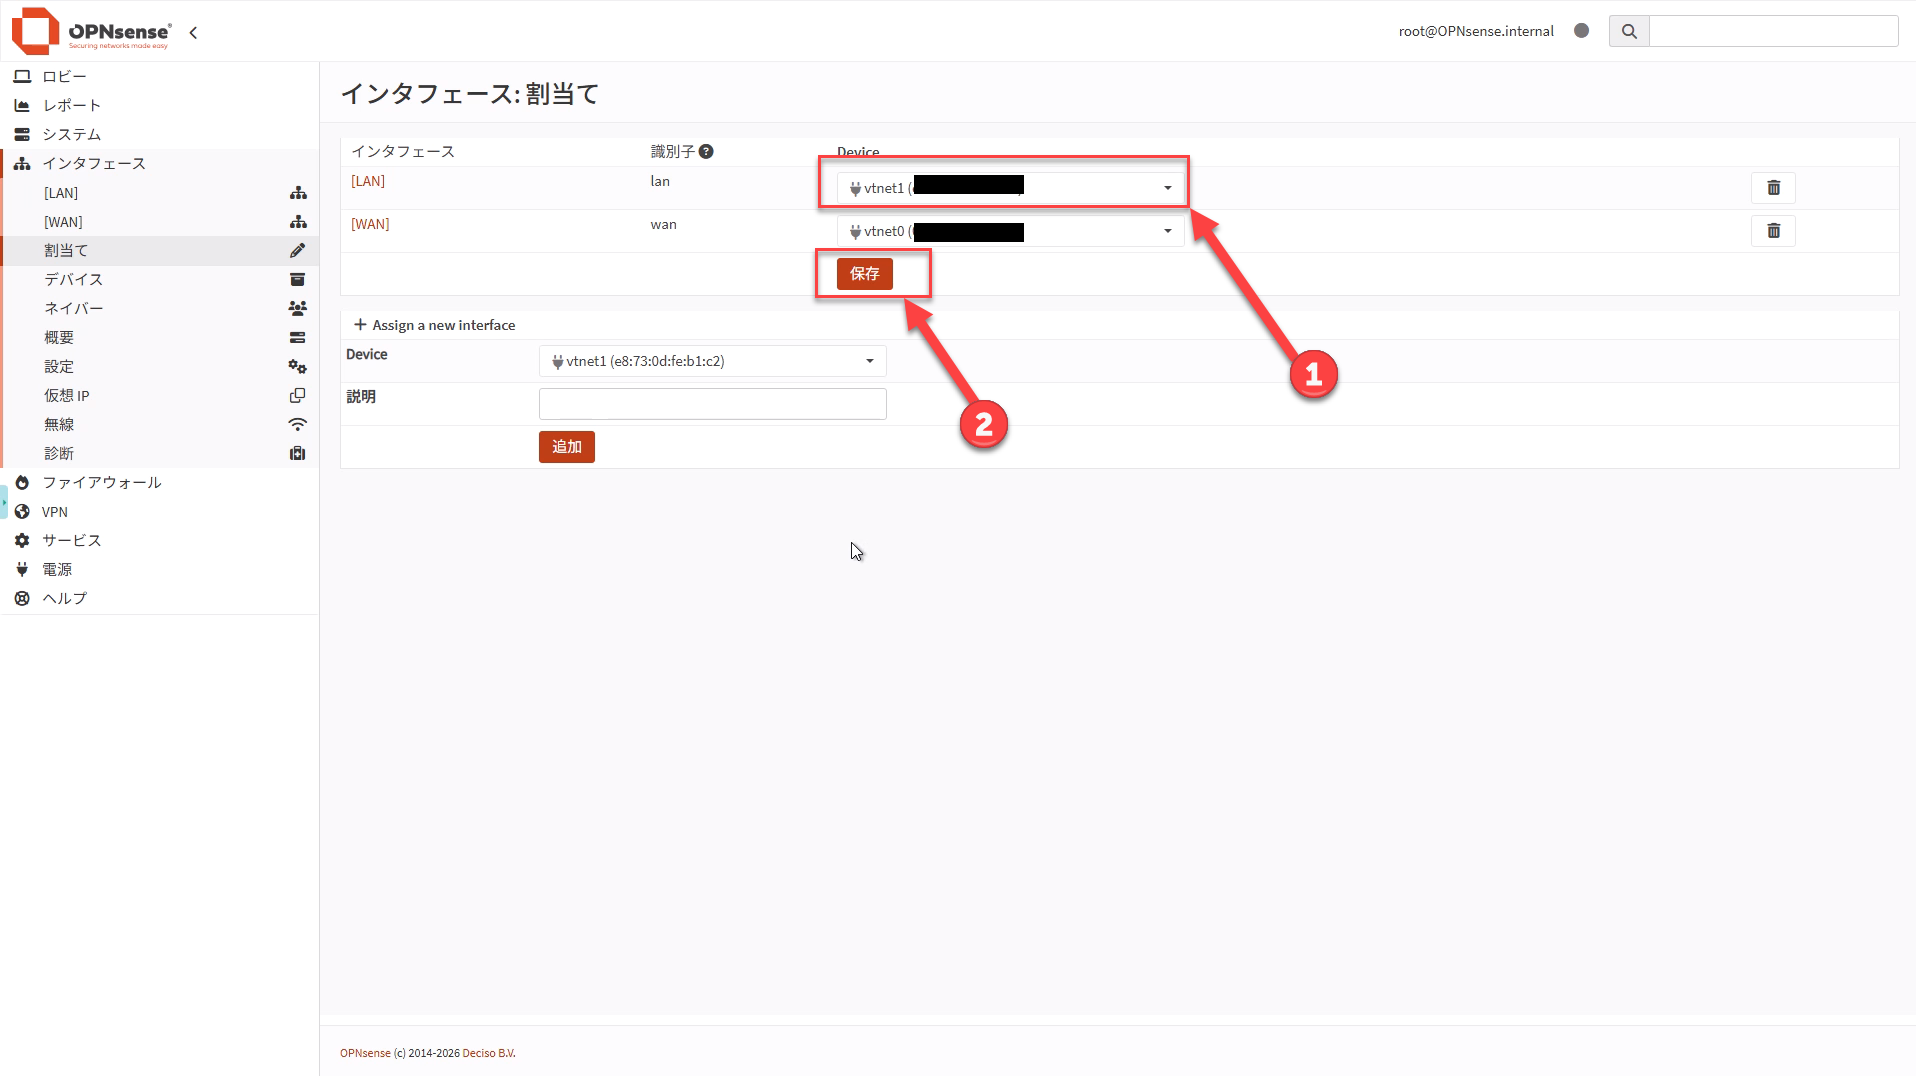
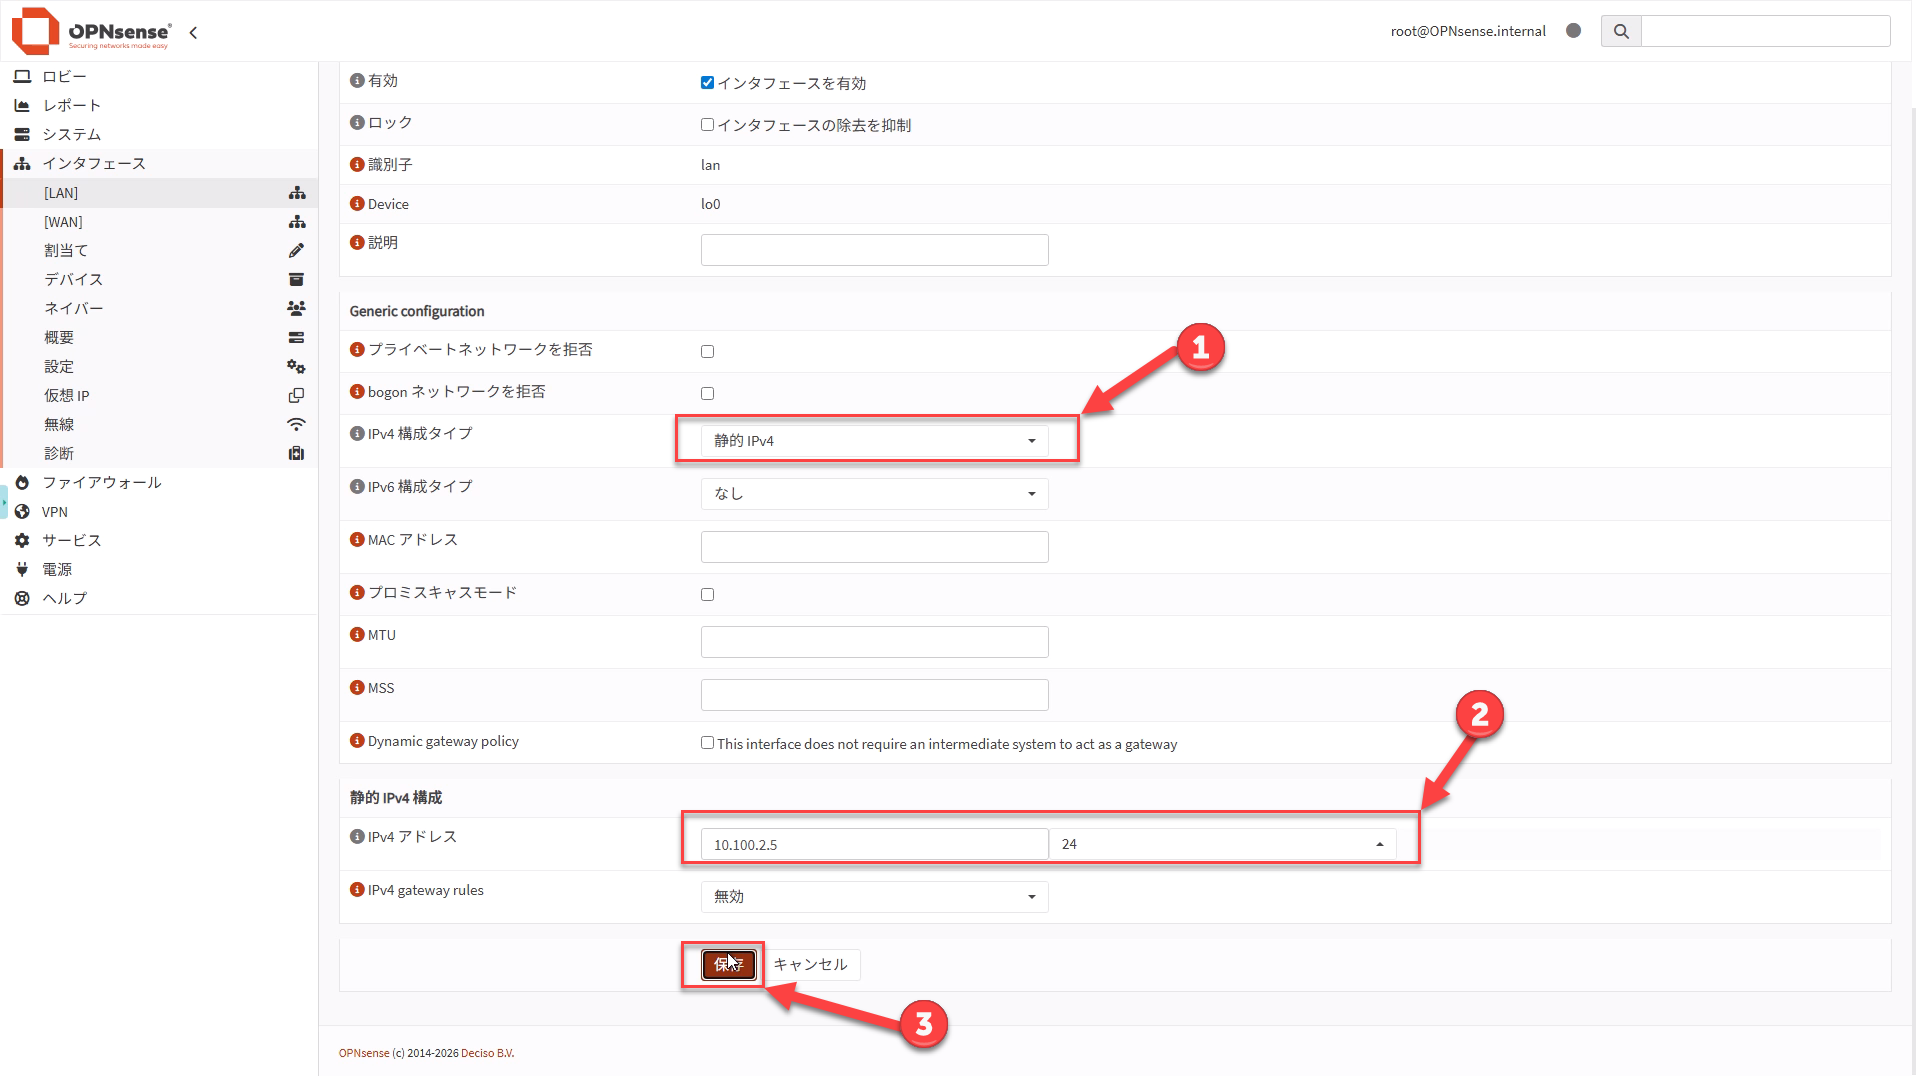
Step 6.2 Bind Device to LAN Interface in OPNsense GUI #
Log in to WebGUI and on the Interfaces → Assignments screen, dropdown select the added NIC (vtnet1) to the LAN interface and click Save.
Next, set an IP address to the assigned LAN interface.
Confirm the IP address and prefix displayed on the private network side in the server overview, enter them, then click Save → Apply Changes.
Step 7(Only When Needed) Enable SSH in WebGUI (Key Only) #
Policy: Register the key first, then enable SSH. If SSH is not used in operations, this section can be skipped.
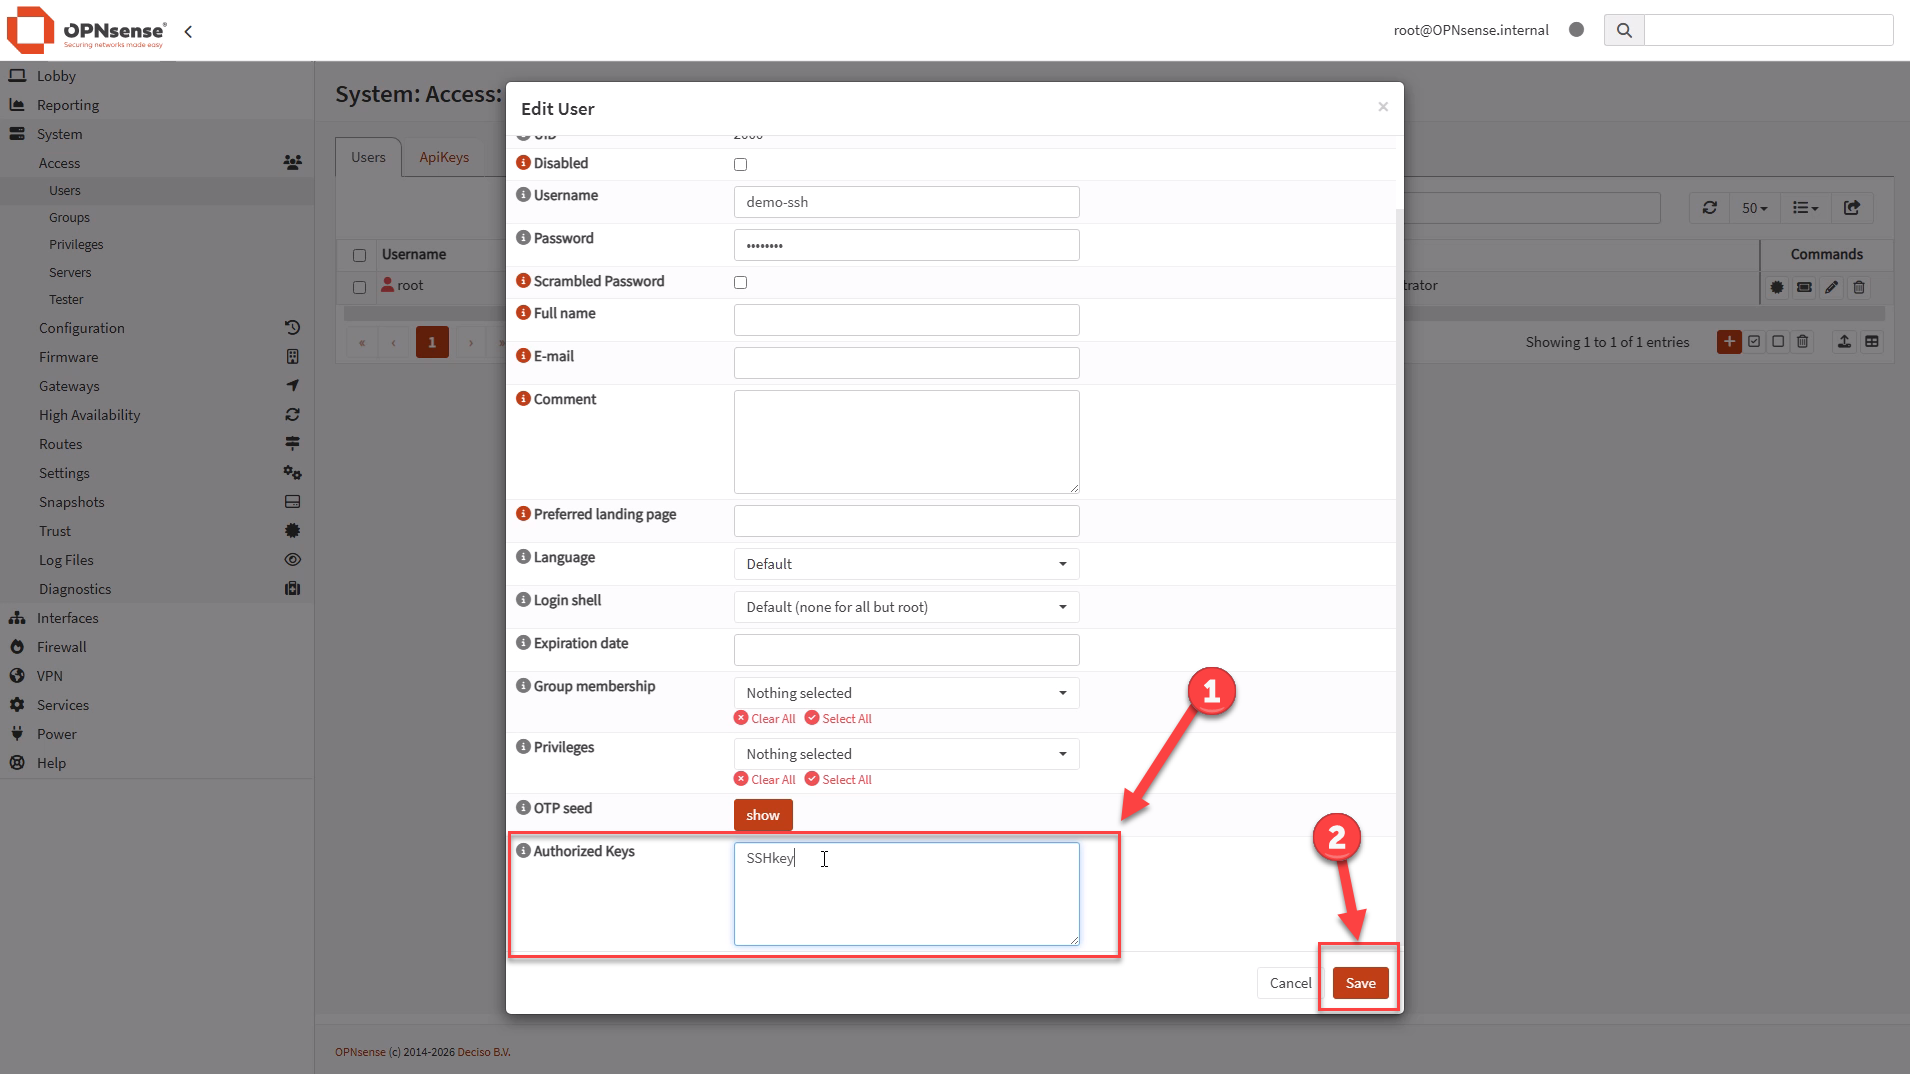
Step 7.1 Register SSH Public Key to User #
Open the following in WebGUI and register the SSH public key (ssh-ed25519 AAAA... on one line).
- Menu example:
System → Access → Users - Target user: Recommended to be an admin user (not root); create if needed
- Registration field: Authorized keys (public key)
Do not paste the private key (id_ed25519, etc.).
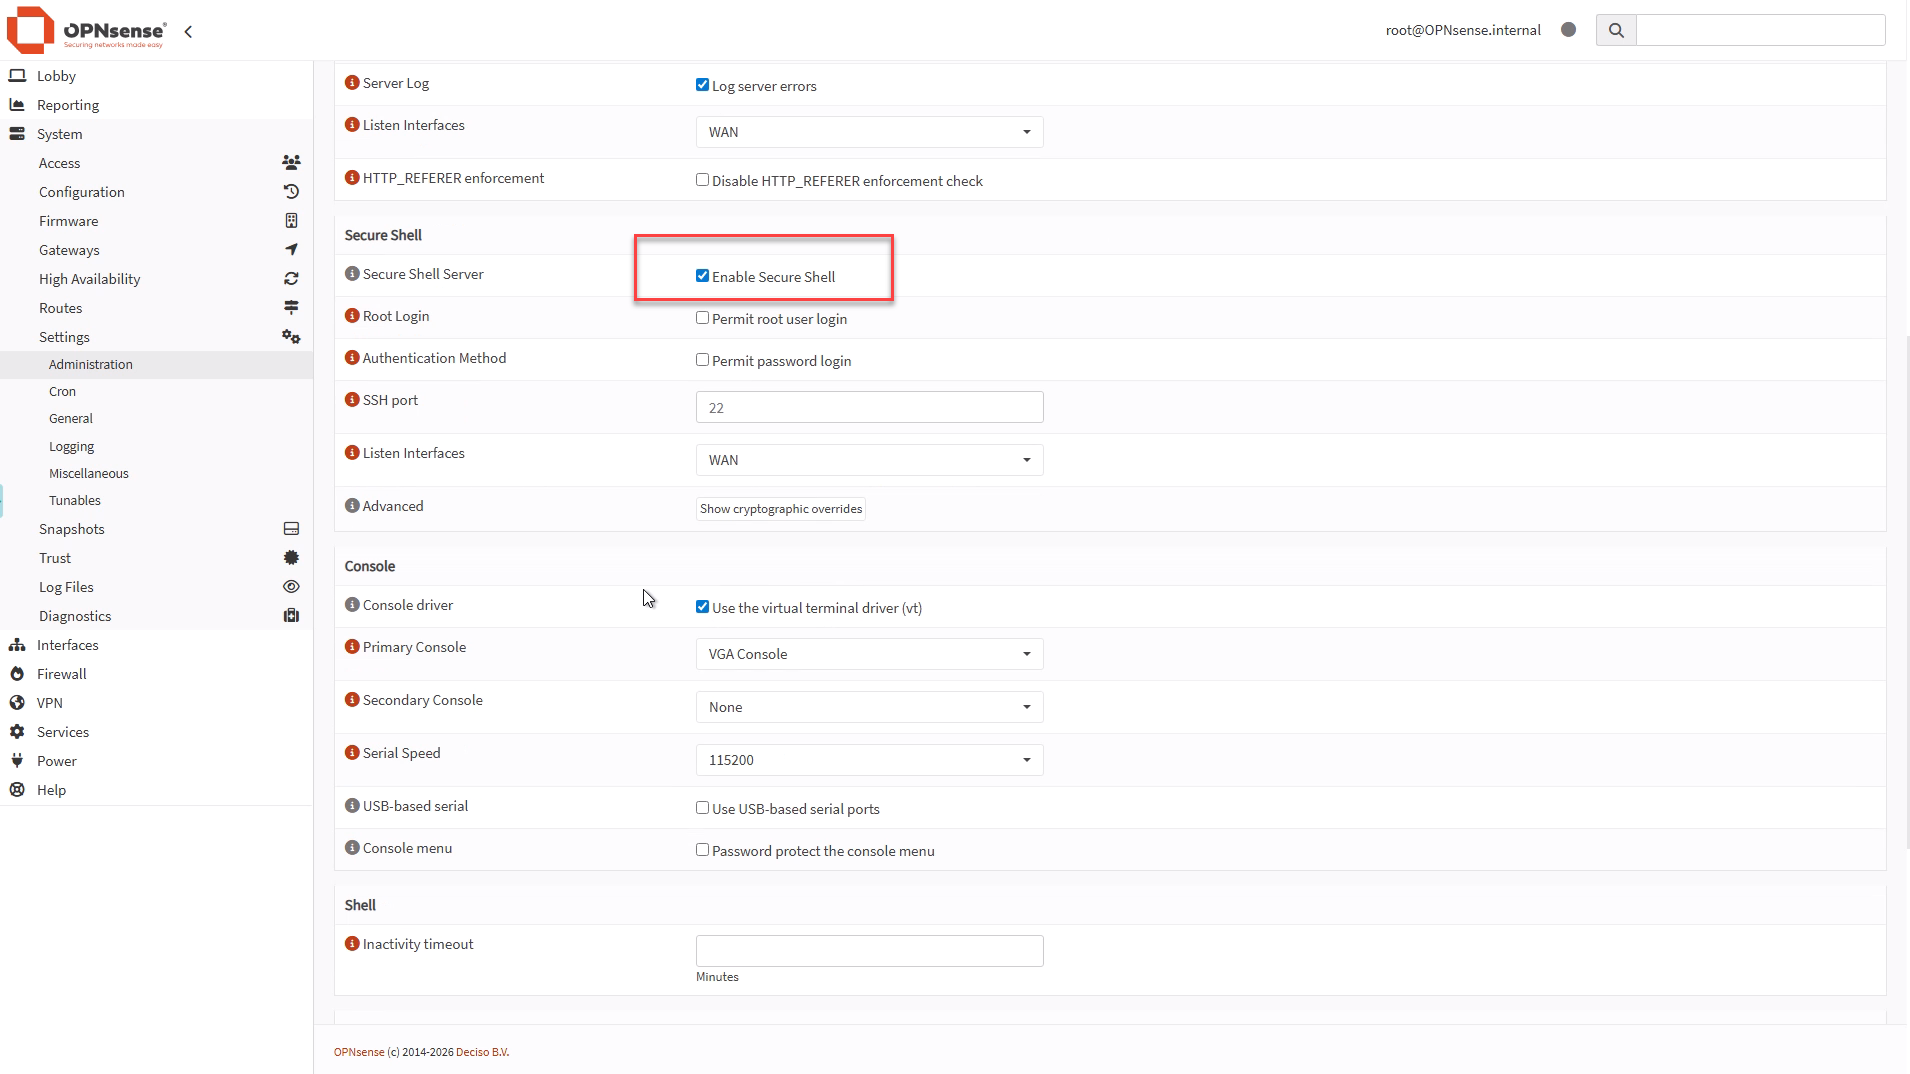
Step 7.2 Enable Secure Shell (Password Prohibited) #
Recommended settings are as follows:
- Enable Secure Shell: ON only when needed
- Permit password login: OFF (key only)
- Permit root user login: OFF if possible (if ON for operational requirements, key only)
- Listen Interfaces: Primarily WAN (or only the interface used for administration)
Step 7.3 Permit 22 Only to Admin Source IP on OPNsense-Side FW and Cloud-Side FW / SG #
- OPNsense: Verify that a permit rule for TCP 22 (Source = admin source / Destination = This firewall (WAN address)) exists in
Firewall → Rules → WAN - Also permit TCP 22 to admin source IP only in cloud-side firewall configuration
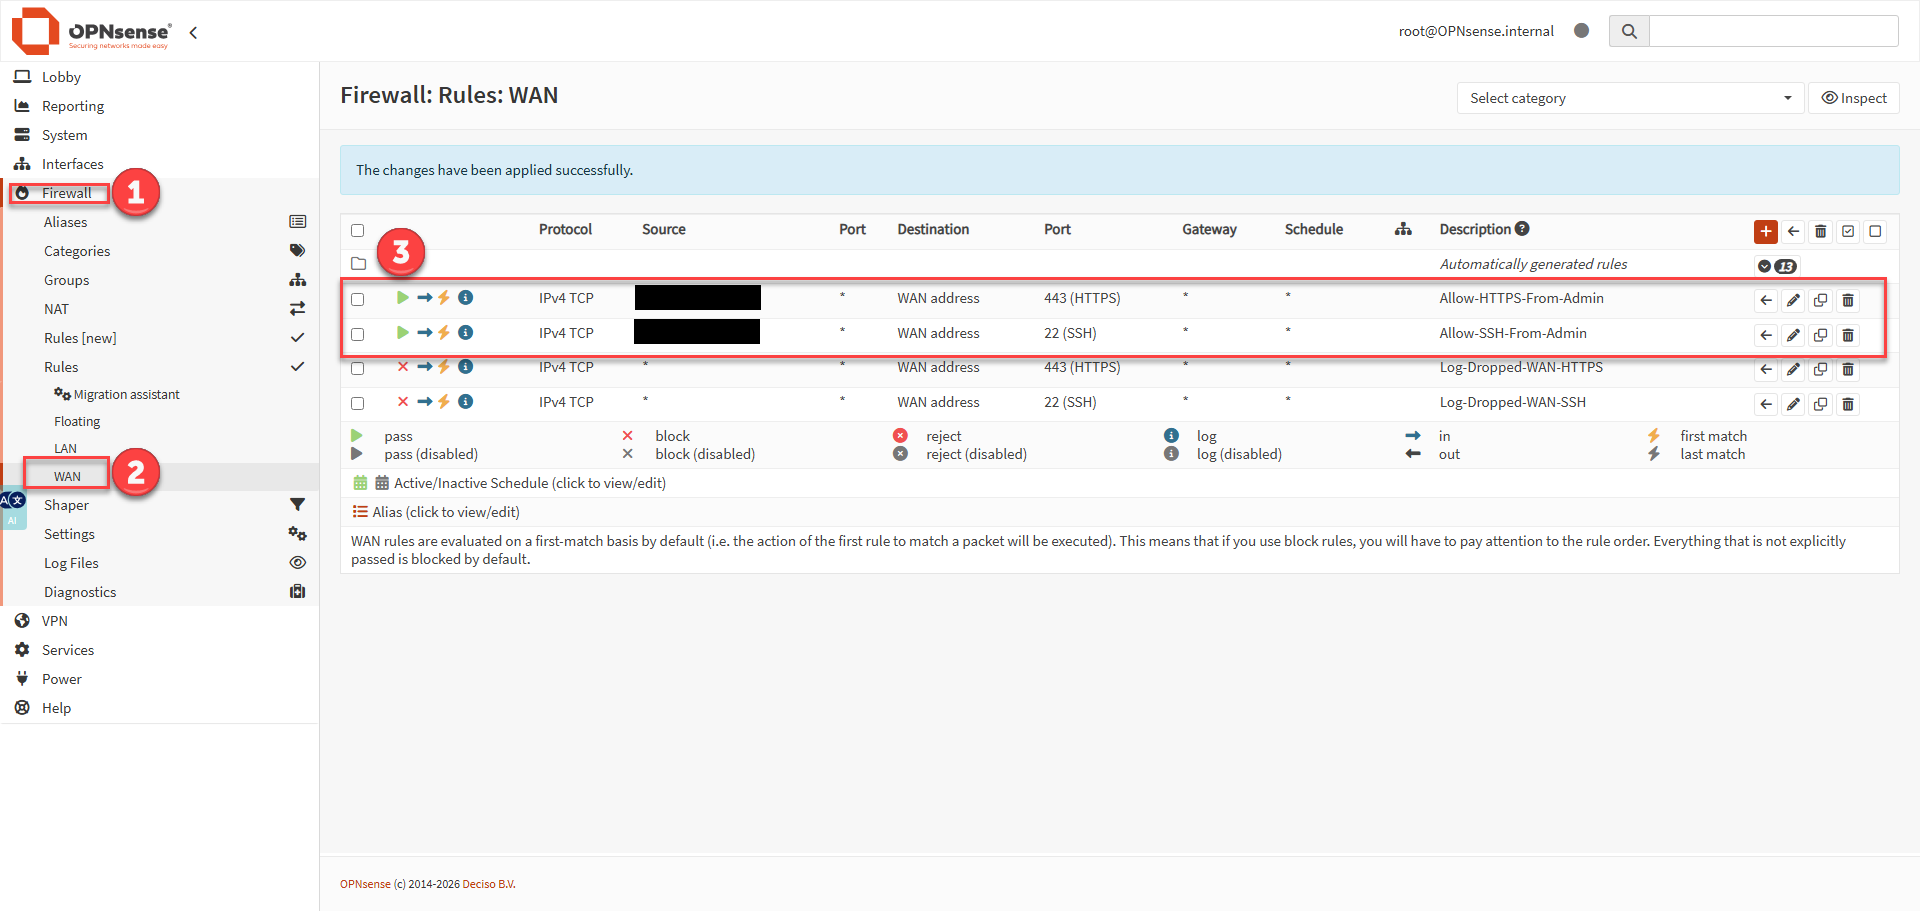
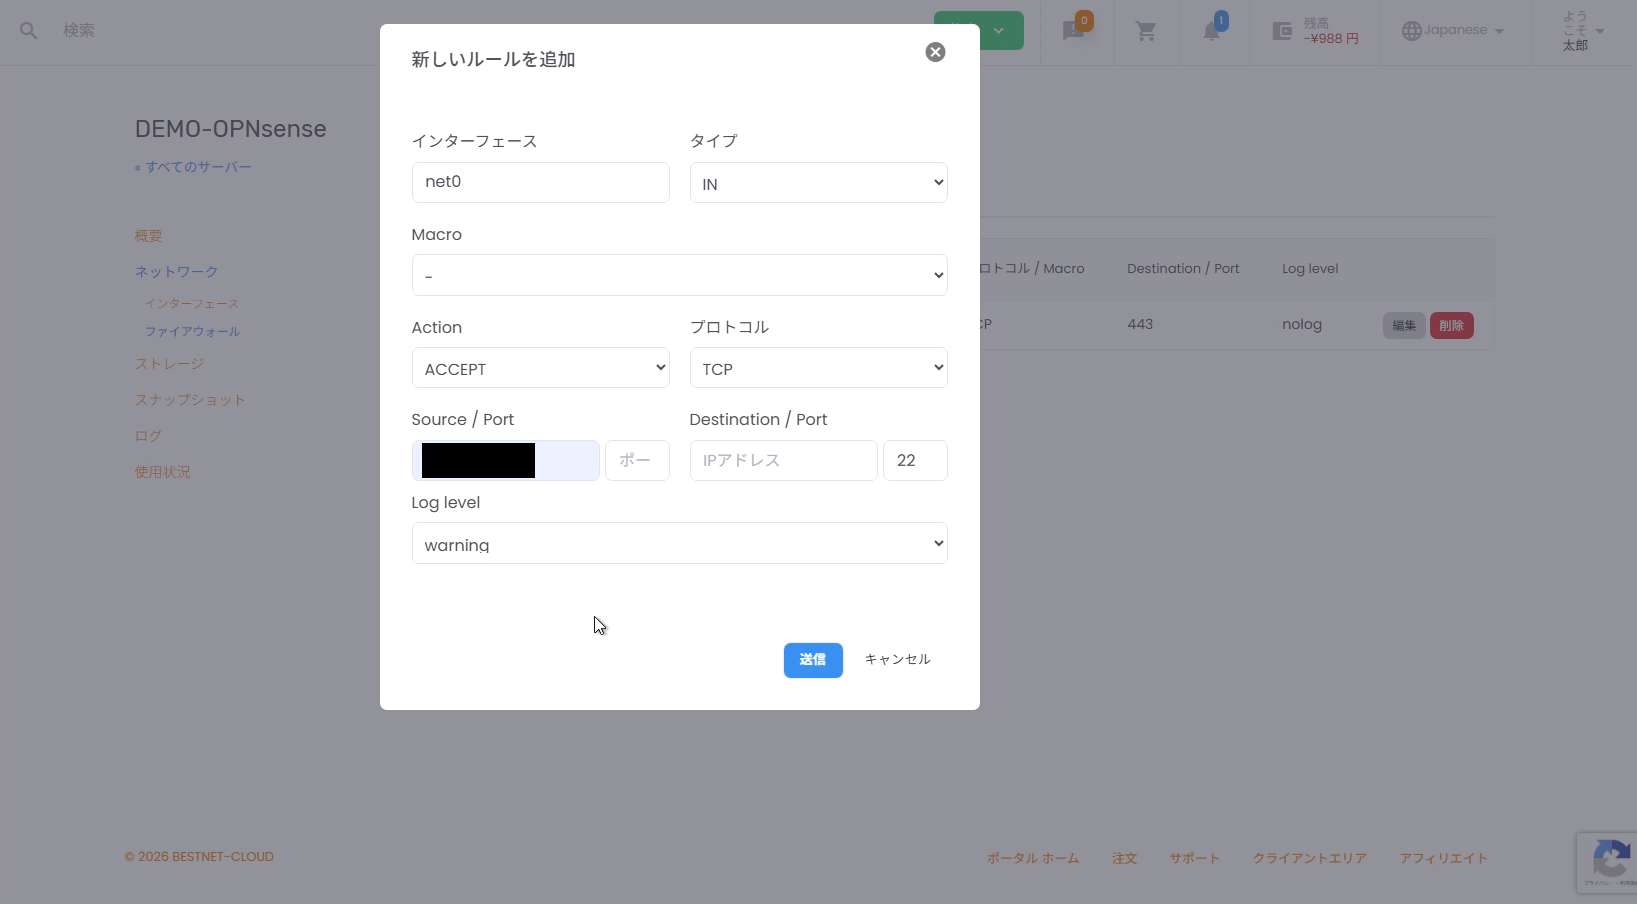
Caution: Do not open 22 fully first. Open it only after key registration and OPNsense-side restrictions are in place.
Step 8Configuration Backup (Recommended) #
You can download the configuration file (config.xml) from WebGUI.
Since the backup may contain sensitive information, be careful about storage location and sharing scope.
- Menu example:
System → Configuration → Backups

Common Troubleshooting and Recovery #
Cannot Access WebGUI (Timeout) #
The order to suspect issues is as follows:
- Is TCP 443 permitted from admin source IP in cloud-side FW / SG?
- Is the admin source IP really correct (has the line changed)?
- Is WebGUI bound to WAN on the OPNsense side (Listen Interfaces = WAN)?
Example of console verification:
sockstat -4 -l | egrep '(:443)\b'
pfctl -sr
Admin Source IP Changed and Cannot Access #
Running firstsetup.sh again from the console and re-entering the admin source IP is most reliable.
Proceed with recovery based on your operations. If uncertain, open a support ticket for consultation.


